
How to Add Fonts to Premiere Pro
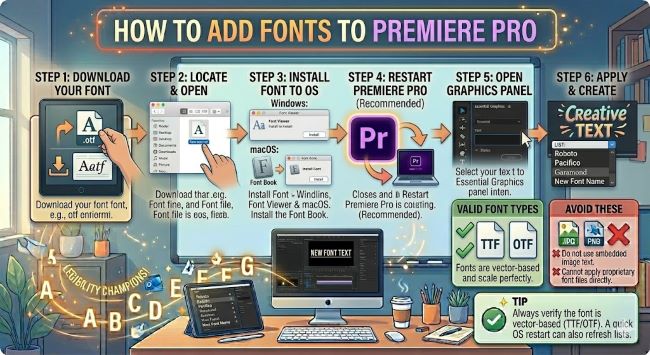
Learn how to add fonts to Premiere Pro on Windows and Mac. This guide covers installing system fonts, using Adobe Fonts, and getting them to show up in your titles and captions.
You found the perfect font for your video project and now you cannot find it anywhere in Premiere Pro. If that sounds familiar, you are dealing with something that trips up a lot of editors: Premiere Pro does not have its own internal font library that you upload fonts into. It reads fonts from your operating system and from Adobe Fonts. Once you understand that, adding fonts to Premiere Pro becomes a straightforward two-step process.
This guide covers every method that works, on both Windows and Mac.
How Premiere Pro Handles Fonts
Premiere Pro pulls fonts from two places:
- System fonts installed on your computer (Windows or Mac)
- Adobe Fonts, which syncs through your Creative Cloud subscription
Whatever fonts are installed on your system or activated through Adobe Fonts will appear in Premiere Pro’s font picker inside the Essential Graphics panel and the Legacy Title tool. There is no font upload system inside the app itself.
How to Add Fonts to Premiere Pro on Windows
- Find the font you want. Free sources include Google Fonts, DaFont, and Font Squirrel. Download the font file. It usually arrives as a .zip folder.
- Unzip the folder by right-clicking and selecting Extract All.
- Open the extracted folder and find the font file. It will end in .ttf (TrueType Font) or .otf (OpenType Font).
- Right-click the font file and select Install to install it for your current user, or Install for all users to make it available across all accounts on the machine.
- Close Premiere Pro completely if it is already running.
- Reopen Premiere Pro and open or create a project.
- Open the Essential Graphics panel (Window > Essential Graphics), add a text layer, and search for the font by name in the font picker.
Premiere Pro reads system fonts when it launches, so any font installed while the app is running will not appear until you restart it.
How to Add Fonts to Premiere Pro on Mac
- Download your font file from your chosen source.
- Unzip the downloaded folder by double-clicking it.
- Find the .ttf or .otf file inside.
- Double-click the font file. A preview window opens.
- Click Install Font in the bottom right corner of the preview window.
- The font installs to your Mac’s Font Book.
- Quit Premiere Pro completely and reopen it.
- Navigate to the Essential Graphics panel, add a text layer, and your font will be available in the font dropdown.
To install multiple fonts at once on Mac, select all the font files in Finder, right-click, and choose Open With > Font Book. Font Book will prompt you to install them all in one step.
How to Add Fonts to Premiere Pro Using Adobe Fonts
If you have an active Creative Cloud subscription, you have access to Adobe Fonts, which includes thousands of professional typefaces. These sync directly to Premiere Pro without any manual file handling.
- Open the Creative Cloud desktop app on your computer.
- Click the Fonts icon (the f icon) in the top navigation, or go to Manage Fonts.
- Browse or search for the font you want.
- Click Activate next to the font. It syncs to your system in the background.
- Once activated, the font appears in Premiere Pro’s font picker without restarting the app in most cases. If it does not appear, restart Premiere Pro.
Adobe Fonts is the most seamless method if you work within the Creative Cloud ecosystem. The fonts activate and deactivate without cluttering your system font library permanently.
You can also activate Adobe Fonts directly from within Premiere Pro:
- In the Essential Graphics panel, click the font picker.
- At the top of the font dropdown, look for the option to Add Adobe Fonts or browse Adobe Fonts.
- This opens the Adobe Fonts website in your browser where you can activate fonts directly.
Where to Find Good Fonts for Video Work
Not every font holds up well on screen at video resolutions. Thin, delicate typefaces can look soft or flicker, especially on standard definition or compressed exports. Here are reliable sources with fonts suited for motion graphics and titles:
- Adobe Fonts (fonts.adobe.com): Included with Creative Cloud, huge library, professional quality across the board.
- Google Fonts (fonts.google.com): Free, well-tested, and many options work well for lower thirds and title cards.
- DaFont (dafont.com): Large variety, particularly strong for display and decorative styles. Check the license before using for commercial projects.
- Font Squirrel (fontsquirrel.com): Free for commercial use, well curated.
For titles and lower thirds, favor fonts with medium to bold weights. Light or thin weights can disappear against busy video backgrounds.
Troubleshooting: Font Not Showing Up in Premiere Pro
If you installed a font and cannot find it in Premiere Pro, work through these checks:
- Restart Premiere Pro. The app reads system fonts on launch. Fonts installed while it was running will not appear until you restart.
- Restart your computer. This clears the font cache on both Windows and Mac and resolves most lingering issues.
- Confirm the font installed correctly. On Windows, check that it appears in C:/Windows/Fonts. On Mac, open Font Book and confirm it is listed there.
- Check for font conflicts. Duplicate fonts installed in different locations can cause display issues. Remove duplicates through Font Book on Mac or the Fonts folder on Windows.
- Try a different font file. Corrupted or incompatible font files sometimes install without error but fail to show up in applications. Download a fresh copy and reinstall.
The Short Answer
Adding fonts to Premiere Pro means installing them on your operating system or activating them through Adobe Fonts. Install the font, restart Premiere Pro, and it will be available in the Essential Graphics panel font picker. Adobe Fonts is the cleanest method if you have Creative Cloud. For free fonts from outside Adobe, install them at the system level and restart the app.
Get the font in, restart, and you are back to editing.