
How to Add Fonts to GIMP
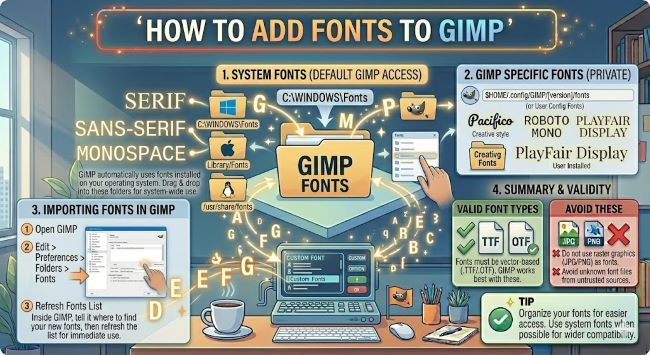
GIMP is a powerful free image editor, but its font system works a little differently from what most people expect. If you have downloaded a font and cannot find it anywhere in GIMP’s text tool, you are not missing a setting inside the app. Adding fonts to GIMP is done at the operating system level, or by dropping font files into a specific GIMP folder. Either way, it is quick once you know the two options available to you.
This guide covers both methods on Windows and Mac, plus how to refresh fonts without restarting GIMP.
How GIMP Handles Fonts
GIMP reads fonts from two places:
- System fonts installed on your computer, the same pool used by every other application
- GIMP’s own fonts folder, a dedicated directory where you can drop font files specifically for GIMP
Both methods work. The system font approach is better if you want the font available across all your applications. The GIMP fonts folder approach is useful if you want to keep a font specific to GIMP without installing it system-wide, or if you are on a machine where you do not have administrator access to install fonts globally.
Method 1: Install Fonts at the System Level
This is the most straightforward approach and works the same way as installing fonts for any other application.
On Windows:
- Download the font file from a source like Google Fonts, DaFont, or Font Squirrel. It will usually arrive as a .zip file.
- Right-click the .zip file and select Extract All to unzip it.
- Find the .ttf or .otf font file inside the extracted folder.
- Right-click the font file and select Install or Install for all users.
- Close GIMP completely if it is already open.
- Reopen GIMP, open the text tool, and search for the font by name in the font picker.
On Mac:
- Download and unzip the font file.
- Double-click the .ttf or .otf file to open a preview.
- Click Install Font in the preview window.
- The font installs to Font Book.
- Quit and reopen GIMP. The font will appear in the text tool font list.
Method 2: Add Fonts to GIMP’s Fonts Folder
GIMP has its own dedicated fonts directory. Any font file you place in this folder becomes available in GIMP without being installed system-wide.
Finding GIMP’s fonts folder on Windows:
The default path is:
C:\Users[YourUsername]\AppData\Roaming\GIMP[version number]\fonts
The AppData folder is hidden by default. To see it, open File Explorer, go to View > Show > Hidden items. Then navigate to the path above. If the fonts folder does not exist yet, create it yourself inside the GIMP version folder.
Drop your .ttf or .otf font files directly into this folder.
Finding GIMP’s fonts folder on Mac:
The default path is:
/Users/[YourUsername]/Library/Application Support/GIMP/[version number]/fonts
The Library folder is hidden on Mac by default. To access it, open Finder, hold the Option key, click the Go menu, and select Library. From there navigate to Application Support > GIMP > [version] > fonts. If the fonts folder does not exist, create it.
Drop your font files into this folder.
How to Refresh Fonts in GIMP Without Restarting
Once you have added fonts to either location, you do not always need to fully restart GIMP to see them. GIMP has a built-in option to rescan for fonts:
- Open GIMP and go to Filters > Script-Fu > Console. Or alternatively, go to Windows > Dockable Dialogs > Fonts to open the fonts panel.
- In the Fonts panel, click the Refresh button (the circular arrow icon) at the bottom of the panel.
- GIMP rescans all font directories and updates the font list.
This saves you from closing and reopening the application every time you add a new font, which is useful when you are installing multiple fonts in one session.
Where to Find Good Fonts for GIMP Projects
GIMP is used for everything from photo editing to digital illustration and graphic design, so the best font depends on the project. Here are reliable sources:
- Google Fonts (fonts.google.com): Free, open source, and a large selection covering everything from clean sans serifs to expressive display fonts.
- DaFont (dafont.com): Particularly strong for decorative, display, and handwriting styles that work well in graphic design projects. Check the license for commercial use.
- Font Squirrel (fontsquirrel.com): Free for commercial use and well curated. Good for professional projects where licensing matters.
- The League of Moveable Type (theleagueofmoveabletype.com): A smaller collection of high-quality open source fonts worth bookmarking.
For GIMP text work specifically, think about how the font will look at the size you are using it. Display fonts that look great at 72pt can fall apart at 12pt. Test at your actual working size before committing.
Troubleshooting: Font Not Appearing in GIMP
If a font still does not show up after installation, work through these checks:
- Restart GIMP fully. If the app was running when you installed the font, it needs a restart to pick it up. On Windows, confirm it is not still running in the taskbar.
- Use the Refresh button. In the Fonts panel (Windows > Dockable Dialogs > Fonts), click the refresh icon to force a rescan.
- Check the correct folder. Confirm the font file is in either C:\Windows\Fonts (Windows system fonts), your user AppData GIMP fonts folder, or the Mac Library GIMP fonts folder. A font dropped in the wrong location will not be found.
- Confirm the file format. GIMP works with .ttf and .otf files. Some less common formats may not be recognized.
- Restart your computer. When in doubt, a full restart clears font caches on both Windows and Mac and resolves most lingering issues.
The Short Answer
To add fonts to GIMP, either install them on your operating system using the standard Windows or Mac method, or drop the font files directly into GIMP’s own fonts folder. System installation makes the font available everywhere. The GIMP fonts folder keeps it contained to GIMP only. After adding a font, use the Refresh button in the Fonts panel to load it without restarting the app.
Two minutes of setup and your font is ready to use.