
How to Fix Shaky Hands Photography: The Complete Guide to Sharp, Blur-Free Photos
Few things frustrate photographers more than reviewing a beautiful shot only to find it soft and blurry. Learning how to fix shaky hands photography solves one of the most common causes of disappointing images, turning fuzzy frames into crisp, professional-looking photos. The good news is that shaky hands rarely doom your photography. With the right technique, camera settings, stabilization tools, and a few clever tricks, you can capture sharp images even if your hands are not perfectly still. This guide covers everything about how to fix shaky hands photography, from free body-positioning habits to the technology built into modern cameras and phones.
Understanding the Real Cause Before You Fix It
The first step in learning how to fix shaky hands photography is understanding what actually causes the blur, because the culprit is often not your hands at all.
Camera shake appears when your shutter speed is too slow compared to the movement of the camera during the exposure. The shutter stays open long enough that the small natural motion of your hands registers as blur across the frame. Every photographer has some movement, even those with the steadiest hands, so the issue is really the relationship between movement and shutter speed.
Many people convinced they have unusually shaky hands are actually shooting in low light, which forces the camera to use a slow shutter speed. In dim conditions, the camera keeps the shutter open longer to gather enough light, and that extra time is when hand movement turns into blur. Recognizing this distinction is central to how to fix shaky hands photography, because it points toward solutions involving shutter speed and light rather than only steadier hands.
That said, genuinely shaky hands do exist and can come from fatigue, cold, too much caffeine, or simply holding a heavy camera for a long time. The encouraging part of how to fix shaky hands photography is that the same fixes work regardless of the cause. Whether your blur comes from slow shutter speeds or actual tremor, technique and stabilization compensate for both.
Understanding the cause shapes the whole approach. Once you see that fixing the blur means managing shutter speed, light, and stability together, the specific techniques in this guide fall into place.
The Shutter Speed Rule That Solves Most Problems
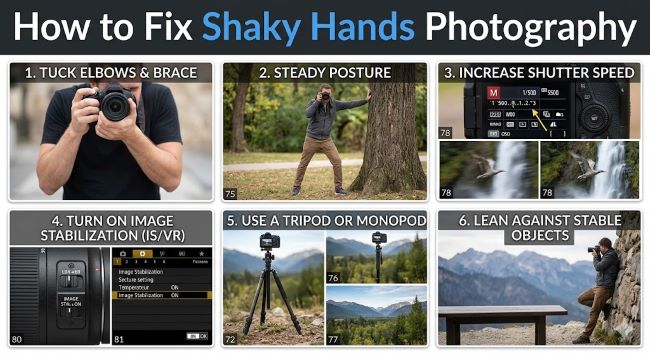
The single most powerful tool in how to fix shaky hands photography is choosing a fast enough shutter speed, and a simple rule tells you how fast.
The reciprocal rule states that your shutter speed should be at least the reciprocal of your focal length. If you shoot at 50mm, use a shutter speed of at least 1/50 second. At 200mm, use at least 1/200 second. At 24mm, 1/25 second or faster works. This relationship matters because longer focal lengths magnify both your subject and your hand movement, so they demand faster shutter speeds.
This rule is the foundation of how to fix shaky hands photography because it directly addresses the source of the blur. A faster shutter speed freezes motion, including the small movements of your hands, before they can register in the image.
For cameras with very high-resolution sensors or when you plan to make large prints, photographers often double the rule for safety. At 50mm, that means using 1/100 second or faster. The extra margin ensures sharpness even under close inspection, a useful refinement in how to fix shaky hands photography for demanding work.
Wide-angle lenses forgive hand movement far more than telephoto lenses. A wide focal length spreads the scene across a broad field of view, so minor shake is barely magnified. Choosing a wider focal length when possible is a quiet but effective part of how to fix shaky hands photography.
Adjusting Settings to Enable Faster Shutter Speeds
Knowing you need a faster shutter speed leads to the next part of how to fix shaky hands photography: adjusting other settings to make that speed possible, especially in low light.
Raising your ISO is the most direct way to enable faster shutter speeds in how to fix shaky hands photography. A higher ISO makes the sensor more sensitive to light, letting you keep the shutter open for less time. Modern cameras handle high ISO values remarkably well, producing usable images with minimal noise at settings that would have been unthinkable years ago.
Opening your aperture wider also supports how to fix shaky hands photography by letting in more light. A wider aperture, indicated by a smaller f-number, allows a faster shutter speed at the same exposure. This is why fast lenses with wide maximum apertures help so much in low light.
Using auto ISO with a minimum shutter speed setting automates how to fix shaky hands photography on many cameras. You set the slowest acceptable shutter speed and a maximum ISO, and the camera raises ISO automatically to keep the shutter fast enough. This hands-off approach prevents slow shutter speeds from sneaking in unnoticed.
Balancing these three settings, shutter speed, ISO, and aperture, is the technical core of how to fix shaky hands photography. The goal is always keeping the shutter fast enough to freeze your hand movement while maintaining proper exposure.
Holding the Camera the Right Way
Beyond settings, physical technique is essential to how to fix shaky hands photography, starting with how you hold the camera.
Use both hands always. The proper grip in how to fix shaky hands photography places your right hand on the camera body and grip while your left hand supports the weight from underneath the lens. Cradling the lens from below rather than gripping it from the side provides far more stability and lets you adjust zoom and focus smoothly.
Tuck your elbows into your body. Letting your elbows splay outward leaves your arms unsupported and prone to wobble. Pulling both elbows tight against your torso braces your arms against your body, a simple change that dramatically improves how to fix shaky hands photography by turning your upper body into a stable platform.
Keep your hands relaxed rather than tense. Gripping the camera too tightly introduces muscle tremor that works against how to fix shaky hands photography. A firm but relaxed hold steadies the camera better than a white-knuckle grip.
Press the shutter gently and follow through. Jabbing the shutter button jolts the camera at the exact moment of capture. The best approach in how to fix shaky hands photography is squeezing the button smoothly and holding the camera steady for a moment after the click rather than dropping it immediately.
Stance and Body Positioning
Your whole body contributes to how to fix shaky hands photography, and a stable stance turns you into a human tripod.
Plant your feet shoulder-width apart, with one foot slightly forward. This staggered stance gives you a broad, stable base in how to fix shaky hands photography, resisting sway in any direction. Leaning very slightly into the camera adds further steadiness.
Brace against solid objects whenever possible. Leaning your shoulder against a wall, resting against a tree, or steadying yourself on a car transforms how to fix shaky hands photography. Even resting your forearms on a railing, table, or fence dramatically reduces movement.
Lower your center of gravity for maximum stability. Kneeling, crouching, or sitting down and resting an elbow on a raised knee creates an improvised tripod. This sitting technique, with your knee up and elbow braced on it, is widely considered the most effective way to steady a camera without actual equipment, a cornerstone of how to fix shaky hands photography.
Resting the camera directly on a surface beats holding it entirely. Setting the camera on a wall, rock, beanbag, or even a folded jacket eliminates hand movement completely. This approach to how to fix shaky hands photography can produce images as sharp as a tripod, though it limits your composition options.
The Breathing Technique That Borrows From Marksmanship
A subtle but powerful element of how to fix shaky hands photography comes from precision shooting sports: controlling your breath.
Your breathing causes your whole upper body to rise and fall, and this motion transfers to the camera. The breathing technique in how to fix shaky hands photography times your shot to the natural pause in your breathing cycle when your body is most still.
Exhale slowly and gently, then press the shutter at the bottom of the exhale during the brief natural pause. You have roughly two to three seconds at this pause when respiratory motion is minimal and your hands are steadiest. Marksmen use this exact method, and it applies directly to how to fix shaky hands photography.
Avoid holding a full breath, which actually increases tension and tremor. The goal in how to fix shaky hands photography is the relaxed pause after exhaling, not a tense breath-hold that makes shake worse.
Combining controlled breathing with a stable stance and proper grip stacks multiple stability gains. Each technique in how to fix shaky hands photography helps on its own, but together they produce noticeably sharper handheld images.
Clever Tricks With the Camera Strap
Some of the most resourceful approaches to how to fix shaky hands photography use equipment you already have, starting with your camera strap.
Wrapping the strap tightly around your arm or wrist creates tension that steadies the camera. By pulling the camera against the taut strap, you engage your muscles and reduce wobble, a free and effective trick in how to fix shaky hands photography.
The strap can also add tension around your neck. Extending the camera away from your body until the neck strap pulls tight creates a stable triangle, useful in how to fix shaky hands photography when shooting at certain angles or with a screen rather than a viewfinder.
A string tripod applies the same principle with simple materials. Attaching a string or bungee cord to the camera’s tripod socket and stepping on the other end, then pulling the camera up against the tension, engages your muscles and reduces shake. This improvised tool is a favorite trick in how to fix shaky hands photography for travelers who want stability without carrying a tripod.
These strap techniques cost nothing and travel everywhere you do. They demonstrate that how to fix shaky hands photography often depends more on resourcefulness than on expensive equipment.
Burst Mode and Self-Timer: Smart Shooting Habits
Two shooting habits significantly improve how to fix shaky hands photography by working around movement rather than eliminating it.
Burst mode takes multiple frames in rapid succession, increasing the odds that at least one is perfectly sharp. The first and last frames in a burst are most affected by the shutter press itself, while the middle frames, when your grip has settled, tend to be sharpest. Shooting a burst of several frames and keeping the best is a reliable tactic in how to fix shaky hands photography, especially in low light.
The self-timer eliminates the shake caused by pressing the shutter button entirely. Even a careful press introduces tiny vibrations, so setting a two-second timer lets the camera settle before capturing. This simple step is a powerful part of how to fix shaky hands photography for stationary subjects.
A remote shutter release achieves the same benefit without touching the camera at all. Whether wireless or wired, a remote keeps your hands off the camera during exposure, a clean solution in how to fix shaky hands photography particularly valuable for long exposures and tripod work.
Pairing these habits with a tripod or a braced position compounds their effect. Combining burst mode or a timer with physical stability addresses how to fix shaky hands photography from two directions at once.
Image Stabilization Technology Explained
Modern cameras include powerful technology for how to fix shaky hands photography, and understanding the types helps you use them well.
Optical image stabilization, often labeled OIS, IS, or VR depending on the brand, moves a floating element inside the lens to counteract shake before light reaches the sensor. OIS is built into many telephoto lenses, where shake matters most, and it stabilizes the viewfinder image, making composition and tracking easier. It is a key tool in how to fix shaky hands photography at long focal lengths.
In-body image stabilization, or IBIS, moves the camera’s sensor itself to compensate for shake across multiple axes, typically five, including roll, pitch, and yaw. The major advantage for how to fix shaky hands photography is that IBIS works with any lens you attach, even old or inexpensive ones with no stabilization of their own.
Together these systems can compensate for several stops of shake, with modern implementations reaching five to eight stops in some cases. This means how to fix shaky hands photography becomes possible at shutter speeds far slower than the reciprocal rule would normally allow, a dramatic advantage in low light.
One crucial caveat shapes how to fix shaky hands photography with stabilization: turn it off when using a tripod. On a stable platform, the system can hunt for movement that is not there and actually introduce blur. Many lenses also offer a panning mode that stabilizes only one axis for smooth horizontal tracking of moving subjects.
Gear That Eliminates Shake
When technique and technology are not enough, dedicated gear offers the most reliable answer to how to fix shaky hands photography.
A tripod is the gold standard. By holding the camera completely still, a tripod allows any shutter speed without shake and is often essential for landscapes, architecture, product photography, and long exposures. For the sharpest possible results, a tripod is the definitive solution in how to fix shaky hands photography.
A monopod offers a lighter, more mobile compromise. While less stable than a tripod, a monopod provides significant support and moves quickly, making it ideal for sports, wildlife, and events where setting up a full tripod is impractical. It earns a place in how to fix shaky hands photography for active shooting.
Beanbags and improvised supports work surprisingly well. Resting the camera on a beanbag molded over a wall, rock, or car door provides excellent stability for a fraction of a tripod’s cost or bulk, a practical option in how to fix shaky hands photography.
For video, a gimbal actively stabilizes the camera through motors. While photographers focused on stills rely on tripods and monopods, anyone shooting handheld video should consider a gimbal as the video-focused answer to how to fix shaky hands photography in motion.
Fixing Shaky Hands Photography on a Smartphone
Smartphones present their own version of the problem, and how to fix shaky hands photography on a phone involves both familiar principles and phone-specific tricks.
Phones are actually quite susceptible to shake because their small sensors rely on computational processing and people often hold them at awkward, unstable angles. The first fix in how to fix shaky hands photography on a phone is holding it with both hands, palms providing a broad base, rather than gripping with fingertips.
Avoid the shutter-button jab by using alternatives. The volume button often works as a shutter, and a self-timer or voice control eliminates the movement of tapping the screen entirely. These small changes meaningfully improve how to fix shaky hands photography on a smartphone.
Skip digital zoom, which magnifies both the subject and any shake while degrading image quality. Moving closer physically rather than zooming digitally is better for how to fix shaky hands photography on a phone.
A few extra habits round out smartphone stability. Tapping the screen to set focus prevents the phone from focusing on the wrong area, cleaning the lens removes the smudges that soften every shot, and propping the phone on a cup, water bottle, or small phone tripod provides support in low light. A compact phone tripod or grip is an inexpensive, highly effective tool in how to fix shaky hands photography on a smartphone.
Addressing Genuinely Shaky Hands
For people whose hands truly do shake noticeably, how to fix shaky hands photography includes a few additional considerations beyond standard technique.
Common everyday factors worsen hand tremor and are easy to address. Reducing caffeine before shooting, warming cold hands, resting when fatigued, and using a lighter camera setup all help steady your hands and support how to fix shaky hands photography.
When tremor is significant or persistent, leaning heavily on gear and stabilization is the most practical path. A tripod, monopod, or strong image stabilization compensates for shake regardless of its cause, which is why how to fix shaky hands photography for those with real tremor centers on these tools rather than on technique alone.
If hand tremor is pronounced, new, or affects daily life beyond photography, it is worth speaking with a doctor, since steady support in photography is a separate matter from understanding the underlying cause. This guidance falls outside how to fix shaky hands photography itself, but mentioning it acknowledges that some readers face genuine physical challenges.
The reassuring reality is that photography accommodates shaky hands well. Between fast shutter speeds, stabilization technology, and supportive gear, how to fix shaky hands photography is achievable for nearly everyone, whatever the source of the movement.
Rescuing Slightly Blurry Photos in Editing
Even with good habits, some shots come out softer than you would like, and editing offers a final layer in how to fix shaky hands photography after the fact.
Sharpening tools in photo editing software can recover a degree of apparent sharpness from slightly soft images. While editing cannot fix severe blur, modest sharpening helps marginal shots, a useful supplement to how to fix shaky hands photography.
Dedicated deblur and AI-based sharpening features in modern editing applications go further, analyzing and reducing motion blur in ways that were not possible before. These tools extend how to fix shaky hands photography into the editing stage, salvaging images that would once have been discarded.
Editing works best as a backup rather than a primary strategy. Capturing a sharp image in the first place always beats trying to rescue a blurry one, so the techniques throughout this guide remain the heart of how to fix shaky hands photography. Editing simply provides a safety net for the occasional soft frame.
Putting It All Together
Mastering how to fix shaky hands photography means combining these approaches rather than relying on any single fix.
Start with a fast enough shutter speed using the reciprocal rule, raise ISO or open the aperture to enable it in low light, and let image stabilization help when available. Layer in solid technique with a proper two-handed grip, tucked elbows, a stable stance, and controlled breathing. Add burst mode, a self-timer, or a remote release to eliminate shutter-press shake, and reach for a tripod, monopod, or improvised support when conditions demand it.
These methods reinforce one another. The complete answer to how to fix shaky hands photography is not one technique but a stack of small advantages that together produce consistently sharp, blur-free images, regardless of your camera, your conditions, or how steady your hands happen to be.
Key Takeaways
- Learning how to fix shaky hands photography starts with recognizing that blur usually comes from a slow shutter speed in low light rather than unusually shaky hands.
- The reciprocal rule, setting shutter speed to at least one over the focal length, is the most powerful single fix in how to fix shaky hands photography.
- Raising ISO and opening the aperture enable faster shutter speeds, the technical core of how to fix shaky hands photography in dim conditions.
- A proper grip with both hands, the left hand cradling the lens from below, and elbows tucked into the body anchors how to fix shaky hands photography.
- A staggered shoulder-width stance, bracing against solid objects, and lowering your center of gravity turn your body into a human tripod.
- The breathing technique borrowed from marksmanship, shooting at the natural pause after a slow exhale, steadies the camera during the most stable moment.
- Camera strap tricks, including wrapping the strap around your arm or building a string tripod, add stability using gear you already carry.
- Burst mode and a self-timer or remote shutter release work around movement, since the middle frames of a burst and timer-released shots avoid shutter-press shake.
- Image stabilization, whether lens-based OIS or in-body IBIS, can compensate for several stops of shake but should be turned off when using a tripod.
- Tripods offer the sharpest results, while monopods, beanbags, and gimbals provide mobile alternatives for how to fix shaky hands photography in the field.
- On smartphones, how to fix shaky hands photography means using both hands, the volume button or timer instead of tapping, avoiding digital zoom, and cleaning the lens.
- Reducing caffeine, warming cold hands, and leaning on gear address genuinely shaky hands, while editing tools provide a final safety net for slightly soft photos.