
How to Fix Overexposed Photos: Methods for Every Skill Level
An overexposed photo is one where too much light hit the sensor (or film), washing out highlights and reducing the image to blown-out white areas where detail should be. The frustration of a great shot ruined by overexposure is common, but the good news is that modern camera sensors retain enough data in the raw file to recover from significant overexposure in post-processing. The key phrase is “raw file”: JPEGs offer less latitude for exposure recovery, and some highlights are simply too blown out to bring back regardless of software. This guide covers every practical method for fixing overexposed photos at every skill level.
Understanding Why Some Photos Can Be Fixed and Others Can’t
Before spending time on a photo that can’t be saved, it helps to understand what’s actually lost in overexposure.
When a pixel reaches its maximum value (pure white in digital terms), no data is recorded in that area: the sensor was simply full. This is called clipping. Clipped highlights cannot be recovered because there’s nothing to recover: the data wasn’t captured.
However, near-white areas that aren’t fully clipped retain data even if they appear very bright on screen. A raw file from most modern cameras retains recoverable data in highlights that would appear washed out in a standard display. This is called dynamic range, and it’s why shooting raw gives you significantly more recovery latitude than JPEG.
Rule of thumb: if an overexposed area in your photo is pure white with no texture visible when you zoom in closely, it’s likely clipped and unrecoverable. If there’s any hint of texture or gradation, recovery is probably possible.
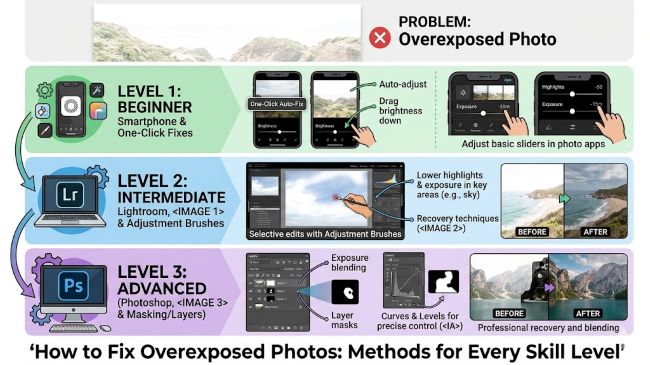
Method 1: Fixing Overexposed Photos in Adobe Lightroom (Desktop and Mobile)
Lightroom is the most capable tool for exposure recovery and the one most photographers use for this task.
Step 1: Open the photo in Lightroom’s Develop module.
Step 2: Check the histogram. Look at the histogram in the top right. Clipped highlights pile up against the right edge. Enable the highlight clipping warning (press J on desktop) to see which areas are blown out, displayed as red overlay.
Step 3: Reduce the Exposure slider. Start by pulling the Exposure slider left (negative value). This lowers the overall brightness of the image. A starting point of -0.5 to -1.5 stops is common for moderately overexposed images.
Step 4: Pull down the Highlights slider. The Highlights slider targets the brightest areas specifically without affecting midtones as much as the Exposure slider. Pull this to -70 or lower: this is where the most dramatic highlight recovery happens in Lightroom. For raw files, this can recover detail that appears completely blown out in the original display.
Step 5: Adjust the Whites slider. The Whites slider controls the absolute brightest tones. Pull it left to recover the brightest highlights. Watch the histogram and aim for the right edge of the histogram to no longer be clipped.
Step 6: Recover shadows and midtones if needed. After pulling exposure and highlights down, the rest of the image may appear darker than ideal. Use the Shadows and Blacks sliders to lift shadow detail back up, and use the Curves panel for more precise tonal control.
Step 7: Check skin tones and key colors. Overexposed areas that affect skin or key subject colors need attention. Use the HSL panel to desaturate or adjust hue of any color that recovered looking unnatural (skin often goes orange-yellow when recovering from overexposure).
Lightroom Mobile: the same sliders exist in Lightroom for iOS and Android. The process is identical on mobile but more precise on desktop with a larger screen.
Method 2: Fixing Overexposed Photos in Photoshop
Photoshop offers more powerful but more complex tools for exposure recovery, particularly useful for targeted area fixes.
Using Camera Raw Filter (for raw or JPEG files): Go to Filter > Camera Raw Filter. The Camera Raw interface in Photoshop is nearly identical to Lightroom’s Develop module. Apply the same sequence: reduce Exposure, pull Highlights down, adjust Whites.
Using Curves: Create a Curves adjustment layer. In the Curves panel, click the top-right point of the curve (highlights) and drag it downward. This reduces highlight brightness specifically. Create an S-curve pulled down at the top to recover highlights while preserving midtones.
Using Luminosity Masks (advanced): For targeted highlight recovery, luminosity masks select only the brightest areas of the image for adjustment. Plugins like Luminar or TK Actions create these masks automatically. Apply a curves or levels adjustment using the luminosity mask to pull down only the overexposed areas without affecting correctly exposed regions.
Method 3: Fixing Overexposed Photos on iPhone (Built-in Editor)
The iPhone’s built-in Photos editor can make meaningful improvements to overexposed images.
Step 1: Open the photo in Photos and tap Edit.
Step 2: Tap the adjustment dial icon (the circle with tick marks).
Step 3: Use these sliders:
- Exposure: reduce from center toward the left
- Highlights: reduce significantly (drag left)
- Brilliance: reduce if the overall image looks blown out
- Whites: reduce to recover the brightest tones
Step 4: Tap Done to save.
The iPhone editor works on HEIC and JPEG files with reasonable results for minor to moderate overexposure. Significantly blown-out images are harder to recover without raw processing capability.
Method 4: Free Online Tools
Lightroom (free version): Lightroom’s free tier on mobile and as a web app (lightroom.adobe.com) provides access to the core exposure recovery sliders without a subscription for basic adjustments.
Snapseed (free iOS and Android): Google’s free photo editing app includes exposure, highlights, and shadows controls. The Selective tool allows targeted adjustments to specific bright areas.
RawTherapee (free desktop): a powerful open-source raw processor with full highlight recovery capability. The learning curve is steeper than Lightroom but the tools are equally capable for recovery work.
GIMP (free desktop): for JPEG files, GIMP’s Curves and Levels tools allow similar adjustments to Photoshop’s Camera Raw approach, though without the raw processing pipeline’s recovery range.
When a Photo Can’t Be Fixed
Some images are too far overexposed to recover meaningfully. Signs that a photo may be beyond saving:
The histogram shows a massive spike against the right wall with no gradation: large areas of pure white.
Key subject areas (faces, important objects) are completely washed out with no texture visible even at maximum recovery in raw processing.
The entire image is overexposed, not just highlights: pulling the exposure down enough to recover the brightest areas makes the rest of the image too dark to be usable.
In these cases, converting the image to black and white can sometimes salvage it by removing the unnatural-looking washed-out color, even if the tonal recovery is incomplete. A heavily overexposed black and white image can have an artistic quality that a failed attempt at color recovery doesn’t.
For related photography and image editing topics, how to connect external monitor to laptop is a practical setup guide for anyone doing photo editing work who wants a larger color-accurate display for more precise exposure and color work in Lightroom or Photoshop.
Key Takeaways
- Overexposed photos can often be recovered in post-processing if shot in raw format: clipped areas (pure white, no texture) cannot be recovered because no data was captured
- In Lightroom, the most effective sequence is: reduce Exposure, pull Highlights to -70 or lower, adjust Whites, then restore shadow detail as needed
- The Highlights slider in Lightroom and Camera Raw is specifically designed for highlight recovery and can restore detail that appears completely blown out in the original display
- Photoshop’s Camera Raw Filter provides the same recovery capability as Lightroom and can be applied to both raw and JPEG files via Filter > Camera Raw Filter
- The iPhone Photos app’s built-in editor handles minor to moderate overexposure recovery reasonably well through the Exposure, Highlights, and Brilliance sliders
- Free alternatives include Snapseed (mobile), RawTherapee (desktop raw processing), and Lightroom’s free web/mobile tier for basic adjustments
- When an image can’t be saved with color, converting to black and white can sometimes salvage a composition that would otherwise be unusable


