
How to Change Font in Outlook
Learn how to change font in Outlook for a single email or as your default for all new messages. Step-by-step instructions for Outlook on Windows, Mac, and the web.
Whether you are tired of Calibri or your company has a preferred typeface for external communications, knowing how to change the font in Outlook is one of those small things that makes a real difference in your day-to-day workflow. You can change the font for a single email as you write it, or you can set a default font that applies to every new message you compose going forward. This guide covers both, across every version of Outlook people actually use.
How to Add Fonts to Google Docs
Learn how to add fonts to Google Docs using the built-in Google Fonts library. This step-by-step guide shows you how to find, add, and manage fonts in any Google Doc.
How to Change the Font in a Single Outlook Email
If you just need to change the font for one message, you do not need to touch any settings. Do it directly in the compose window.
- Open a new email in Outlook or reply to an existing one.
- Click inside the message body.
- Select the text you want to change, or press Ctrl+A (Windows) or Cmd+A (Mac) to select all the text in the body.
- In the formatting toolbar above the message body, click the font name dropdown.
- Choose the font you want from the list.
- You can also change the font size, color, and style (bold, italic) from the same toolbar.
That change applies only to this message. Your default font for future emails stays the same.
How to Change the Default Font in Outlook on Windows
Setting a default font means every new email you compose will start with your chosen typeface, size, and color automatically. You set this once and it applies going forward.
- Open Outlook and go to File > Options.
- In the Outlook Options window, click Mail in the left sidebar.
- Under the Compose messages section, click Stationery and Fonts.
- The Signatures and Stationery window opens. You will see three options:
- New mail messages: Controls the font for emails you compose from scratch.
- Replying or forwarding messages: Controls the font when you reply to or forward an email.
- Composing and reading plain text messages: Controls the font for plain text emails.
- Click Font next to whichever option you want to change.
- In the Font dialog box, choose your font, style, size, and color.
- Click OK to close the Font dialog, then OK again to close the Stationery and Fonts window, and OK once more to close Outlook Options.
Your new default font will apply to all new messages from this point on.
How to Change the Default Font in Outlook on Mac
The Mac version of Outlook handles this slightly differently.
- Open Outlook and go to Outlook > Preferences from the menu bar.
- Click Fonts under the Email section.
- You will see options for HTML messages and Plain text messages.
- Click Choose next to whichever you want to change.
- Select your font, size, and style in the font picker.
- Close the preferences window. The change saves automatically.
Note that Outlook for Mac handles HTML and plain text separately. Most modern emails are HTML, so that is the setting that affects the majority of what you send and receive.
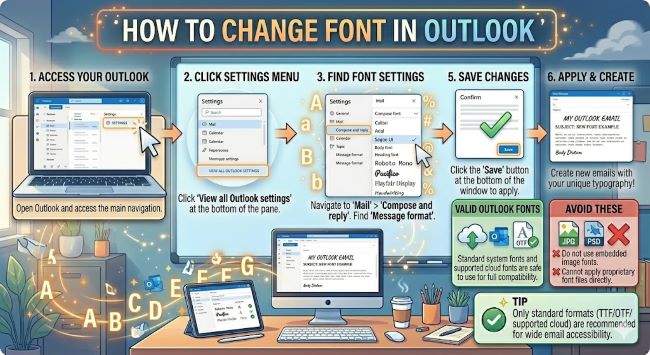
How to Change Font in Outlook on the Web
Outlook on the web (outlook.com or your organization’s web version) has its own default font settings.
- Log in to Outlook on the web.
- Click the Settings gear icon in the top right corner.
- Click View all Outlook settings at the bottom of the settings panel.
- Go to Mail > Compose and reply.
- Under Message format, you will see a text editor where you can set your default font, size, and color.
- Make your changes in the editor toolbar.
- Click Save at the bottom of the page.
This setting applies only to the web version. It does not sync to the desktop app.
A Few Things Worth Knowing
Recipients may not see your font. If the person receiving your email uses a mail client that does not support HTML formatting, or if their email is set to display plain text only, your custom font will not render on their end. They will see a default font instead. For most modern email clients this is not an issue, but it is worth knowing.
Stick to web-safe fonts for external emails. Fonts like Arial, Calibri, Georgia, Times New Roman, and Verdana are installed on virtually every computer. If you choose a font that the recipient does not have, their email client will substitute it. For internal emails where everyone uses the same system, this matters less.
Check your company’s email guidelines. Some organizations have brand standards that specify which fonts to use in external communications. If yours does, match the default font in Outlook to those guidelines so every email you send is consistent without extra effort.
The Short Answer
To change the font in Outlook for a single email, select your text and use the formatting toolbar in the compose window. To change it for all future emails, go to File > Options > Mail > Stationery and Fonts on Windows, or Outlook > Preferences > Fonts on Mac. Set it once and every new message starts exactly the way you want it.
It is a small change that removes a small friction from your day, and those are usually the best kind.


