
How to Add Fonts to Google Slides

Want more font options in your presentations? Here is exactly how to add fonts to Google Slides using Google Fonts, plus tips for keeping your slides consistent across devices.
Google Slides comes with a decent font library, but if you have spent any time designing presentations, you have probably hit the ceiling. The default list feels limiting, and finding something that fits your brand or project can turn into a frustrating scroll. The good news is that adding fonts to Google Slides is built right into the app. No downloads, no extensions, no workarounds needed.
This guide shows you exactly how to do it, what your options are, and a few things worth knowing before you start.
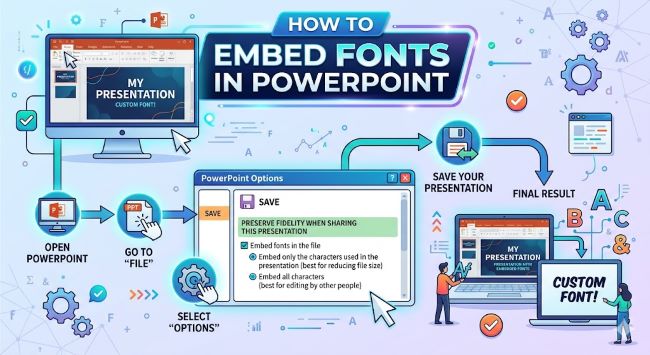
How to Embed Fonts in PowerPoint
Learn how to embed fonts in PowerPoint so your presentation looks exactly the same on any device. A step-by-step guide for Windows and Mac users.
How Google Slides Handles Fonts
Google Slides connects to Google Fonts, which is a library of over 1,500+ free typefaces. You do not install these fonts on your computer. Instead, you add them directly inside Google Slides, and they become available in your presentation from any device as long as you have internet access.
This is different from PowerPoint, where you install fonts on your machine. With Google Slides, the fonts live in the cloud alongside your file.
How to Add Fonts to Google Slides
- Open your presentation in Google Slides.
- Click on a text box or create one.
- Go to the font name dropdown in the toolbar. It usually shows the current font, like “Arial.”
- Click the dropdown and scroll to the very top. You will see an option called More fonts.
- Click More fonts. A window opens showing the Google Fonts library.
- Browse or search for the font you want. You can filter by category (Serif, Sans Serif, Display, Handwriting, Monospace) or sort by popularity, alphabetical order, or date added.
- Click a font to select it. It moves to the My fonts column on the right.
- Click OK when you are done.
The font now appears in your font dropdown and is ready to use in any text box in that presentation.
How to Find the Right Font in the Google Fonts Library
With over 1,000 options, the library can feel overwhelming. A few filters make it manageable:
- Search by name if you already know what you want. Type it in the search bar at the top of the More Fonts window.
- Filter by category to narrow your options. Handwriting fonts work well for personal or creative projects. Sans serif fonts tend to read better on screens.
- Sort by popularity to see what other people are using. Popular fonts are popular for a reason: they tend to be clean, versatile, and readable.
- Preview the font by looking at the sample text in the list before you add it.
If you are building a branded presentation, look for fonts that match or complement the ones in your brand guidelines. Google Fonts lets you pair a display font for headings with a simpler body font for slide content.
Can You Add Non-Google Fonts to Google Slides?
Not directly. Google Slides only connects to Google Fonts, so you cannot upload a custom .ttf or .otf file the way you can install fonts on a desktop app.
If you need a specific font that is not in Google Fonts, you have a couple of options:
- Create text as an image. Design the text in Canva, Figma, or Photoshop using your custom font, export it as a PNG, and insert it into your slide as an image. It will not be editable as text, but it will display correctly everywhere.
- Find a close match in Google Fonts. The library is large enough that you can usually find something similar. Use tools like Font Squirrel’s Matcherator or Fontjoy to identify near-matches.
Will Your Fonts Show Up on Other Devices?
Yes, with one condition: the person viewing the file needs an internet connection. Google Fonts loads from the web, so if someone opens your presentation offline, Google Slides may substitute the font with a default.
For presentations you plan to show in a room with unreliable wifi, export a PDF version as a backup. The fonts will be embedded in the PDF and will display correctly no matter what.
A Few Font Tips for Better Slides
- Stick to two fonts per presentation: one for headings, one for body text. More than that tends to look cluttered.
- Avoid thin or light font weights for body text on slides. They can be hard to read from a distance.
- Check how your fonts look on a projected screen, not just your laptop. Colors and contrast shift under projection.
- If your slides feel inconsistent, use the Slide Master (View > Theme builder) to set your fonts globally instead of changing them slide by slide.
The Short Version
To add fonts to Google Slides, open the font dropdown, click More fonts, browse the Google Fonts library, and add what you need. It takes about 30 seconds and gives you access to hundreds of quality typefaces without leaving the app.
If you need a font that is not in Google Fonts, your best fallback is to create text as an image in another tool and import it. It is not perfect, but it works.
Pick fonts that serve your content, keep it simple, and your slides will look better for it.


