
How to Embed Fonts in PowerPoint
You spent hours getting your PowerPoint presentation just right. Custom fonts, clean layout, perfect spacing. Then you open it on the conference room laptop and the whole thing falls apart. The fonts have been swapped out for something generic, the text overflows its boxes, and your carefully designed slides look like a rough draft.
This happens because the fonts you used are not installed on that machine. The fix is simple: embed fonts in PowerPoint before you share the file.
Here is exactly how to do it.
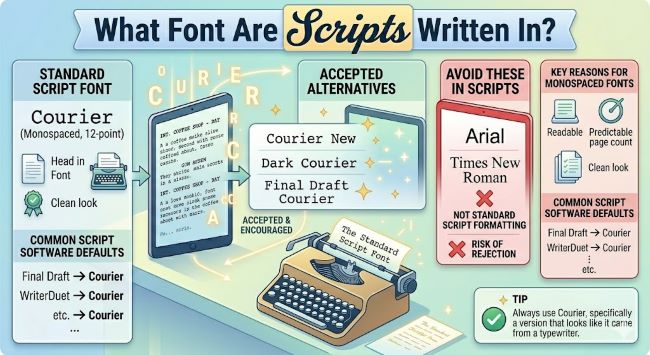
What Font Are Scripts Written In?
Wondering what font scripts are written in? The industry standard is Courier Prime or Courier Final Draft at 12pt.
Why Font Embedding Matters
When you embed fonts in a PowerPoint file, you are packaging the font data directly into the presentation. Anyone who opens the file sees the same typefaces you chose, regardless of what fonts are installed on their computer.
Without embedding, PowerPoint substitutes missing fonts with whatever it can find. That substitution rarely looks good and can break your entire layout.
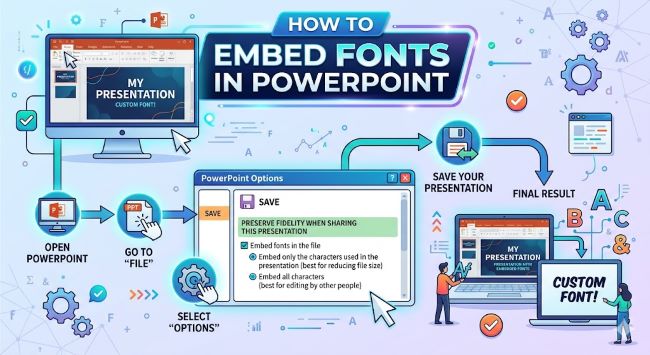
How to Embed Fonts in PowerPoint on Windows
- Open your presentation in PowerPoint.
- Click File in the top left corner.
- Select Options at the bottom of the left sidebar.
- In the PowerPoint Options window, click Save from the left menu.
- Scroll down to the section labeled Preserve fidelity when sharing this presentation.
- Check the box next to Embed fonts in the file.
- Choose one of two sub-options:
- Embed only the characters used in the presentation keeps the file smaller but limits editing on other machines.
- Embed all characters creates a larger file but gives anyone who opens it full editing access to the fonts.
- Click OK and save your file.
That is it. The fonts are now part of the file.
How to Embed Fonts in PowerPoint on Mac
Font embedding works differently on Mac. The option to embed fonts is not available in PowerPoint for Mac the same way it is on Windows. This is a known limitation.
Your best workaround options are:
- Export to PDF. Go to File > Export > PDF. A PDF preserves your fonts exactly and works on any device.
- Use a Windows machine or a virtual machine to open the file and embed fonts through the Windows method above.
- Stick to system fonts that come pre-installed on most computers, such as Arial, Georgia, or Helvetica. These do not need embedding because they are almost always available.
If you regularly share presentations across platforms, keeping a copy of your file on a Windows machine for the final save is a reliable habit.
Which Option Should You Choose?
Embed only the characters used in the presentation is the right choice when:
- You are sharing a read-only or final version.
- File size matters (for email attachments or uploading to a portal).
Embed all characters is the right choice when:
- You expect someone else to edit the file.
- The presentation uses custom or branded fonts that must stay consistent.
A Few Things to Know Before You Embed
File size will increase. Embedding fonts adds data to your file. Complex or decorative fonts can add several megabytes. If you are emailing the file, check the attachment size limit.
Not all fonts can be embedded. Some font licenses restrict embedding. If a font cannot be embedded, PowerPoint will tell you. In that case, you can convert the text to outlines in a design tool, export to PDF, or switch to a font with no embedding restrictions.
Embedding does not apply retroactively to other files. The setting applies to the current presentation template. If you want embedding on by default, you will need to change it each time or set it in your default template.
Quick Checklist Before Sharing a Presentation
- Embed fonts using File > Options > Save (Windows).
- Or export to PDF if you are on a Mac or sharing a final version.
- Check the file size after embedding.
- Test the file on a different device if possible before the big moment.
Embedding fonts is one of those small steps that takes about 30 seconds and saves you from an embarrassing situation in front of a room full of people. Do it before you share, and your slides will look exactly the way you intended, every time.


