
How to Take a Screenshot on Dell
Learn how to take a screenshot on Dell laptop or desktop using keyboard shortcuts, Snipping Tool, and other built-in Windows methods. Quick and easy step-by-step guide.
Taking a screenshot on a Dell is something most people need to do at some point, whether you are capturing an error message, saving something for reference, or sharing what is on your screen. Since Dell laptops and desktops run Windows, the methods are the same across every Dell device. There are a few different ways to do it depending on how much of the screen you want to capture and where you want the screenshot to go.
This guide covers every method that works, from the fastest single-key shortcut to the most precise cropping tool.
Method 1: Print Screen Key (Fastest for Full Screen)
The quickest way to take a screenshot on a Dell is the PrtScn key, which you will find in the top row of your keyboard, usually near the Delete key.
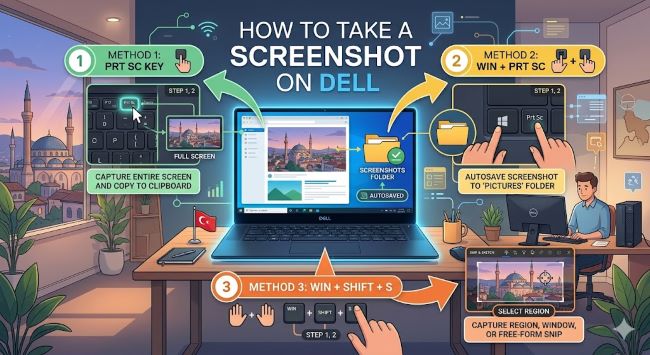
- PrtScn alone: Copies a screenshot of your entire screen to the clipboard. Nothing saves automatically. Open any image editor (Paint, Word, or even an email) and press Ctrl + V to paste it.
- Windows key + PrtScn: Takes a full-screen screenshot and saves it automatically to Pictures > Screenshots on your computer. The screen flashes briefly to confirm the capture.
- Alt + PrtScn: Captures only the active window rather than the full screen. Copies to clipboard, so paste it where you need it.
Method 2: Snipping Tool (Best for Precision)
The Snipping Tool is built into Windows and gives you full control over exactly what you capture.
On Windows 11 and Windows 10:
Press Windows key + Shift + S. Your screen dims and a small toolbar appears at the top with four capture options:
- Rectangular Snip: Draw a rectangle around the area you want
- Freeform Snip: Draw any shape around the area
- Window Snip: Click a window to capture just that window
- Full-screen Snip: Captures the entire screen
After you select an area, the screenshot copies to your clipboard and a notification appears in the bottom right corner. Click the notification to open the screenshot in the Snipping Tool editor, where you can annotate, crop, and save it.
To open the full Snipping Tool app, search for it in the Start menu. It lets you set a delay before capturing, which is useful for screenshots of menus or tooltips that disappear when you click.
Method 3: Xbox Game Bar (Good for Gaming and Apps)
If you are gaming or want to capture app content, the Xbox Game Bar has a built-in screenshot function.
Press Windows key + G to open the Game Bar overlay. Click the camera icon or press Windows key + Alt + PrtScn to take a screenshot. Screenshots save automatically to Videos > Captures on your computer.
Where Do Screenshots Go on a Dell?
This depends on which method you used:
- PrtScn alone or Alt + PrtScn: Screenshot goes to your clipboard only. Paste it somewhere to save it.
- Windows key + PrtScn: Saves automatically to C:\Users[YourName]\Pictures\Screenshots
- Snipping Tool (Windows + Shift + S): Copies to clipboard. Click the notification to save from the editor.
- Xbox Game Bar: Saves automatically to C:\Users[YourName]\Videos\Captures
Quick Reference: Screenshot Shortcuts on Dell
| Method | Shortcut | Where It Saves |
|---|---|---|
| Full screen to clipboard | PrtScn | Clipboard only |
| Full screen auto-save | Win + PrtScn | Pictures > Screenshots |
| Active window | Alt + PrtScn | Clipboard only |
| Snipping Tool | Win + Shift + S | Clipboard (save manually) |
| Game Bar | Win + Alt + PrtScn | Videos > Captures |
The Short Answer
To take a screenshot on a Dell, press Windows key + PrtScn for a full-screen shot that saves automatically, or press Windows key + Shift + S to open the Snipping Tool and capture a specific area. Both methods work on every Dell laptop and desktop running Windows 10 or 11.
Pick the method that fits the situation and you are done in seconds.


