
How to Insert a Text Box in Google Docs
Learn how to insert a text box in Google Docs using the Drawing tool. This step-by-step guide covers adding, editing, and formatting text boxes in any Google Doc.
Google Docs handles most text in a straightforward flow from top to bottom, which works well for standard documents. But sometimes you need text that sits in a specific spot on the page, independent of the main body. That is where text boxes come in. Inserting a text box in Google Docs is not as obvious as it is in Word or Google Slides, but once you find the right tool, the process is simple and the results are flexible.
This guide shows you exactly how to do it.
How to Insert a Text Box in Google Docs Using the Drawing Tool
Google Docs does not have a dedicated text box button in the toolbar. Instead, you access text boxes through the Drawing tool. Here is the step-by-step:
- Open your Google Doc.
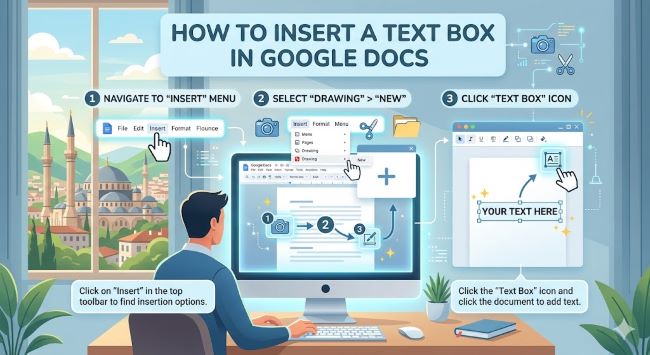
- Click Insert in the top menu bar.
- Select Drawing, then click New. This opens the Drawing canvas.
- In the Drawing toolbar, click the Text box icon. It looks like a letter T inside a box. If you do not see it, click the toolbar icon that looks like a box with a plus sign to find it.
- Click and drag on the drawing canvas to create your text box. Draw it at the size you want.
- Type your text inside the box.
- Use the formatting options in the Drawing toolbar to change the font, size, color, alignment, and background fill of the text box.
- When you are done, click Save and Close in the top right corner of the Drawing window.
The text box appears in your Google Doc as an image element. You can click it to select it, drag it to reposition it, and resize it by dragging the corner handles.
How to Edit a Text Box in Google Docs
To edit the text or change the formatting of a text box you already inserted:
- Click on the text box in your document to select it.
- Click Edit that appears below the selected drawing.
- The Drawing canvas opens again with your text box inside.
- Make your changes, then click Save and Close.
You cannot edit text box content directly in the document itself. Every edit goes through the Drawing tool.
How to Format Your Text Box
Inside the Drawing canvas, you have several formatting options:
- Font and size: Use the font dropdown and size field in the toolbar
- Text color: Click the A with a color bar icon
- Background fill: Click the paint bucket icon to add a background color to the box
- Border color and thickness: Use the border color and border weight icons to style the box outline
- Alignment: Use the alignment buttons to left, center, or right-align your text within the box
To remove the border entirely, set the border color to transparent using the border color tool.
How to Move and Resize a Text Box in Google Docs
Once the drawing is placed in your document, click it to select it. You will see:
- Blue handles at the corners and edges for resizing. Drag these to make the text box larger or smaller.
- A move cursor when you hover over the center of the box. Click and drag to reposition it anywhere on the page.
Use the text wrapping options that appear below the selected drawing to control how your document text flows around the text box. Options include In line, Wrap text, Break text, and Behind text.
A Quicker Alternative: Single-Cell Table
If you need a simple bordered box for text and do not need to position it freely on the page, a single-cell table is a faster option.
Go to Insert > Table and select a 1×1 table. Type inside it and format the border using the table options. It flows with your document text rather than floating, which works better for inline content like callout boxes or sidebars.
The Short Answer
To insert a text box in Google Docs, go to Insert > Drawing > New, click the text box icon in the Drawing toolbar, draw your box, add your text, and click Save and Close. The box appears in your document as a movable, resizable element. For a simpler inline option, use a 1×1 table instead.


