
How to Change Default Font in Word
Learn how to change the default font in Word on Windows and Mac so every new document starts with your preferred typeface, size, and style automatically.
Microsoft Word defaults to Calibri 11pt. It has for years. And if that is not the font you want to write in, opening a new document and immediately changing the font gets old fast. The good news is that you only have to fix this once. Knowing how to change the default font in Word means every new document you open starts exactly the way you want, with no manual adjustments needed.
This guide covers how to do it on Windows and Mac, and explains why the change sometimes does not stick so you can avoid that frustration.

How to Change Font in Outlook
Learn how to change font in Outlook for a single email or as your default for all new messages. Step-by-step instructions for Outlook on Windows, Mac, and the web.
How to Change the Default Font in Word on Windows
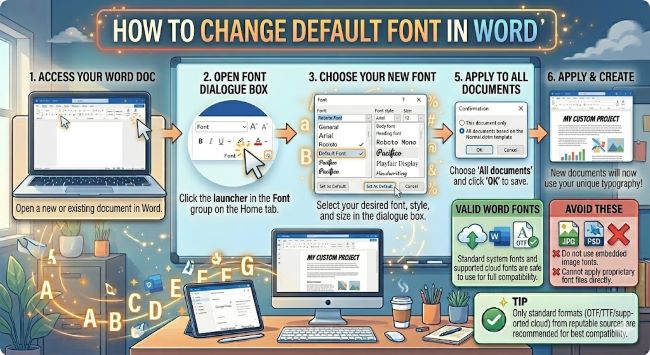
- Open Microsoft Word and start a new blank document.
- Go to the Home tab in the ribbon.
- In the Font section, click the small arrow in the bottom right corner of the Font group. This opens the Font dialog box.
- In the Font dialog box, choose your preferred font from the Font list, set the Style (Regular, Bold, Italic), and choose your Size.
- Once your settings look right, click Set As Default in the bottom left corner of the dialog box.
- A prompt will appear asking whether you want to apply the default to this document only, or to all documents based on the Normal template.
- Select All documents based on the Normal.dotm template and click OK.
From this point on, every new blank document you create in Word will open with your chosen font and size.
How to Change the Default Font in Word on Mac
The steps on Mac are nearly identical, with slightly different navigation.
- Open a new blank document in Word for Mac.
- Go to the Format menu in the top menu bar and select Font.
- The Font dialog box opens. Choose your preferred font, style, and size.
- Click Default in the bottom left corner of the dialog box.
- A prompt asks whether to apply the change to this document only or to all future documents. Choose All documents based on the Normal template.
- Click OK.
Word for Mac saves the change to your Normal template the same way the Windows version does.
Why the Normal.dotm Template Matters
When you change the default font, Word saves that setting to a file called Normal.dotm. This is the template Word uses every time you open a new blank document. Think of it as the blueprint for every new document you create.
If you choose “This document only” in the prompt, the change applies to your current document but leaves Normal.dotm unchanged. Future documents will still open with Calibri 11pt. Always choose the “All documents” option to make the change permanent.
If your default font keeps reverting, Normal.dotm may be getting reset by a Word update, a corrupted template file, or a sync conflict if you use OneDrive. The fix is to repeat the steps above after the revert happens, or locate the Normal.dotm file and delete it so Word creates a fresh one with your settings.
How to Change the Default Font for Specific Styles
Word uses styles to control formatting throughout a document. The Normal style controls body text. Heading 1, Heading 2, and other styles control their respective elements independently.
If you change the default font through the Font dialog, it updates the Normal style, which covers body text. But your headings may still use a different font unless you update those styles separately.
To change the font for a heading style:
- Type some text and apply the heading style you want to change (Heading 1, Heading 2, etc.).
- Change the font of that text to what you want.
- Right-click the style name in the Styles panel on the Home tab.
- Select Update Heading 1 to Match Selection (or whichever heading you are changing).
- To make it permanent, right-click the style again and choose Modify, then check New documents based on this template before clicking OK.
Doing this for each heading style gives you complete control over the typography in every new document.
Best Default Fonts for Word Documents
Calibri is clean and readable, but there are good reasons people switch away from it. Here are some solid alternatives depending on what you are writing:
- Times New Roman 12pt: The standard for academic and legal documents. Required by most style guides including MLA and Chicago.
- Arial 11pt or 12pt: Clean, professional, and familiar. Works well for business documents.
- Georgia 11pt: A serif font designed for screen readability. Slightly warmer than Times New Roman.
- Garamond 12pt: Elegant and slightly more compact than Times New Roman. Common in publishing.
- Calibri 12pt: If you like Calibri but just want it larger, bumping from 11pt to 12pt improves readability for most people.
Pick the font that suits the kind of writing you do most, set it once, and move on.
The Short Answer
To change the default font in Word, open the Font dialog through the Home tab (Windows) or Format menu (Mac), choose your font and size, click Set As Default, and select the option to apply it to all documents. Word saves the change to your Normal.dotm template, and every new document opens with your preferred font from that point on.
It takes about 60 seconds and saves you the same manual adjustment every single time you open a new file.


