
How to Use Google Authenticator Transfer: Step-by-Step Guide
Moving your two-factor authentication codes when you get a new phone is one of those tasks that feels minor until you do it wrong and find yourself locked out of important accounts. Google Authenticator’s built-in transfer feature, introduced to make this process easier than the old manual re-setup method, still requires understanding exactly how it works to avoid losing access to your accounts during the transition. This guide walks through the process completely.
Why This Process Matters
Authenticator apps generate time-based codes locally on your device without syncing to any cloud account by default (in older versions of Google Authenticator), which means simply installing the app on a new phone and logging into your Google account doesn’t automatically restore your authentication codes the way many other apps would. Without properly transferring your accounts, you risk losing access to every service protected by those codes — potentially including critical accounts like your email, banking, and other financial services — unless you have backup codes saved separately or another recovery method configured.
Google has since added an optional account sync feature, but understanding the manual transfer method remains important since not everyone has sync enabled, and the transfer method works regardless of your sync settings.
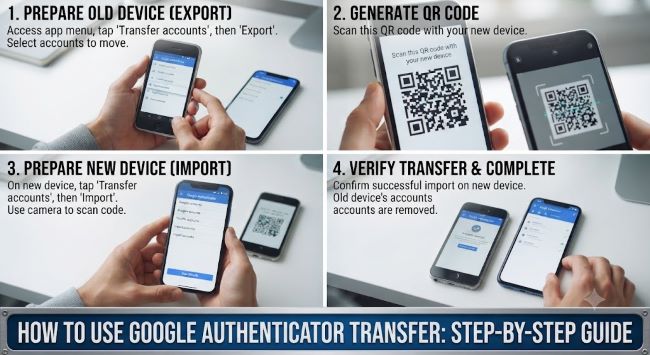
How to Use Google Authenticator’s Built-In Transfer Feature
Step 1: Open Google Authenticator on your old phone.
Step 2: Tap the three-dot menu icon in the top-right corner of the app.
Step 3: Select “Transfer accounts.”
Step 4: Choose “Export accounts.”
Step 5: Select which accounts you want to transfer. You can typically select all accounts or choose specific ones individually if you only want to move some.
Step 6: Authenticate using your device’s biometric verification (fingerprint or face recognition) or PIN, since this is a security-sensitive action.
Step 7: A QR code (or series of QR codes if you have many accounts) will be generated on your old phone’s screen.
Step 8: On your new phone, open Google Authenticator (download and install it first if you haven’t already).
Step 9: Tap the “+” icon to add an account, then select “Scan a QR code.”
Step 10: Scan the QR code displayed on your old phone’s screen using your new phone’s camera within the app.
Step 11: Confirm the accounts transferred successfully by checking that all expected accounts now appear in Authenticator on your new phone, generating valid-looking rotating codes.
Step 12: Verify each transferred account works by actually attempting to log into a few of the underlying services and confirming the generated code is accepted, rather than assuming the transfer was successful just because the accounts appear listed in the app.
Important Considerations Before You Transfer
Don’t delete the app from your old phone until you’ve fully verified the new phone works. Keep both devices accessible and the old phone’s Authenticator app intact until you’ve successfully logged into several of your most important protected accounts using the codes generated on your new device.
If you have many accounts, you may need multiple QR codes. Google Authenticator typically batches accounts across several QR codes if you have a large number set up, displaying them sequentially — make sure you scan all of them on the new device, not just the first one shown.
This transfer method requires both devices to be present simultaneously, since you’re scanning a code displayed on one device with the camera of the other. This isn’t a cloud-based restore process you can complete with only the new phone in hand.
Some accounts may require re-linking rather than transferring. Certain services tie their two-factor authentication setup to your specific device in ways that don’t transfer cleanly even using this official method, occasionally requiring you to disable and re-enable two-factor authentication for that specific account using your new device directly through that service’s own security settings.
If You’ve Already Lost Access to Your Old Phone
If your old phone is lost, broken, or otherwise inaccessible and you didn’t transfer your accounts beforehand, your options depend on what backup measures you had in place:
Backup codes. Many services provide one-time backup codes specifically for this scenario when you first set up two-factor authentication. If you saved these somewhere secure and accessible, you can use them to log in and then set up a fresh two-factor authentication configuration on your new device.
Account recovery processes. Most major services (Google, Microsoft, banking institutions) have an account recovery process for exactly this situation, though it typically takes longer than a smooth transfer would and may require identity verification steps.
Google’s own account-level recovery, if you’re specifically locked out of your Google account itself rather than just the Authenticator app, involves Google’s standard account recovery flow, separate from the Authenticator transfer process described above.
This situation is exactly why completing a proper transfer before you switch phones, rather than discovering the problem after the fact, matters so much — and it’s also why understanding alternative authentication approaches that don’t rely entirely on a single physical device is worth considering for your most critical accounts specifically.
Alternative and Complementary Approaches
For your most important accounts, consider whether passwordless authentication methods might offer a more resilient long-term approach than device-dependent authenticator apps alone, since passwordless and passkey-based systems are increasingly designed with cross-device recovery built into their core architecture rather than requiring manual transfer steps during every phone upgrade. For a deeper look at how this emerging approach compares to traditional two-factor authentication, what is a passwordless login covers the underlying mechanics and practical considerations of this alternative security model.
Beyond the specific mechanics of any one authentication method, building genuinely strong overall account security habits — including how you store backup codes, manage password reuse, and think about device security broadly — matters more than any single tool in isolation. Practical data security tips for ambitious webpreneurs covers broader security practices worth understanding alongside the specific mechanics of authenticator app transfers covered here.
Key Takeaways
- Google Authenticator’s built-in transfer feature, accessed through the three-dot menu and “Transfer accounts,” generates a QR code on your old phone that you scan with your new phone’s camera to move your accounts
- This process requires both your old and new phones present simultaneously, since it’s a direct device-to-device QR code scan rather than a cloud-based restore
- Don’t delete the app or reset your old phone until you’ve fully verified the new phone’s transferred codes actually work by successfully logging into several of your protected accounts
- Accounts with many entries may generate multiple sequential QR codes — make sure to scan all of them, not just the first one displayed
- If you’ve already lost access to your old phone without transferring first, your options depend on saved backup codes or each individual service’s account recovery process, which typically takes longer than a smooth transfer would
- Consider whether passwordless authentication methods might offer more resilient long-term protection for your most critical accounts compared to relying entirely on device-dependent authenticator apps
- Building broader strong security habits, beyond just the mechanics of any single authentication tool, provides more durable overall account protection


