How to Sanitize Sponges: 5 Methods That Work and When to Replace Them
The kitchen sponge is the tool you use to clean everything else. It is also one of the dirtiest items in the house. It stays warm and damp, and it collects bits of food all day. That mix is ideal for bacteria. Studies have found that a used kitchen sponge can hold more germs than a toilet seat. Knowing how to sanitize sponges cuts that load and helps keep your dishes and counters clean.
This guide covers five methods, compares how well they work, and explains the safety rules for each. It also tells you how often to sanitize, when to throw a sponge out, and which alternatives are easier to keep clean.
Why Sponges Get So Dirty
A sponge has thousands of tiny holes. Those holes hold water and trap food. Bacteria settle in and multiply fast at room temperature. Each wipe can then spread them to plates, cutting boards, and countertops.
Most of the microbes are harmless. Some can cause illness, mainly when a sponge has touched raw meat, poultry, eggs, or their juices. That is how cross-contamination happens in a home kitchen.
A sour or musty smell is a clear sign that bacteria have built up. Do not wait for the smell, though. A sponge can carry plenty of germs with no odor at all.
Cleaning vs. Sanitizing vs. Disinfecting
- Cleaning removes dirt and food with soap and water.
- Sanitizing lowers the number of germs to a safer level.
- Disinfecting kills nearly all germs on a surface.
Rinsing a sponge under the tap is cleaning. It does not sanitize. Heat or a chemical is needed for that.
Method Comparison
| Method | Time | What You Need | How Well It Works | Watch Out For |
|---|---|---|---|---|
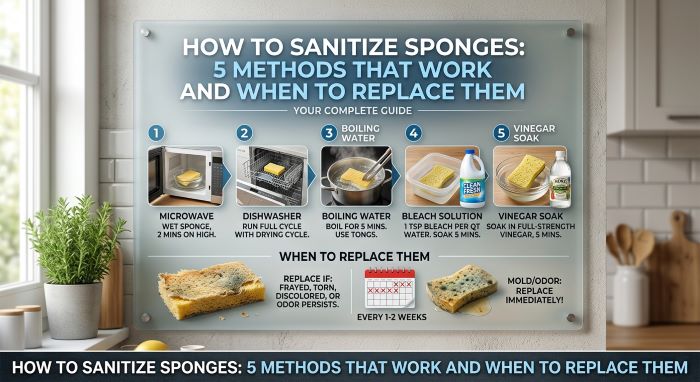
| Microwave | 1 to 2 minutes | Microwave, water | Very high in USDA testing | Fire risk if the sponge is dry or has metal |
| Dishwasher with heated dry | One full cycle | Dishwasher | Very high in USDA testing | Needs the hottest cycle and heated dry |
| Bleach soak | 5 minutes | Bleach, water | High | Fumes and skin contact. Never mix with other cleaners |
| Boiling water | 5 minutes | Pot, water | High | Burns from hot water |
| Vinegar soak | 5 minutes or more | White vinegar | Lower | Less effective than heat or bleach |
A study by the United States Department of Agriculture’s research service tested several methods on dirty sponges. Microwaving for one minute and running a dishwasher cycle with a drying phase each killed more than 99.9 percent of bacteria. Soaking in chemical solutions was less effective in that study.
Method 1: Microwave
This is the fastest way, and one of the best. It works only on sponges with no metal parts.
- Check the sponge. If it has a metallic scrub pad or any metal fibers, do not microwave it.
- Rinse out food bits.
- Soak the sponge completely. A dry or merely damp sponge can catch fire. Some people place it in a microwave-safe bowl with about half a cup of water.
- Microwave on high for one minute. Two minutes is fine for a large sponge that is soaking wet.
- Stay nearby while it runs.
- Let the sponge sit for at least a minute. It will be extremely hot. Remove it with tongs or wait until it cools.
- Wring it out and let it air dry.
Safety notes:
- Never microwave a dry sponge.
- Never microwave a sponge with metal.
- Plastic-based and some synthetic sponges can melt. Check the package.
- Expect a strong smell if the sponge is very dirty.
Method 2: Dishwasher
This is the easiest method if you run the dishwasher often.
- Rinse the sponge.
- Place it on the top rack. Secure it so it does not fall onto the heating element.
- Run the hottest, longest cycle with a heated dry phase.
- Remove the sponge when the cycle ends and let it finish drying in the open air.
The heated dry step matters. A cycle that leaves the sponge wet does much less.
Method 3: Bleach Soak
Bleach kills a wide range of germs. It suits sponges that cannot go in the microwave.
- Put on gloves and open a window.
- Mix three quarters of a cup of regular bleach into one gallon of water. For a smaller batch, use about three tablespoons of bleach per quart.
- Submerge the sponge for five minutes.
- Squeeze it a few times so the solution reaches the inside.
- Rinse the sponge well under running water.
- Wring it out and let it air dry.
Safety notes:
- Never mix bleach with ammonia, vinegar, or any other cleaner. The mix can release toxic gas.
- Use cool or lukewarm water, since hot water makes fumes stronger.
- Keep bleach away from children and pets.
- Bleach can break down some sponges faster and may fade colored ones.
Method 4: Boiling Water
- Bring a pot of water to a rolling boil.
- Add the sponge with tongs and push it under the surface.
- Boil for five minutes.
- Turn off the heat and let the water cool.
- Remove the sponge with tongs, wring it out when it is safe to touch, and air dry.
Natural cellulose sponges handle boiling well. Some synthetic sponges may warp.
Method 5: Vinegar Soak
Vinegar is a mild acid. It reduces some bacteria and helps with odors, but it is weaker than heat or bleach.
- Pour full-strength white vinegar into a bowl.
- Submerge the sponge for at least five minutes.
- Squeeze, rinse, and air dry.
Use this method when you have no microwave, dishwasher, or bleach. Do not rely on it after cleaning up raw meat juices.
How Often Should You Sanitize?
- Daily or every other day if you cook often.
- Right away after the sponge touches raw meat, poultry, fish, or eggs. Better still, use a paper towel for those messes and throw it away.
- Any time it smells.
Between sanitizing sessions, rinse the sponge with hot water after each use, wring it out hard, and store it where air can reach all sides.
When to Replace a Sponge
Sanitizing does not make a sponge last forever. Food safety guidance generally advises replacing kitchen sponges often.
Replace a sponge:
- Every one to two weeks with regular use
- When it smells, even after sanitizing
- When it is torn, flattened, or falling apart
- When it stays slimy
- After cleaning up after someone who is ill
Some researchers have questioned how much home sanitizing helps over time. A 2017 study that examined used kitchen sponges found that ones their owners said they sanitized did not hold fewer bacteria overall. The authors suggested weekly replacement. Sanitizing still reduces germs in the short term, but it is not a reason to keep a sponge for months.
Daily Habits That Keep Sponges Cleaner
- Rinse out all food and soap after each use.
- Wring the sponge until it stops dripping.
- Store it upright in a rack or holder with drainage. Do not leave it in the sink or in a puddle.
- Use separate sponges for dishes and for counters or floors. Color coding helps.
- Do not wipe up raw meat juices with a sponge.
- Do not use a kitchen sponge on the floor or in the bathroom.
- Let it dry fully overnight.
A dry sponge is a cleaner sponge. Bacteria need moisture to grow.
Sponge Alternatives That Are Easier to Keep Clean
| Tool | Why It Helps | How to Clean It |
|---|---|---|
| Dish brush | Bristles dry fast and trap less food | Dishwasher or a bleach soak |
| Silicone scrubber | Non-porous surface | Dishwasher or boiling water |
| Dishcloths | Can be changed daily | Washing machine on a hot cycle, then dry fully |
| Swedish dishcloths | Absorbent and quick to dry | Dishwasher or washing machine |
| Paper towels | Single use for raw meat messes | Throw away |
Many food safety experts prefer brushes, since they stay drier. If you like sponges, keep a small supply so you can swap them often.
What Not to Do
- Do not microwave a dry sponge. It can ignite.
- Do not microwave anything with metal.
- Do not mix cleaning chemicals.
- Do not assume soap sanitizes. Soap lifts dirt. It does not kill most bacteria in a sponge.
- Do not store a wet sponge in a closed container.
- Do not keep a sponge that smells. Odor means it is time to replace it.
- Do not use a sponge on raw meat spills.
Other Types of Sponges
Scrub sponges with a rough side. Check for metal. Non-metal versions can go in the dishwasher or a bleach soak.
Natural sea sponges. Avoid bleach and microwaves, which damage them. Soak in a mild solution of baking soda and warm water, rinse, and dry.
Bath sponges and loofahs. Rinse after each use, hang to dry outside the shower, soak weekly in diluted bleach or vinegar, and replace every few weeks.
Makeup sponges. Wash with gentle soap after each use, squeeze out, and air dry. Replace every one to three months.
Car wash and household sponges. Rinse well, soak in a bleach solution if needed, and dry in the sun.
Quick Routine: How to Sanitize Sponges in Under Two Minutes
For most homes, one short routine at the end of the day is enough. Here is how to sanitize sponges without adding real work to your evening.
- Rinse the sponge under hot running water and squeeze out all food bits.
- Check for metal. If the sponge has none, soak it until it drips.
- Place it in the microwave and heat on high for one minute.
- Leave it in the microwave to cool while you wipe down the counters with a clean cloth.
- Remove it with tongs, wring it out, and stand it upright in a rack.
If your sponge has a metal scrubber, put it on the top rack of the dishwasher with the evening load and choose heated dry.
What the Research Says
Several studies have tested how to sanitize sponges at home, and the results help explain the advice in this guide.
- USDA research. Scientists at the Agricultural Research Service soaked sponges in a mix that included ground beef, left them at room temperature to grow bacteria, and then tested several treatments. Microwaving and dishwashing with a dry cycle each reduced bacteria by more than 99.9 percent. They also cut yeasts and molds sharply. Soaking in bleach solution, lemon juice, or plain water did less.
- The 2017 sponge study. Researchers in Germany examined used kitchen sponges and found very dense bacterial communities. Sponges that owners reported cleaning regularly did not show lower overall bacterial counts. The team suggested replacing sponges about once a week.
These findings do not conflict as much as they seem to. Heat reduces germs right after treatment. Bacteria that survive can then regrow in a damp sponge. So the best plan is to combine both ideas: sanitize often, dry fully, and replace on a schedule.
How to Sanitize Sponges Without a Microwave or Dishwasher
Not every kitchen has both appliances. You still have good options.
- Boil it. Five minutes at a rolling boil works for most cellulose sponges.
- Soak it in bleach. Use the dilution listed above and rinse well.
- Use the washing machine. Add sponges to a hot load of kitchen towels, then dry them fully.
- Dry it in the sun. Sunlight and airflow help a rinsed sponge dry fast. Treat this as a helpful habit, not a full sanitizing method.
Who Should Take Extra Care
Some households face a higher risk from foodborne germs. These include homes with babies, older adults, pregnant people, and anyone with a weakened immune system. In those homes, consider these steps.
- Replace sponges weekly, or switch to dishcloths that you change every day.
- Use paper towels for raw meat, poultry, and egg spills.
- Keep a separate brush for baby bottles.
- Learn how to sanitize sponges with heat, and do it daily.
Sanitizing Schedule at a Glance
| Task | How Often |
|---|---|
| Rinse and wring out | After every use |
| Sanitize with heat or bleach | Every one to two days |
| Sanitize right away | After contact with raw meat juices |
| Replace the sponge | Every one to two weeks |
| Wash the sponge holder | Weekly |
Do not forget the holder. A rack or dish that collects water grows its own film of bacteria. Wash it with hot, soapy water when you clean the sink. Once the routine is set, how to sanitize sponges stops being a question and becomes a habit.
Frequently Asked Questions
What is the best way to sanitize a kitchen sponge? Microwaving a wet, metal-free sponge for one minute or running it through a dishwasher with heated dry are the two methods that tested best.
How long should I microwave a sponge? One minute on high for a wet sponge. Up to two minutes for a large one.
Is it safe to microwave a sponge? Yes, if it is soaking wet and has no metal. Let it cool before you touch it.
Does dish soap kill bacteria in a sponge? Not well. Soap helps rinse germs away but does not sanitize.
Does vinegar sanitize a sponge? It helps somewhat but is less effective than heat or bleach.
How often should I replace my sponge? About every one to two weeks.
Can I wash a sponge in the washing machine? Yes, on a hot cycle with detergent. Dry it fully afterward.
Why does my sponge smell? Bacteria are feeding on trapped food and moisture. Replace it.
Is a brush more sanitary than a sponge? Brushes dry faster and tend to hold fewer bacteria.
Final Thoughts
Learning how to sanitize sponges takes only a minute. Wet the sponge and microwave it, or toss it in the dishwasher on a hot cycle with heated dry. Use a bleach soak or boiling water when those are not an option. Do it every day or two, and always after a messy job.
Just as important, let the sponge dry between uses, keep it away from raw meat, and replace it every week or two. No method makes a sponge last forever. With good habits and a fresh supply on hand, how to sanitize sponges becomes a quick part of your kitchen routine, and your cleaning tool stays clean.
Key Takeaways
- Kitchen sponges hold large numbers of bacteria, since they stay warm, wet, and full of food particles.
- The simplest answer to how to sanitize sponges is heat: microwave a wet, metal-free sponge for one minute, or use a dishwasher with heated dry.
- A five-minute soak in diluted bleach or five minutes in boiling water also works.
- Vinegar is weaker and should not be the only method after raw meat messes.
- Never microwave a dry sponge or one with metal, and never mix bleach with other cleaners.
- Wring sponges out and store them where they can dry fully.
- Replace sponges every one to two weeks, or sooner if they smell or fall apart.