How to Replace a Shower Cartridge
A shower that drips all night, runs hot and cold, or has a handle that fights back usually has one worn part to blame: the cartridge. This small valve inside the wall controls water flow and temperature. The good news is that you can change it yourself with basic tools. Once you learn how to replace a shower cartridge, the job takes most people 30 to 60 minutes and costs far less than a plumber’s visit.
This guide covers the warning signs, the tools, and each step of the repair. It also explains how to find the right part, what differs by brand, and what to do when the old cartridge will not come out.
What Is a Shower Cartridge?
A shower cartridge is a cylinder made of plastic, brass, or both that sits inside the valve body behind the handle. When you turn the handle, the cartridge moves. That movement opens and closes ports for hot and cold water and blends them to the temperature you set.
Most modern single-handle showers use a cartridge. Swapping it is a much smaller job than a full shower valve replacement, which means opening the wall. Many also include a pressure-balancing feature, which keeps the temperature steady when someone flushes a toilet or starts the dishwasher. Over time, rubber seals harden, minerals build up, and moving parts wear. Then the valve leaks or sticks.
Signs You Need a New Cartridge
- Water drips from the showerhead or tub spout when the handle is off
- The handle is stiff, loose, or hard to turn
- The water will not get hot enough, or it will not get cold enough
- The temperature swings without warning
- Water pressure has dropped in the shower only
- Water leaks from behind the handle
- You hear squealing or whistling when the water runs
- The handle turns but the water flow does not change
One or two of these signs point to the cartridge and mean it is time to learn how to replace a shower cartridge. If pressure is low throughout the house, the cause lies elsewhere.
Tools and Materials
| Item | Purpose |
|---|---|
| New cartridge that matches your valve | The replacement part |
| Phillips and flathead screwdrivers | Remove the handle and trim plate |
| Allen key set | Loosen the set screw on many handles |
| Adjustable wrench or channel-lock pliers | Remove nuts and grip the cartridge stem |
| Needle-nose pliers | Pull the retaining clip |
| Cartridge puller for your brand | Free a stuck cartridge |
| Silicone plumber’s grease | Lubricate new seals |
| White vinegar and an old toothbrush | Clean mineral deposits |
| Rag or drain cover | Keep small parts out of the drain |
| Utility knife | Cut old caulk around the trim plate |
| Flashlight | See inside the valve |
| Bucket and towels | Catch leftover water |
| Silicone caulk | Reseal the trim plate if needed |
Use silicone grease only. Petroleum-based grease can damage rubber seals.
Before You Start: Find the Right Cartridge
The first rule of how to replace a shower cartridge is to buy the exact match. The wrong part will not fit, so identify your valve first.
- Look for a brand name. Check the handle, the trim plate, and the drain cover for a logo.
- Check your records. A manual or receipt may list the model.
- Remove the old cartridge and take it to the store. This is the surest method. Staff can match it by sight.
- Take photos. Photograph the handle, trim plate, and old cartridge from several angles.
- Contact the maker. Most brands will identify a valve from photos. Several, such as Moen and Delta, offer lifetime limited warranties to the original homeowner and may send a free part.
A new shower cartridge usually costs between $15 and $80, depending on the brand and type.
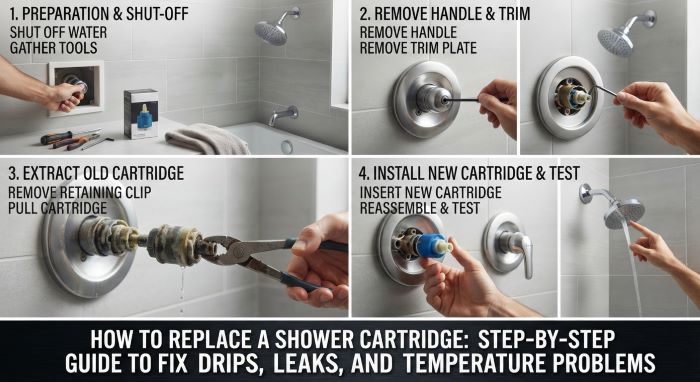
Step 1: Turn Off the Water
Never pull a cartridge with the water on. Look for shutoff options in this order.
- Screwdriver stops. Some valves have two small slotted screws on the valve body behind the trim plate. Turn each a quarter turn or until snug to shut off the hot and cold lines.
- A local shutoff. Some homes have valves for the bathroom behind an access panel.
- The main shutoff. If you find nothing else, close the main valve for the house, usually near the water meter or where the line enters the home.
Then open the shower handle and a faucet on a lower floor to drain pressure from the pipes.
Step 2: Protect the Drain and the Tub
Cover the drain with a rag or a drain stopper. Tiny screws and clips vanish down drains with ease. Lay a towel in the tub or on the shower floor to protect the finish from dropped tools.
Step 3: Remove the Handle
Handles attach in one of two ways.
- Set screw. Look for a small hole on the underside or side of the handle. Loosen the screw inside with an Allen key and slide the handle off.
- Center screw. Pry off the decorative cap on the front of the handle with a small flathead screwdriver. Remove the Phillips screw beneath it and pull the handle straight off.
If the handle is stuck, wiggle it gently while you pull. A handle puller tool helps with stubborn ones. Avoid prying against the tile.
Step 4: Remove the Trim Plate
The trim plate, also called the escutcheon, covers the hole in the wall. Remove its two screws. If caulk holds it to the wall, run a utility knife around the edge and ease it off. Slide off any sleeve or tube that covers the valve stem.
Step 5: Remove the Retaining Clip or Nut
The cartridge is locked in place by one of these.
- A U-shaped clip. Common on Moen valves. Grip the top of the clip with needle-nose pliers and pull it straight up and out.
- A bonnet nut. Common on Delta valves. Turn the large round nut counterclockwise with a wrench or pliers. Wrap the jaws with tape to protect the finish.
- Screws. Some valves hold the cartridge with two or four screws.
Set these parts aside in a cup. Take a photo of the cartridge before you move it, and note which way it faces. Many have a tab, notch, or “H” and “C” markings that must go back the same way.
Step 6: Pull the Old Cartridge
Grip the cartridge stem with pliers and pull straight out with a slight twist. Some slide out with little effort.
Many do not. Mineral buildup can bond a cartridge to the valve body. In that case:
- Soak the area with white vinegar for 10 to 15 minutes.
- Twist the stem back and forth to break the seal.
- Use a cartridge puller made for your brand. It threads onto the stem and uses leverage to draw the cartridge out.
- Pull straight. Prying at an angle can damage the valve body.
If the cartridge breaks apart and leaves pieces inside, remove every fragment with needle-nose pliers or a pick. The old rubber seals must come out too.
Step 7: Clean the Valve Body
Shine a flashlight into the valve. Wipe out grit, old grease, and bits of rubber. Scrub mineral scale with a toothbrush dipped in vinegar. Rinse with a damp rag.
If your valve has screwdriver stops or you can control the main shutoff with a helper, briefly turn the water on for a second to flush debris, with a bucket held in front. Then shut it off again.
Step 8: Install the New Cartridge
- Compare the new cartridge with the old one. They should match in length, shape, and seal position.
- Coat the rubber O-rings with a thin layer of silicone grease.
- Line up the cartridge the same way the old one sat. Match tabs to slots and hot to the left side.
- Push it straight in until it seats fully. Some kits include a plastic tool to help.
- Reinstall the retaining clip, bonnet nut, or screws. The clip should slide all the way down.
Do not force a cartridge that will not seat. Pull it out, check the alignment, and look for debris.
Step 9: Set the Temperature Limit
Many valves have a rotational limit stop, a plastic ring that sets how far the handle can turn toward hot. It prevents scalding. Follow the instructions in the box to adjust it. A safe maximum for most homes is about 120 degrees Fahrenheit at the showerhead. Test with a thermometer once the water is back on.
Step 10: Reassemble and Test
- Slide the sleeve and trim plate back on and tighten the screws.
- Reattach the handle.
- Turn the water supply back on slowly.
- Open the shower and let it run for a minute to clear air.
- Check hot and cold. If they are reversed, the cartridge is in backward. Many can be rotated 180 degrees to fix this.
- Turn the shower off and watch for drips.
- Look behind the trim plate, if you can, for any sign of leaks.
- Run a bead of silicone caulk around the top and sides of the trim plate. Leave the bottom open so trapped water can drain.
Cartridge Types by Brand
| Brand | Common Retainer | Notes |
|---|---|---|
| Moen | U-shaped clip | 1222 Posi-Temp and 1225 cartridges are common. A puller is often needed |
| Delta | Bonnet nut | MultiChoice and older Monitor valves use different cartridges. Older models have separate seats and springs |
| Kohler | Screws or a retaining nut | Many models have a separate pressure-balancing unit and mixer cap |
| Pfister | Retaining nut or screws | Check the model, since designs vary by series |
| American Standard | Screws or a nut | Often includes a separate pressure-balance spool |
| Grohe | Screws or a threaded ring | Thermostatic cartridges need careful calibration |
Model numbers and designs change, so confirm the exact part for your valve.
Cartridge Types by Function
- Pressure-balancing cartridge. The most common type. It reacts to pressure changes and keeps temperature steady.
- Thermostatic cartridge. Senses water temperature and holds a set number. Found in higher-end and multi-outlet showers.
- Ceramic disc cartridge. Uses two hard discs to control flow. Durable and smooth.
- Diverter cartridge. Directs water between a tub spout, showerhead, and hand shower. It is a separate part from the mixing cartridge.
Two-handle and three-handle showers often use stems with washers and seats, not cartridges. The repair is similar in spirit but uses different parts.
Troubleshooting After Installation
| Problem | Likely Cause | Fix |
|---|---|---|
| Hot and cold are reversed | Cartridge installed 180 degrees off | Rotate the cartridge or the stem as the instructions describe |
| Still dripping | Debris in the valve, damaged valve body, or wrong part | Remove, clean, and reseat. Check the part number |
| Water not hot enough | Temperature limit stop set too low | Adjust the limit stop |
| Low flow | Debris clogging the cartridge or showerhead | Flush the valve and clean the showerhead screen |
| Handle hard to turn | Dry seals | Remove and apply silicone grease |
| Leak behind the handle | O-ring pinched or bonnet nut loose | Reseat the cartridge and tighten the nut |
| Clip will not go in | Cartridge not fully seated | Push the cartridge in further and align the slots |
How Long Do Shower Cartridges Last?
A shower cartridge usually lasts 10 to 20 years. Hard water shortens that span. Minerals grind against seals and coat moving parts. If you replace cartridges every few years, your water is the likely cause.
A water softener or filtration system at the point where water enters the house protects every valve, faucet, and appliance. This guide to the best whole house water filter compares options. For smaller setups, including under-sink and countertop units, see the best water filter for home.
While You Have the Trim Off
A cartridge swap is a good time for a few related jobs.
- Clean the showerhead by soaking it in vinegar to clear mineral deposits.
- Check the caulk around the tub and the trim plate, and replace any that is cracked.
- Look for dark spots or a musty smell around the valve opening, which can signal a hidden leak.
- Scrub away mildew on grout and caulk lines. This guide on how to clean shower mold covers safe methods.
A slow leak behind the wall feeds mold growth, so fixing a faulty cartridge early protects more than your water bill.
Cost: DIY vs. Plumber
| Approach | Typical Cost | Time |
|---|---|---|
| Do it yourself | $15 to $80 for the cartridge, plus $15 to $30 if you need a puller | 30 to 60 minutes |
| Hire a plumber | Roughly $150 to $400 with parts and labor | About an hour on site |
The savings are the main reason homeowners look up how to replace a shower cartridge. Costs vary by region and by valve type. Thermostatic cartridges cost more than standard ones.
When to Call a Plumber
- You cannot find a way to shut off the water.
- The cartridge is seized and will not move with a puller.
- The cartridge broke and pieces are stuck inside.
- The valve body is cracked, corroded, or scratched.
- The valve is very old and parts are no longer made.
- Leaks continue after a correct installation.
- You see water damage inside the wall.
- You rent your home. In that case, call your landlord first.
A damaged valve body means a new shower cartridge will not fix the leak. You need a full shower valve replacement, which involves opening the wall and soldering or crimping pipe.
Common Mistakes to Avoid
Most failed attempts at how to replace a shower cartridge trace back to one of these errors.
- Skipping the water shutoff
- Leaving the drain uncovered
- Buying a cartridge by guesswork
- Forcing a stuck cartridge at an angle
- Leaving old O-rings or fragments in the valve
- Using petroleum grease
- Installing the cartridge upside down
- Forgetting the retaining clip
- Overtightening screws and cracking the trim
- Skipping the temperature limit setting
Frequently Asked Questions
How do I know which cartridge I need? Identify the brand from the trim, then match the old cartridge at a store or with the maker’s help.
Can I replace it without turning off the water? No. Water will spray out at full pressure.
How long does the job take? Thirty to 60 minutes if the old cartridge comes out cleanly.
Do I need a special tool? Often not. A brand-specific puller helps a great deal when the cartridge is stuck.
Why does my shower still drip with a new cartridge? Debris, a worn valve body, or the wrong part are the usual causes.
How often should I replace it? Only when problems appear. Many last well over a decade.
Is the process the same for a bathtub and shower combo? Yes. The mixing valve works the same way.
Can a bad cartridge cause low water pressure? Yes, in that shower only. Clogged ports restrict flow.
Are cartridges universal? No. Each brand and valve series uses its own shower cartridge design.
What is the difference between a cartridge swap and a shower valve replacement? A cartridge swap changes only the moving part inside the valve and is done from the front. A shower valve replacement changes the whole valve body in the wall and usually calls for a plumber.
Final Thoughts
Learning how to replace a shower cartridge is one of the most useful home plumbing skills. Shut off the water, remove the handle and trim, pull the clip, slide out the old cartridge, clean the valve, and fit the new one with a little silicone grease. Then set the temperature limit and test for leaks.
Take your time on the two steps that cause the most trouble: finding the exact replacement part and pulling a stuck cartridge straight out. If the valve body is damaged or the cartridge will not budge, a plumber is worth the cost. For most homes, though, knowing how to replace a shower cartridge turns a nagging drip into a short afternoon project.
Key Takeaways
- A worn cartridge causes drips, stiff handles, and unstable water temperature.
- The core of how to replace a shower cartridge is: shut off water, remove handle and trim, pull the clip, swap the cartridge, and reassemble.
- Identify the brand and match the old part exactly, since cartridges are not universal.
- Use vinegar and a brand-specific puller for a stuck cartridge, and always pull straight.
- Coat new O-rings with silicone grease, and never use petroleum grease.
- Set the temperature limit stop to prevent scalding, and test for leaks before you caulk.
- Call a plumber if you cannot shut off the water, the cartridge is seized, or the valve body is damaged.