
How to Fix Chipped Tile: Step-by-Step Repair Methods for Every Type of Chip
Chipped tile is one of the most common minor home repair issues, and it’s often more fixable than it looks. Whether the chip is from a dropped tool, a heavy pot, or years of foot traffic, the repair approach depends on how large the chip is, where the tile is located, and whether you want a cosmetically seamless fix or just a functional one that stops the chip from growing. This guide covers every method from quick touch-ups to full tile replacement.
Assessing the Damage Before You Start
Not all chips are equal, and the right repair method depends on what you’re actually dealing with.
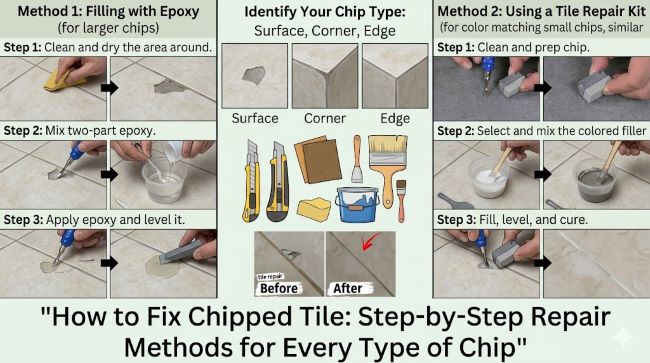
Small surface chip (under 1/4 inch): a decorative chip that doesn’t expose the substrate beneath the tile. These are primarily cosmetic and can be addressed with a repair kit or paint touch-up.
Medium chip (1/4 to 1 inch): exposes some of the tile body beneath the glaze. Requires a filler material to restore the surface and prevent the chip from expanding.
Large chip or crack (over 1 inch, or any crack extending across the tile): significantly compromises the structural integrity of the tile. May require tile replacement, particularly on floors where a cracked tile is a trip hazard and allows water intrusion.
Chip at the edge or corner: these are common and repair well with epoxy filler, though they’re more visible than center chips because light hits them at a sharp angle.
Method 1: Porcelain and Tile Repair Kit (Best for Most Chips)
Tile repair kits are the most widely available solution for small to medium chips. They consist of a two-part epoxy filler or a ready-mix repair compound that’s tinted to match the tile color, applied to the chip, and cured hard.
What you need:
- Tile repair kit (Rust-Oleum Tub & Tile Touch-Up, Devcon Epoxy, or a brand-specific ceramic repair kit)
- Fine-grit sandpaper (400-600 grit)
- Clean cloth and isopropyl alcohol
- Toothpicks or small spatula for application
- Clear nail polish or tile sealer (optional, for surface protection)
Step 1: Clean the chip thoroughly. Use isopropyl alcohol on a clean cloth to degrease the chipped area. Any oil, soap residue, or dust will prevent the repair compound from adhering. Let the area dry completely.
Step 2: Mix the repair compound (if two-part). If using a two-part epoxy, mix equal parts per the package instructions. Work quickly once mixed because epoxy begins curing within minutes to hours depending on the product.
Step 3: Apply the filler. Use a toothpick, small spatula, or the applicator included with the kit to fill the chip. Apply slightly more filler than needed — it should be slightly overfilled and proud of the surface. The filler will shrink slightly as it cures.
Step 4: Smooth and level. Before the filler fully cures, smooth the surface to match the surrounding tile. A dampened finger, a flat tool, or the back of a spoon works well. Aim to match the texture of the surrounding tile: smooth for glazed tile, slightly textured for unglazed or matte finishes.
Step 5: Allow to cure. Follow the product’s cure time. Most tile repair compounds achieve initial hardness in 2-4 hours and full cure in 24 hours. Don’t use the repaired area until fully cured.
Step 6: Sand if needed. Once cured, if the repaired area is slightly higher than the surrounding tile, sand it level with 400-600 grit wet sandpaper. Use light circular motions and check frequently to avoid sanding through the repair.
Step 7: Color matching. Most kit systems include multiple color components for mixing. Test your color mix on a piece of cardboard and compare to the tile before applying. Perfect color matching is difficult: work in good lighting and compare wet and dry results (the color often shifts slightly as it dries).
Method 2: Acrylic Paint Touch-Up (Small Surface Chips Only)
For very small chips on glazed tile where the chip is primarily a color issue rather than a structural one, acrylic paint can serve as a touch-up tool. This is the least durable solution but requires no special materials.
What you need:
- Acrylic craft paint in a matching color
- Fine-tipped artist’s brush
- Clear gloss varnish or clear nail polish
Step 1: Clean and dry the chipped area.
Step 2: Mix paint colors until you achieve a close match to the tile color. Test on a piece of paper first.
Step 3: Apply paint in thin layers with a fine brush, building up color gradually. Allow each layer to dry before adding the next.
Step 4: Once the color is matched and dry, apply a thin coat of clear gloss varnish or nail polish over the repaired area to seal and protect it and restore the glazed appearance.
This repair is visible under close inspection and won’t last as long as an epoxy repair, but it’s a quick fix for minor cosmetic chips and is completely reversible.
Method 3: Replacing a Badly Damaged Tile
When a chip is large, when the tile is cracked through, or when the chip is in a high-traffic area that would continue to worsen, replacement is the right call.
What you need:
- A replacement tile (ideally from original stock; otherwise, match as closely as possible from a tile store)
- Oscillating multi-tool or grout saw
- Chisel and hammer (or tile removal tool)
- Tile adhesive or thinset mortar
- Grout matching the existing grout color
- Safety glasses and gloves
Step 1: Remove the grout surrounding the damaged tile using a grout saw or oscillating tool with a grout removal blade. Work carefully to avoid damaging adjacent tiles.
Step 2: Break the damaged tile. Using a hammer and chisel (or a drill with a large bit to create leverage points), break the tile from the center out. Never try to lift a tile from an edge first: this can pop adjacent tiles.
Step 3: Remove tile pieces and clean the substrate. Scrape away all old adhesive or mortar from the substrate surface until it’s clean and flat.
Step 4: Apply thinset or tile adhesive to the substrate and set the new tile. Press firmly and use tile spacers to maintain consistent grout lines with adjacent tiles.
Step 5: Allow the adhesive to cure (typically 24 hours), then apply grout. Match the grout color to the existing grout and seal when dry.
Preventing Future Chips
The most common causes of tile chips are impact from dropped objects and inadequate underlayment that allows flex in the floor. A tile floor with flex in the subfloor will develop cracks and chips as the subfloor moves while the rigid tile cannot. Ensuring proper subfloor rigidity before retiling prevents this pattern.
For wall tiles, the most common cause of chips is impact from hard objects and fixtures mounted too close to the tile surface.
For related home repair topics, how to repair chipped paint covers a similar repair process for another common household surface damage issue where the right filler and color-matching approach makes the difference between a visible repair and an invisible one.
Key Takeaways
- Small chips under 1/4 inch are primarily cosmetic and repair well with tile repair kits or paint touch-up; large chips and cracks may require tile replacement
- Clean the chip with isopropyl alcohol before any repair: oils and residue prevent adhesion
- Two-part epoxy tile repair kits are the most durable solution for medium chips: apply slightly overfilled, smooth before cure, sand level after cure
- Color matching is the hardest part of any tile repair: test your color mix in good lighting and compare wet vs dry appearance before applying to the tile
- For cracked or severely chipped floor tiles, replacement is safer than repair: a cracked floor tile is a trip hazard and allows water to penetrate the substrate
- Replacement requires grout removal, tile removal from the center out, substrate cleaning, new adhesive, and color-matched grout to complete the repair
- Tile chips on floors with flex in the subfloor will recur: address the subfloor rigidity issue rather than just repairing chips repeatedly


