
How to Repair Chipped Paint: A Step-by-Step Guide for Walls, Trim, and Furniture
Chipped paint happens to every painted surface eventually. Whether it’s a wall corner that got bumped, a door frame that’s absorbed years of contact, or a piece of furniture with flaking finish, the repair process follows the same basic principles: clean, fill, prime, paint, and blend. Done correctly, a chipped paint repair is invisible. Done incorrectly, it produces a patch that draws the eye more than the original chip. This guide covers the full process for walls, trim, and furniture, including the color-matching and blending steps that most guides skip.
What Causes Paint to Chip
Understanding the cause helps you fix it correctly and prevent it from recurring.
Impact damage: the most common cause. A corner knocked by furniture, a door handle hitting the wall, or something dropped against a painted surface chips the paint and sometimes the surface below it.
Adhesion failure: paint that wasn’t properly primed or was applied over a dirty, oily, or glossy surface will chip and peel as it loses its bond. This type of chipping often spreads: fixing one area while leaving the root cause unaddressed means more chips will follow.
Moisture damage: paint on surfaces exposed to moisture (bathrooms, kitchens, exterior) blisters and chips when water gets behind the paint film. Repairing this type of chip requires addressing the moisture source, not just the paint.
Age and brittleness: older paint formulations become brittle over time and chip at impact points that newer, more flexible paint would survive.
Surface movement: paint over wood surfaces that expand and contract seasonally can crack and chip along grain lines.
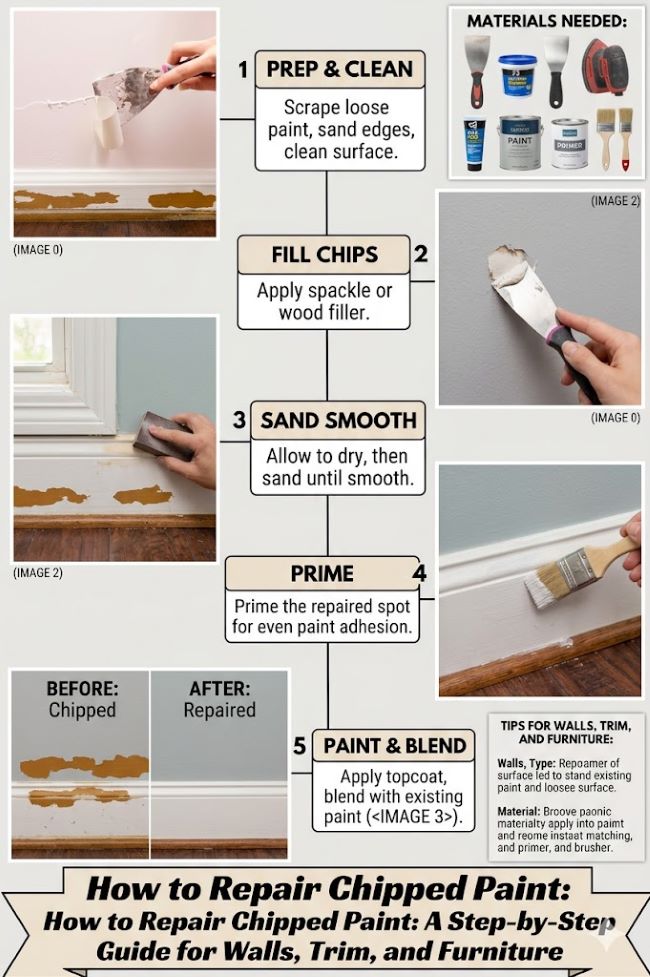
Tools and Materials You’ll Need
- Sandpaper (120 grit, 220 grit)
- Spackling compound or lightweight joint compound (for drywall chips)
- Wood filler or epoxy filler (for wood trim or furniture)
- Primer (tinted to near the finish coat color when possible)
- Paint matching the existing color
- Small artist’s brush and a small roller (2-4 inch foam for walls)
- Painter’s tape
- Clean cloth
- Feathering brush or dry brush for blending
Repairing Chipped Paint on Walls
Step 1: Assess and prepare the area. Check whether the chip is through the paint only or whether the drywall surface beneath is also damaged. If the chip exposed bare drywall paper or created a small dent, you’ll need to fill before painting.
Use 120-grit sandpaper to lightly sand the edges of the chip: this feathers the transition between the chipped area and the intact paint, which is essential for an invisible repair. Abrupt edges between chip and surface produce a visible ridge even after painting. Sand until the transition feels gradual rather than stepped.
Step 2: Clean the area. Wipe the repair area with a lightly damp cloth to remove sanding dust and any grease or surface contamination. Let dry completely.
Step 3: Fill if needed. If the chip left a depression or dent, apply a thin layer of lightweight spackling compound using a putty knife. Feather the edges out well beyond the chip. Let dry completely (spackling often dries faster than stated: test by pressing gently — it should feel firm with no give). Sand the dried fill to flush with the surrounding surface using 220-grit sandpaper, then wipe clean.
Step 4: Prime. Apply primer to the repaired area. Priming is the step most people skip that most directly determines whether the repair blends. Unprimed patches absorb finish paint differently than the surrounding sealed surface, creating a sheen or texture difference called “flashing” that’s visible from across the room. Use a tinted primer (tinted toward the finish color) for the best result.
Allow primer to dry fully.
Step 5: Paint and blend. Apply the finish coat paint. The key to an invisible wall repair is feathering: don’t just paint the repair area. Load a small brush or foam roller with the paint and work from the edge of the repair outward, using decreasing pressure as you move toward the intact painted area. This blends the repair into the surrounding paint rather than creating a hard edge.
For flat or eggshell paint, one coat typically blends well. For semi-gloss or gloss paint, blending is harder because gloss levels are more visible: apply multiple thin coats and feather each one.
Step 6: Match the sheen. The sheen (flatness or glossiness) of the repair area must match the surrounding paint. If your paint has been on the wall for several years, it may have changed sheen from cleaning and aging. Test a small area and compare in raking light before calling the repair done.
Repairing Chipped Paint on Trim and Woodwork
Wood trim is harder to repair invisibly than drywall because:
- The surface is harder and impacts leave deeper impressions
- Wood trim is often painted in gloss or semi-gloss, which shows texture differences clearly
- Trim is often touched and inspected more closely than walls
Step 1: Sand the chip edges aggressively. Use 120-grit sandpaper to sand the edges of the chip until the transition from chip to paint is as gradual as possible. This is more important on trim than on walls because trim paint is thicker and the edge transition more abrupt.
Step 2: Fill with wood filler. Apply wood filler (Minwax High Performance, DAP Plastic Wood, or similar) to any depression. Wood filler dries hard and is sandable: overfill slightly and sand flush once dry.
For larger chips on trim, two-part epoxy wood filler (Bondo Wood Filler, Abatron WoodEpox) is more durable and doesn’t shrink as it cures.
Step 3: Sand to 220 grit. Once the filler is dry and sanded flush, finish-sand the entire area with 220-grit. The surface should feel smooth and continuous.
Step 4: Prime with a high-adhesion primer. Trim primer needs to bond well to both the filler and the surrounding paint. Zinsser BIN or Bulls Eye 1-2-3 are reliable options that adhere to multiple surface types.
Step 5: Paint with trim-appropriate finish paint. Apply thin coats of gloss or semi-gloss trim paint, feathering edges well. Sand lightly with 220-grit between coats. At least two coats over the primed area will be needed to match the opacity and sheen of the surrounding trim.
Repairing Chipped Paint on Furniture
Furniture repairs follow the same process as trim but often require color matching to an original factory finish that isn’t available off the shelf.
For color matching: take a piece of the chipped paint or a chip photograph to a paint store for computerized color matching. Most stores can match any color from a physical sample, though getting the formula exactly right sometimes takes two or three attempts.
For small touch-ups on furniture with standard colors, artist’s acrylic paints mixed to match and sealed with a clear topcoat often work better than wall or trim paint because they’re more flexible and available in smaller quantities.
For related surface repair, how to fix chipped tile covers the parallel process for ceramic and porcelain surfaces where filling, color matching, and surface texture matching are equally important for an invisible result.
Key Takeaways
- The most important step in repairing chipped paint is feathering the edges: sanding the transition between chip and intact paint to create a gradual slope rather than an abrupt edge
- Skipping primer is the most common reason paint repairs remain visible: prime the repair area with a tinted primer before applying finish paint
- “Flashing” (a dull patch visible from an angle) is caused by unprimed bare drywall or filler absorbing finish paint differently than the sealed surrounding surface
- For wall repairs, feather the paint from the repair area outward with decreasing pressure to blend into the surrounding surface
- Trim chips require wood filler (or two-part epoxy for larger damage), aggressive edge sanding, high-adhesion primer, and multiple thin coats of gloss or semi-gloss paint
- Sheen matching is as important as color matching: a flat patch on a semi-gloss surface is as visible as a color mismatch
- Paint stores can color-match from a physical chip sample for furniture repairs where the original color isn’t a standard formula


