
How to Set Out of Office in Outlook App: Complete Guide for Mobile and Desktop
Setting up an out of office reply before a vacation, holiday, or extended absence is one of the simplest things you can do to manage expectations and avoid coming back to a flood of follow-up emails. The Outlook app handles automatic replies slightly differently depending on whether you’re using the mobile app or the desktop version, and whether your account is a Microsoft 365 business account or a personal account. This guide covers every version so you can find the exact steps for your setup. How to Set Out of Office in the Outlook Mobile App (iPhone and Android)
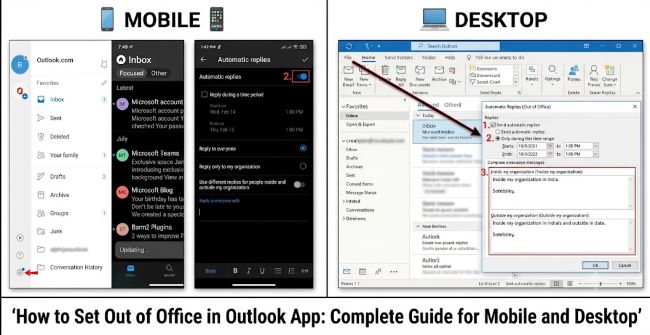
The process is the same on both iOS and Android.
Step 1: Open the Outlook app on your phone.
Step 2: Tap your profile picture or initials in the top-left corner to open the sidebar menu.
Step 3: Tap the Settings gear icon in the bottom-left corner of the sidebar.
Step 4: Under the Mail section, tap your email account name.
Step 5: Tap Automatic Replies.
Step 6: Toggle Automatic Replies to ON.
Step 7: You’ll see two text fields:
- Reply to people inside my organization: for internal contacts
- Reply to people outside my organization: for external senders
Type your out of office message in the relevant fields. You can use different messages for internal and external contacts, which is useful if you want to share more detail with colleagues than with external clients.
Step 8: To set a specific date range so the reply turns off automatically, toggle on Send replies during a time period and set your start and end dates and times.
Step 9: Tap the checkmark or Save in the top-right corner.
Your automatic reply is now active. Anyone who emails you during the specified period (or until you turn it off manually) will receive your out of office message.
Note: If you don’t see an Automatic Replies option after tapping your account name, your account type may not support it through the mobile app. Gmail accounts added to Outlook mobile, for example, don’t have this option through Outlook: you’d need to set an out of office reply through Gmail’s own settings.
How to Set Out of Office in Outlook for Windows (Desktop)
Step 1: Open Outlook on your Windows computer.
Step 2: Click File in the top-left corner of the ribbon.
Step 3: On the Info page, click Automatic Replies (Out of Office). If you don’t see this option, your account type may be IMAP/POP (see the section below on non-Exchange accounts).
Step 4: In the Automatic Replies dialog, select Send automatic replies.
Step 5: To set a date range, check Only send during this time range and set your start and end dates and times. If you leave this unchecked, the reply runs until you manually turn it off.
Step 6: Type your reply in the Inside My Organization tab for internal senders. Click the Outside My Organization tab to set a different message for external contacts, and choose whether to reply to everyone outside or only to people in your contacts.
Step 7: Click OK to save.
An orange banner appears at the top of your Outlook window confirming automatic replies are on. Click Turn Off in that banner at any time to deactivate the reply immediately.
How to Set Out of Office in Outlook for Mac (Desktop)
Step 1: Open Outlook on your Mac.
Step 2: Click Tools in the top menu bar.
Step 3: Click Automatic Replies.
Step 4: Check Send automatic replies for account [your email].
Step 5: Set your date range by checking Send replies only during this time period and entering start and end dates.
Step 6: Type your message. If your account supports it, you’ll see separate tabs for replies inside and outside your organization.
Step 7: Click OK.
The process on Mac is nearly identical to Windows but accessed through Tools rather than the File menu.
How to Set Out of Office in Outlook Web (Browser)
If you’re accessing Outlook through a web browser (outlook.office.com or outlook.live.com):
Step 1: Click the Settings gear icon in the top-right corner.
Step 2: Click View all Outlook settings at the bottom of the Settings panel.
Step 3: Go to Mail > Automatic replies.
Step 4: Toggle Turn on automatic replies to ON.
Step 5: Check Send replies only during a time period if you want a date range.
Step 6: Type your message. Separate options exist for internal and external senders.
Step 7: Click Save.
Setting Out of Office for Non-Exchange Accounts (Gmail, IMAP, POP)
If your email is set up in Outlook as a Gmail, Yahoo, or generic IMAP/POP account, the built-in Automatic Replies feature may not be available through Outlook. Microsoft 365 and Exchange accounts have server-side automatic reply support. Non-Exchange accounts don’t.
For Gmail accounts: log into Gmail directly in your browser, go to Settings > See all settings > General, scroll to Vacation responder, turn it on, set dates and message, and save. This reply runs server-side so it works even when Outlook is closed.
For other IMAP accounts: check your email provider’s webmail interface for an out of office or vacation reply setting. These are handled server-side by your email provider, not by the Outlook app.
Writing an Effective Out of Office Message
The message itself matters as much as the mechanics of setting it up. A good out of office reply in Outlook app should include:
- The dates you’ll be away
- When the sender can expect a response
- An alternative contact for urgent matters (name, email, phone if appropriate)
- Any relevant context (limited phone/email access, time zone differences if traveling internationally)
Keep it brief. Three to five sentences is usually enough. Avoid committing to specific response times you can’t guarantee once you return.
For other productivity settings worth configuring before you go out of office, why is my alarm so quiet iPhone is a practical device setting to check so your return alarm works reliably when you’re back.
Key Takeaways
- To set out of office in Outlook mobile app: tap profile picture > Settings gear > account name > Automatic Replies > toggle on and type your message
- In Outlook for Windows: File > Automatic Replies > Send automatic replies > set date range and message > OK
- In Outlook for Mac: Tools > Automatic Replies > check the box > set dates and message > OK
- In Outlook Web: Settings gear > View all Outlook settings > Mail > Automatic replies > toggle on > save
- Set a specific date range so the reply turns off automatically without requiring a manual disable when you return
- Use separate internal and external messages: colleagues may need different information than external clients
- Gmail and IMAP accounts don’t support Outlook’s Automatic Replies feature: set vacation replies through the email provider’s own web interface instead


