
How to Add Fonts to Windows 10
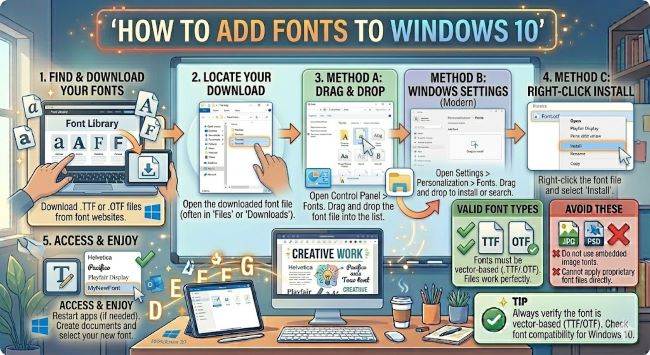
Learn how to add fonts to Windows 10 in three different ways. This step-by-step guide covers installing fonts from files, the Microsoft Store, and the Settings app.
Whether you need a specific typeface for a design project, a document, or just want more options in your creative work, adding fonts to Windows 10 is one of the quickest system tweaks you can make. Once a font is installed on Windows 10, it becomes available in every application on your computer, from Word and Photoshop to PowerPoint and beyond. There are a few ways to do it, and this guide covers all of them so you can pick the one that fits your situation.
Method 1: Install Fonts by Right-Clicking the Font File
This is the fastest and most common method. If you have downloaded a font file from the web, this is where you start.
- Download the font you want. Reliable free sources include Google Fonts, DaFont, and Font Squirrel. The font will usually download as a .zip file.
- Right-click the .zip file and select Extract All to unzip it. Open the extracted folder.
- Inside, you will find one or more font files ending in .ttf (TrueType Font) or .otf (OpenType Font).
- Right-click the font file and choose one of two options:
- Install: Installs the font for your user account only.
- Install for all users: Installs the font system-wide so every user account on the computer can access it. This option requires administrator permissions.
- Windows installs the font in seconds. No restart is needed for most applications to recognize it.
If the font family includes multiple weights (Regular, Bold, Italic, Light, etc.), select all the font files at once, right-click, and install them together. This saves time and ensures the full family is available in your apps.
Method 2: Install Fonts Through Windows 10 Settings
Windows 10 also lets you install fonts directly through the Settings app, which gives you a drag-and-drop option and a central place to manage your installed fonts.
- Open Settings by pressing Windows + I.
- Go to Personalization > Fonts.
- At the top of the Fonts page, you will see a drag-and-drop area labeled Drag and drop to install.
- Open File Explorer, navigate to your downloaded font file, and drag it into that area.
- Windows installs the font automatically.
The Fonts page in Settings also shows every font currently installed on your system, lets you preview them, and allows you to uninstall fonts you no longer need. It is a cleaner way to manage your font library compared to hunting through the system Fonts folder.
Method 3: Get Fonts from the Microsoft Store
Windows 10 connects to the Microsoft Store for additional fonts, including some high-quality options that are free to download.
- Open Settings > Personalization > Fonts.
- Click the link that says Get more fonts in Microsoft Store. This opens the Store directly in the fonts section.
- Browse the available fonts. Many are free, and some are paid.
- Click the font you want and select Get or Install.
- The font downloads and installs automatically. No file handling required.
The Microsoft Store font selection is smaller than what you will find on Google Fonts or DaFont, but the quality is consistent and the installation is seamless.
Where to Find Good Fonts for Windows 10
If you want fonts beyond what the Microsoft Store offers, these are the most reliable free sources:
- Google Fonts (fonts.google.com): Over 1,000 free fonts, all open source and safe for personal and commercial use. Download individual fonts or entire families.
- DaFont (dafont.com): A large community-driven library with strong decorative and display categories. Always check the license before using fonts commercially.
- Font Squirrel (fontsquirrel.com): Curated and free for commercial use. Smaller library than DaFont but higher quality control.
- 1001 Fonts (1001fonts.com): Another large free library with clear license labeling for each font.
For most everyday use, Google Fonts is the best starting point. The fonts are well-made, work across all applications, and carry no licensing complications.
How to Uninstall Fonts in Windows 10
If your font list has grown too large or you want to remove a font you no longer use, the process is straightforward.
- Go to Settings > Personalization > Fonts.
- Click the font family you want to remove.
- On the font detail page, click Uninstall.
- Confirm the removal.
You can also uninstall fonts through the old Fonts folder in the Control Panel. Go to Control Panel > Appearance and Personalization > Fonts, right-click any font, and select Delete.
Troubleshooting: Font Not Showing Up After Installation
If you installed a font but cannot find it in an application, try these steps:
- Close and reopen the application. Most programs read the font list when they launch. A font installed while the app was running will not appear until you restart it.
- Restart your computer. A full restart clears the font cache and resolves most cases where fonts install correctly but do not appear.
- Check that the font installed for all users. If you installed the font only for your user account and the application runs as a different account (such as an admin account), it may not see the font. Reinstall using the Install for all users option.
- Verify the file installed correctly. Go to Settings > Personalization > Fonts and search for the font by name. If it is not listed there, the installation did not complete.
The Short Answer
Adding fonts to Windows 10 takes less than a minute. Download the font file, right-click it, and select Install or Install for all users. The font is then available in every application on your computer. Use the Settings app for a drag-and-drop option and to manage your full font library. If you want more choices, the Microsoft Store has additional fonts you can install without any file handling.
Install it once and it is there across everything you use.