
How to Clean Laptop Fan: A Safe Step-by-Step Guide
A laptop that used to run silently now sounds like it is preparing for takeoff. It gets uncomfortably hot, performance drops during anything demanding, and the fan never spins down. The cause is almost always dust accumulating in the cooling system, leaving the fan unable to move air through a clogged heatsink. It is fixable, taking anywhere from five minutes to an hour.
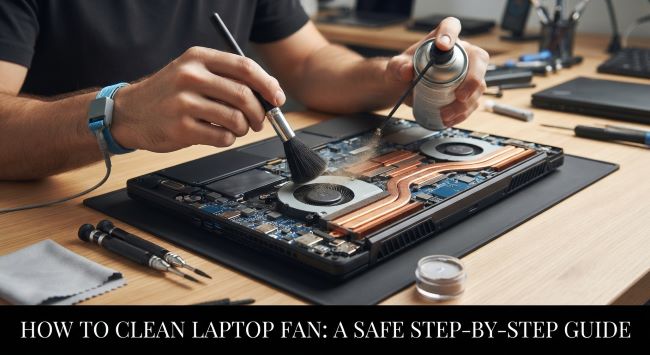
Why It Matters
Laptops pull air through intake vents to cool the processor and graphics chip, and that airflow carries dust with it. Over months and years it builds up on the fan blades and, more importantly, packs into the fine heatsink fins where hot air exits. The consequences are predictable:
- Loud fan noise, as the fan spins faster trying to compensate.
- Higher temperatures, leading to thermal throttling and reduced performance.
- Heat you can feel through the chassis.
- Shorter battery life, since cooling consumes power.
- Potential long-term wear on components running consistently hot.
Knowing how to clean laptop fan assemblies addresses all of these at once, and it is among the highest-value maintenance tasks for an aging machine.
Before You Start
A few precautions apply to every method of how to clean laptop fan components:
- Shut down completely, not sleep or hibernate, and unplug the power adapter.
- Remove the battery if your model has a removable one.
- Work on a hard, flat surface in a well-ventilated area.
- Ground yourself by touching something metal, since static damages components.
- Check your warranty, because opening the case voids it on some machines.
That last point matters. Under warranty, the external method below is safe, but internal disassembly may not be worth the risk.
Method 1: Compressed Air Through the Vents
The simplest approach to how to clean laptop fan assemblies requires no disassembly:
- Identify the vents, typically on the sides, rear, or underside.
- Hold the can upright and use short bursts from a few inches away.
- Hold the fan blades still with a toothpick or plastic tool through the vent.
- Blow through the exhaust vent as well as the intakes, working dust outward.
- Wipe away the dust that emerges.
The fan-holding step is important and widely skipped. Compressed air spins a fan far beyond its designed speed, which can generate damaging voltage or wear the bearing. Keeping the can upright matters too, since tilting releases liquid propellant onto components.
This takes five minutes and often improves things noticeably, though it cannot remove dust genuinely packed into the heatsink fins.
Method 2: Opening the Laptop
For a thorough result, how to clean laptop fan assemblies properly means accessing them directly. This carries more risk but is far more effective:
- Find a guide specific to your model, since layouts vary enormously.
- Remove the bottom panel screws, keeping them organized, as lengths often differ.
- Open the panel with a plastic pry tool rather than metal, working around the edges.
- Disconnect the internal battery if the guide advises it.
- Clean the fan blades with a soft brush, holding them still.
- Clear the heatsink fins, where most blockage lives. You will often find a solid mat of dust that lifts out in one piece.
- Reassemble carefully, reconnecting cables and returning screws to correct positions.
The heatsink fins are the crucial part, since dust compacts there into a felt-like layer that blocks airflow almost completely and no external blowing will remove it.
What to Avoid
Several mistakes cause real damage when learning how to clean laptop fan components:
| Mistake | Consequence |
|---|---|
| Letting the fan spin freely | Bearing wear or component damage |
| Using a household vacuum | Static discharge risk |
| Tilting the compressed air can | Liquid propellant on components |
| Using metal tools to pry | Scratched boards, damaged clips |
| Applying liquid cleaners | Short circuits |
| Forcing panels open | Broken clips and connectors |
| Losing track of screws | Wrong screw lengths damage threads |
The vacuum cleaner point surprises people. Household vacuums can generate static charge, which is exactly what you do not want near circuit boards. If you want suction, anti-static vacuums designed for electronics exist.
How Often to Do It
How to clean laptop fan components often depends on environment. A laptop in a clean home used on desks might need attention yearly, while one in a dusty environment, a home with pets, or frequently on beds and sofas might need it every few months. The practical prompt is the fan itself running loudly during tasks that used to be quiet.
Prevention
Reducing how often you need to think about how to clean laptop fan maintenance is straightforward:
- Use it on hard surfaces, since beds, cushions, and laps block intake vents.
- Consider a laptop stand or cooling pad to improve airflow underneath.
- Do not smoke near it, since residue combines with dust into a sticky film.
- Blow out the vents periodically rather than waiting for symptoms.
- Monitor temperatures with a free utility to notice gradual changes.
When to Get Professional Help
Some situations call for a technician. If opening the case voids your warranty, if the design requires extensive disassembly as many ultrabooks do, if you are not confident inside hardware, if the fan makes grinding noises suggesting mechanical failure, or if temperatures stay high after cleaning, a repair shop is sensible. That last case often means degraded thermal paste, a routine job worth paying for.
The bottom line on how to clean laptop fan systems is that dust in the cooling path is the most common cause of loud fans, high temperatures, and throttled performance, and clearing it is genuinely worthwhile. Start with compressed air through the vents in short bursts, holding the can upright and physically holding the fan blades still so they cannot spin freely. For a proper result, follow a model-specific guide to open the bottom panel and clear the heatsink fins directly, since that is where the real blockage sits. Avoid household vacuums, liquid cleaners, and metal tools, use your laptop on hard surfaces to prevent recurrence, and see a technician for warranty concerns, grinding noises, or temperatures that stay high after cleaning.
Key Takeaways
- Dust accumulating on fan blades and in heatsink fins causes loud fans, high temperatures, and throttled performance.
- Always shut down completely, unplug, remove the battery if possible, and ground yourself before starting.
- Check your warranty first, since opening the case voids it on some machines.
- The simplest method is compressed air through the vents in short bursts from a few inches away.
- Hold the fan blades still with a plastic tool, since free spinning can damage the bearing or generate damaging voltage.
- Keep compressed air cans upright, as tilting releases liquid propellant onto components.
- For thorough cleaning, follow a model-specific guide to open the bottom panel and clear the heatsink fins directly.
- Never use a household vacuum, liquid cleaners, or metal pry tools near internal components.
- Use your laptop on hard surfaces rather than beds or cushions, which block intake vents.
- See a technician for warranty concerns, complex disassembly, grinding noises, or temperatures that stay high after cleaning.