How to Clean Makeup Brushes: The Complete Guide
Clean makeup brushes aren’t just about appearance — dirty brushes accumulate bacteria, old product buildup, and skin cell debris that can contribute to breakouts, uneven makeup application, and reduced brush lifespan if neglected long enough. Understanding the proper cleaning process, what products genuinely work best, and how often you should actually be doing this helps you maintain your brushes effectively without it becoming an overly burdensome routine task.
Why Regular Brush Cleaning Matters
Beyond the hygiene concerns, makeup brushes that aren’t cleaned regularly gradually accumulate old product residue that affects how new makeup applies, often resulting in patchy, uneven, or muddy-looking application compared to a properly cleaned brush. Bacteria and oil buildup on brushes used around the eyes and mouth specifically carry meaningful hygiene concerns, since these areas are particularly susceptible to irritation or infection from accumulated bacteria transferred during makeup application.
Step-by-Step Brush Cleaning Process
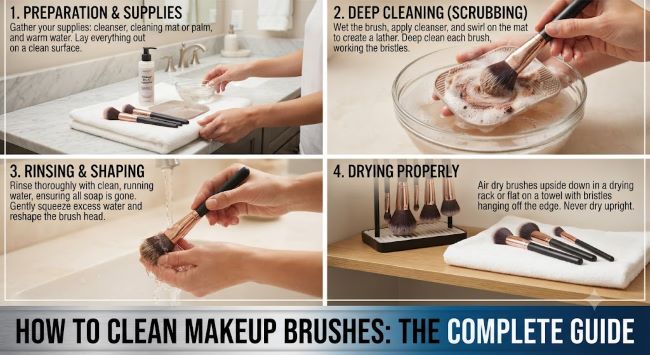
Step 1: Wet the brush bristles under lukewarm running water, holding the brush with bristles pointing downward to avoid water seeping into the ferrule (the metal portion connecting the bristles to the handle) and the glue holding the bristles in place, since water exposure here over time can loosen bristles and shorten your brush’s overall lifespan.
Step 2: Apply a small amount of brush cleanser or gentle shampoo to the wet bristles, either by dipping the brush directly into a cleansing solution or by applying a small amount of cleanser to your palm or a dedicated brush cleaning mat/pad.
Step 3: Gently swirl the brush in circular motions against your palm or a textured cleaning pad, working the cleanser through the bristles to lift away product residue, oil, and accumulated debris, continuing until you see the water running clear rather than colored with old makeup product.
Step 4: Rinse thoroughly under lukewarm running water, again keeping bristles pointed downward, continuing until all cleanser and product residue has been fully rinsed away and the water runs completely clear.
Step 5: Gently squeeze out excess water using a clean towel, reshaping the bristles back into their original form while they’re still damp, since brushes dry into whatever shape they’re left in, making this reshaping step important for maintaining your brush’s proper original shape over repeated cleaning cycles.
Step 6: Lay brushes flat to dry, ideally with the bristle end slightly elevated or hanging over the edge of a counter (rather than standing upright in a cup, which allows water to seep down into the ferrule and handle), allowing air to circulate around the bristles and dry them completely before next use, generally taking several hours to overnight depending on brush size and bristle density.
What Products to Use
Dedicated brush cleansers, formulated specifically for makeup brush cleaning, are widely available and generally provide effective, gentle cleaning without being overly harsh on natural or synthetic bristle materials, making them a reliable default choice for regular brush maintenance.
Gentle baby shampoo is a commonly used and genuinely effective alternative to dedicated brush cleansers, offering similar gentle cleansing properties at typically a lower cost, and is widely recommended by makeup professionals as a reliable, accessible cleaning option.
Mild, fragrance-free dish soap can also work for deeper cleaning, particularly for brushes with heavy product buildup, though using it too frequently or in too concentrated a form can potentially be more drying to brush bristles over time compared to products specifically formulated for this purpose.
Avoid harsh solvents or alcohol-based cleaners for regular deep cleaning, since these can damage bristles, strip natural oils from natural hair brushes specifically, and potentially loosen the glue holding bristles in place over repeated use, even though quick alcohol-based spray cleaners have a legitimate role for fast between-use sanitizing rather than full deep cleaning.
Quick Daily/Between-Use Cleaning
Beyond full deep cleaning, a quick daily or between-use cleaning method helps maintain hygiene and prevent excessive product buildup between your less frequent full cleaning sessions:
Spot cleaning with a brush cleaning spray, specifically formulated quick-dry sprays designed for daily sanitizing, work well for removing surface product and providing some antibacterial benefit without requiring the full wet-cleaning process, making them practical for daily use between full cleanings.
Wiping brushes on a clean towel or specialized cleaning pad after each use, particularly for brushes used with cream or liquid products, helps remove the bulk of product residue immediately rather than letting it dry and harden into the bristles before your next full cleaning session.
How Often Should You Clean Your Makeup Brushes
Brushes used around the eyes (eyeshadow brushes, eyeliner brushes) should generally be cleaned weekly given the sensitivity of the eye area and the genuine hygiene concerns associated with bacteria buildup specifically in this area.
Foundation and complexion brushes, which come into contact with facial skin oils and any active skincare or makeup ingredients more broadly, should also generally be cleaned weekly to maintain both hygiene and proper application quality.
Brushes used less frequently or with powder products specifically (powder blush brushes, bronzer brushes, and similar) can often be cleaned somewhat less frequently, roughly every two weeks, since powder products generally accumulate less bacteria-supporting residue compared to cream or liquid product brushes.
Sponges (like makeup blending sponges) should generally be cleaned even more frequently than brushes, ideally after every single use, given their higher moisture retention and correspondingly greater bacteria growth potential compared to brush bristles specifically.
Extending Your Brush Lifespan
Store brushes properly between uses, ideally upright in a clean holder with bristles facing up (for storage between cleanings, as distinct from the downward-facing drying position recommended during the actual cleaning and drying process specifically) to maintain bristle shape and prevent unnecessary bending or damage.
Avoid sharing brushes with others, both for hygiene reasons and because different people’s skin oils and bacteria profiles can affect how quickly a shared brush accumulates buildup and requires cleaning.
Replace brushes that show genuine signs of wear (shedding bristles, bent or damaged ferrules, persistent odor despite proper cleaning) rather than continuing to use a brush well past its functional lifespan, since even properly maintained brushes don’t last indefinitely.
For locating quality brush cleansers and replacement brushes locally, beauty supply near me covers how to find stores carrying these products. For other quick beauty routine fixes worth knowing alongside proper brush maintenance, how to make your hair not look greasy in 5 minutes covers another fast practical beauty solution, and everything you need to know about Mercadona lip liner 06 covers a specific popular product worth knowing about for your broader makeup routine. If you also wear eyelash extensions and want guidance on safely removing them at home, what is the fastest way to remove eyelash extensions at home covers that related beauty maintenance topic.
Key Takeaways
- Clean makeup brushes by wetting bristles downward, applying a gentle cleanser, swirling in circular motions until water runs clear, rinsing thoroughly, and laying flat to dry rather than standing upright
- Dedicated brush cleansers or gentle baby shampoo are both effective, widely recommended options, while harsh solvents or alcohol-based cleaners should be reserved for quick spot sanitizing rather than regular deep cleaning
- Eye area brushes and foundation/complexion brushes should generally be cleaned weekly given hygiene concerns specific to those use areas, while powder brushes can often be cleaned somewhat less frequently
- Makeup blending sponges should ideally be cleaned after every single use given their higher moisture retention and correspondingly greater bacteria growth potential
- Always reshape bristles while damp and dry brushes flat or bristle-side-down to prevent water seeping into the ferrule, which can loosen bristles and shorten brush lifespan over time
- Quick daily spot cleaning with a sanitizing spray or towel wipe between full cleaning sessions helps maintain hygiene and prevent excessive product buildup
- Replace brushes showing genuine wear signs (shedding, bent ferrules, persistent odor) rather than continuing to use them well past their functional lifespan, even with proper ongoing maintenance