
How to Reset AirPods: Complete Step-by-Step Guide
A factory reset is one of the most reliable troubleshooting steps for AirPods experiencing persistent connection issues, pairing problems, or audio glitches that haven’t resolved through simpler fixes like restarting your device or toggling Bluetooth off and on. Understanding the correct reset process for your specific AirPods model, along with what happens during a reset and how to properly re-pair afterward, helps you resolve these issues without unnecessary frustration.
When You Should Reset Your AirPods
A reset is generally worth attempting when you’re experiencing: AirPods that won’t connect or repeatedly disconnect from your device, one AirPod that’s noticeably quieter or not producing sound at all despite appearing connected, AirPods that show up in your Bluetooth settings but won’t actually play audio, or persistent pairing failures when trying to connect to a new or different device. Before resetting, it’s worth trying simpler troubleshooting first — ensuring your AirPods are charged, restarting your connected device, and toggling Bluetooth off and on — since a full reset, while not destructive, does require completely re-pairing your AirPods afterward, an extra step worth avoiding if a simpler fix resolves your specific issue.
How to Reset AirPods (Standard AirPods, 1st-4th Generation)
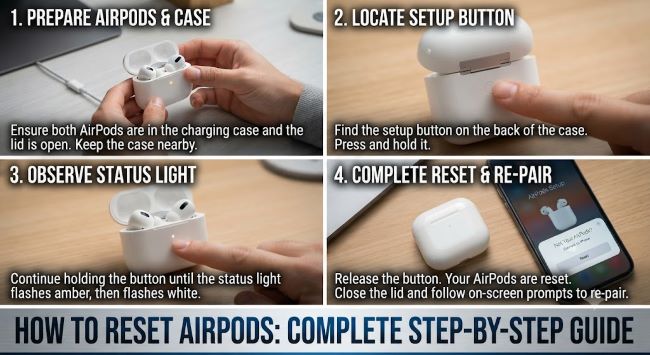
Step 1: Place both AirPods in their charging case, but don’t close the lid yet.
Step 2: On your iPhone or iPad, go to Settings, then Bluetooth, find your AirPods in the device list, and tap the small “i” information icon next to their name.
Step 3: Tap “Forget This Device” and confirm when prompted, which removes the existing pairing connection from your device’s memory.
Step 4: Close the lid of your AirPods charging case and wait approximately 30 seconds.
Step 5: Open the lid again, then press and hold the small setup button on the back of the charging case (a small circular button, distinct from the case’s charging port) for approximately 15 seconds, until the status light on the front of the case flashes amber a few times and then flashes white, indicating the reset has completed successfully.
Step 6: With the case lid still open and the AirPods inside, bring the case close to your iPhone or iPad to trigger the standard pairing setup sequence that appears on your device’s screen, following the on-screen prompts to complete re-pairing.
How to Reset AirPods Pro
The process for AirPods Pro (all generations) follows the same general steps as standard AirPods, with the setup button location being the key consistent element: it’s located on the back of the charging case, and the same press-and-hold-for-15-seconds approach applies, watching for the same amber-then-white status light flashing pattern to confirm the reset completed successfully.
How to Reset AirPods Max
AirPods Max, being a different physical form factor (over-ear headphones rather than earbuds with a compact charging case), have a somewhat different reset process:
Step 1: Forget the AirPods Max from your device’s Bluetooth settings, following the same Settings > Bluetooth > tap the “i” icon > Forget This Device process described above.
Step 2: Press and hold both the noise control button and the Digital Crown simultaneously for approximately 15 seconds, until the status light (located near the Digital Crown) flashes amber and then white, indicating a successful reset.
Step 3: Bring the AirPods Max close to your iPhone or iPad to trigger the pairing setup sequence, following the on-screen prompts to complete re-pairing.
What Happens During a Reset
A reset clears the existing Bluetooth pairing information stored on the AirPods themselves, essentially returning them to a factory-fresh, unpaired state, similar to how they behaved the very first time you took them out of the box. This doesn’t erase or affect any firmware updates your AirPods have received, and it doesn’t damage the hardware in any way — it specifically addresses pairing and connection-related software state, which is exactly why it resolves many persistent connection issues that simpler troubleshooting (restarting your phone, toggling Bluetooth) sometimes can’t fully clear.
Re-Pairing After a Reset
Once reset, your AirPods need to be paired again as if they were brand new, following the standard Apple pairing process: open the case near your unlocked iPhone or iPad with Bluetooth enabled, wait for the pairing animation to appear on your device’s screen, and tap “Connect” to complete setup. If you use your AirPods across multiple Apple devices linked to the same iCloud account (an iPhone and an iPad, for example), Apple’s automatic device switching feature should restore connectivity across your other devices once the AirPods are paired to your primary device again, generally without requiring a fully separate manual pairing process on each additional device.
If Resetting Doesn’t Resolve Your Issue
If a full reset doesn’t resolve persistent problems, particularly issues like one AirPod being noticeably quieter than the other or producing no sound at all, the underlying cause may be a hardware issue (debris blocking the speaker mesh, a failing internal component) rather than a software or pairing problem that a reset can address. For a deeper look specifically at the common causes and fixes for volume imbalance between your two AirPods, why is one AirPod louder than the other covers this specific issue in detail, including troubleshooting steps beyond a standard reset that address this particular symptom.
Resetting AirPods When Switching Owners
A factory reset is also the appropriate step if you’re selling, gifting, or otherwise transferring your AirPods to someone else, since this clears your personal pairing history and ensures the new owner can pair the AirPods cleanly to their own device without any lingering connection to your Apple ID or device history. Following the same reset steps outlined above accomplishes this cleanly, and it’s good practice to complete this step before handing off AirPods to a new owner regardless of the specific reason for the transfer.
It’s worth noting that a standard reset doesn’t remove AirPods from your Find My network history automatically in all cases, so if you’re transferring ownership permanently, also removing the AirPods from your Find My app and your list of devices associated with your Apple ID is a worthwhile additional step beyond just the physical reset process itself.
Key Takeaways
- Reset AirPods when experiencing persistent connection issues, pairing failures, or audio problems that haven’t resolved through simpler troubleshooting like restarting your device or toggling Bluetooth
- For standard AirPods and AirPods Pro, forget the device in Bluetooth settings first, then press and hold the setup button on the back of the charging case for 15 seconds until the status light flashes amber then white
- AirPods Max use a different reset process involving the noise control button and Digital Crown pressed simultaneously for 15 seconds, rather than a dedicated setup button
- A reset clears Bluetooth pairing information specifically, returning your AirPods to a factory-fresh unpaired state without affecting firmware updates or causing any hardware damage
- After resetting, AirPods need to be fully re-paired as if new, though Apple’s automatic device switching should restore connectivity across your other Apple devices linked to the same iCloud account afterward
- If a reset doesn’t resolve your specific issue, particularly volume imbalance between the two AirPods, the underlying cause may be a hardware problem requiring different troubleshooting than a standard reset addresses