
How to Make Sourdough Starter: A Simple Step-by-Step Guide
The remarkable thing about sourdough is that the whole tradition rests on two ingredients: flour and water. No commercial yeast, no special equipment, no purchased culture. Left in a jar and fed regularly, flour and water attract wild yeast and bacteria, and within a week or two you have a living culture capable of raising bread. Here is how to make sourdough starter from scratch, step by step.
What Is a Sourdough Starter?
A sourdough starter is a living culture of wild yeast and lactic acid bacteria maintained in flour and water. The wild yeast produces the carbon dioxide that makes bread rise, while the bacteria produce the acids giving sourdough its tangy flavor. Unlike commercial yeast, a single cultivated strain, a starter is an ecosystem drawn from the flour and surrounding environment. Once established, it can be maintained indefinitely, and some bakers keep cultures going for decades.
What You Need
Learning how to make sourdough starter requires remarkably little:
- Flour. Whole wheat or rye works especially well for starting, since whole grains carry more wild yeast. Switch to all-purpose or bread flour later if you prefer.
- Water. Room temperature. If your tap water is heavily chlorinated, let it sit out a few hours or use filtered.
- A glass jar, large enough to allow significant rise so you can watch the activity.
- A loose cover, since the culture needs airflow and must never be sealed airtight.
- A kitchen scale, since weighing is far more accurate than measuring by volume.
The Day-by-Day Process
Here is the practical process for how to make sourdough starter, which takes roughly one to two weeks depending on temperature.
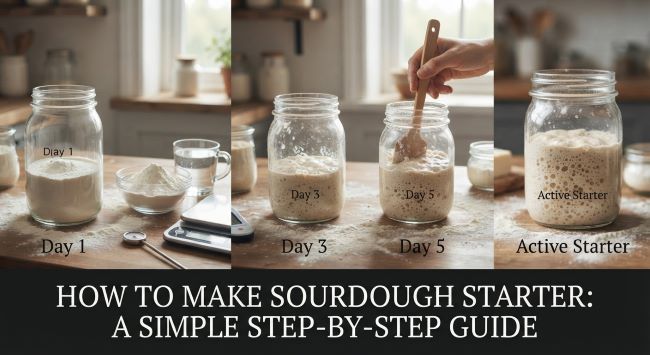
Day 1: Combine equal weights of flour and water in your jar, around 50 grams of each is a good starting point. Stir until no dry flour remains. Cover loosely and leave at room temperature.
Day 2: You may see a few bubbles, or nothing at all. Either is normal. Discard about half the mixture, then feed it with fresh flour and water in equal weights, roughly matching what remains. Stir, cover, and leave.
Days 3 to 5: Continue discarding half and feeding daily. Expect a burst of activity, sometimes with an unpleasant smell, followed by a quiet lull. This is normal, and many beginners abandon a perfectly healthy starter here.
Days 5 to 10: Activity becomes more consistent, and the smell shifts toward pleasantly tangy and yeasty. Move to feeding twice daily as the culture becomes vigorous.
Days 7 to 14: Your starter should reliably double within roughly four to eight hours of feeding. Once consistent, it is ready to bake with.
The discarding step puzzles beginners but is essential. Without it, volume grows unmanageably and the culture becomes too acidic and underfed. The discard can be used in various recipes rather than wasted.
How to Tell When It’s Ready
A key part of how to make sourdough starter is knowing when it is genuinely mature enough to bake with:
| Sign | What It Means |
|---|---|
| Reliably doubles after feeding | Strong, active yeast |
| Predictable timing | Established, stable culture |
| Plenty of bubbles throughout | Healthy fermentation |
| Pleasant tangy, yeasty smell | Good bacterial balance |
| Domed then falling pattern | Normal, vigorous cycle |
The most reliable test is consistency. A single impressive rise is not enough, since young starters often have early activity from bacteria that later die back. You want predictable doubling at roughly the same pace, several feedings in a row.
Troubleshooting Common Problems
Several issues commonly arise when learning how to make sourdough starter:
No activity at all. Usually temperature. Try a warmer spot, allow more time, or switch to whole grain flour.
A dark liquid layer on top. Called hooch, this means the starter is hungry. Stir it in or pour it off and feed more often.
Strong smells early on. Normal in the first days as the microbial population sorts itself out.
Activity that stopped. The classic day three to five lull. Keep feeding.
Pink, orange, or fuzzy growth. The one genuine warning sign. Discard and begin again, since this means contamination.
Patience is the main requirement, and most failures in how to make sourdough starter come from giving up during the normal quiet phase. Keep it warm, use a scale for consistency, mark the jar to track the rise, and never seal it airtight.
Understanding Sourdough Itself
Learning how to make sourdough starter naturally leads to curiosity about sourdough bread more broadly, including common questions about its properties and nutrition. The long fermentation process changes the dough in ways that plain commercial yeast baking does not, which is why sourdough is often discussed differently from other breads. One question that comes up constantly is whether the fermentation makes sourdough suitable for those avoiding gluten, and the guidance in Is Sourdough Bread Gluten Free? addresses that question directly, which is worth reading alongside this since understanding what fermentation does and does not change helps you know what you are actually making once your starter is up and running.
The bottom line on how to make sourdough starter is that it requires only flour, water, a jar, and patience. Combine equal weights of flour and water, then discard about half and feed it fresh flour and water daily, keeping it loosely covered at room temperature. Expect a burst of early activity followed by a quiet lull around days three to five, and keep feeding through it. Within one to two weeks, when your starter reliably doubles within several hours of feeding and smells pleasantly tangy, it is ready to bake with. Maintain it at room temperature for frequent baking or in the fridge with weekly feedings for occasional use, and it can last for years.
Key Takeaways
- A sourdough starter is a living culture of wild yeast and bacteria maintained in flour and water, requiring no commercial yeast.
- You need only flour, water, a glass jar, a loose cover, and ideally a kitchen scale.
- Whole wheat or rye flour works best for starting, since whole grains carry more wild yeast and bacteria.
- Combine equal weights of flour and water, then discard about half and feed fresh flour and water daily.
- Expect early activity followed by a quiet lull around days three to five, which is normal and not a failure.
- The starter is ready when it reliably doubles within four to eight hours of feeding, with a pleasant tangy smell.
- Consistent, predictable doubling over several feedings is a better readiness test than a single impressive rise.
- Maintain it at room temperature with daily feeding, or in the fridge with weekly feeding for occasional baking.
- A dark liquid layer called hooch means it is hungry, but pink, orange, or fuzzy growth means discard and start over.
- Patience matters most, since most failures come from giving up during the normal quiet phase.