
How to Connect an External Monitor to a Laptop: A Complete Guide
Connecting an external monitor to a laptop is one of the most practical upgrades you can make to your workspace. Whether you’re expanding your screen real estate for multitasking, presenting to a group, or using a larger display for creative work, the process is straightforward once you know which ports you’re working with and what settings to adjust. This guide covers every connection type, both Windows and Mac setup, display modes, and the most common problems you’ll run into.
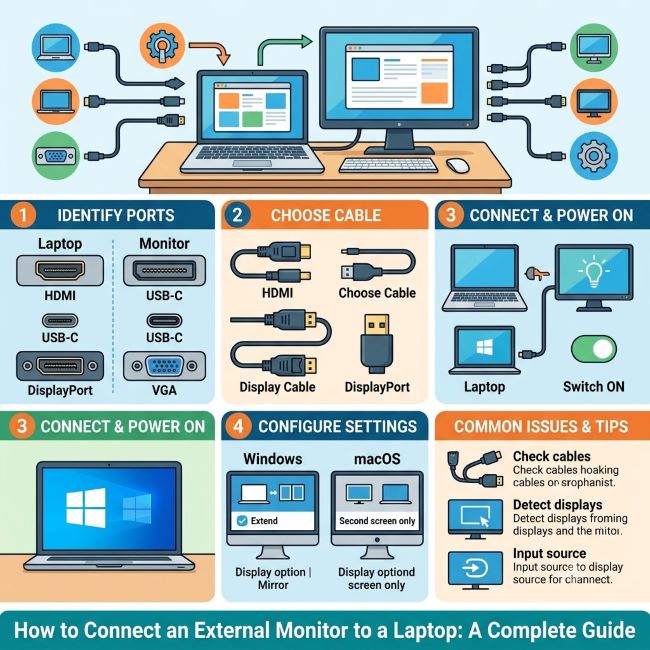
Step 1: Identify Your Laptop’s Output Port
Before anything else, you need to know what video output port your laptop has. This determines which cable or adapter you need to connect an external monitor.
HDMI. The most common port on laptops made in the last decade. Full-size HDMI is a trapezoid-shaped port, about 14mm wide. Mini HDMI and Micro HDMI are smaller variants found on some ultrabooks and older laptops. HDMI carries both video and audio.
DisplayPort. A slightly angled rectangular port, often found on business and gaming laptops alongside or instead of HDMI. Carries high bandwidth video including 4K at high refresh rates. Mini DisplayPort is smaller and was common on older MacBooks and some Windows ultrabooks.
USB-C / Thunderbolt. Many modern thin laptops (and all recent MacBooks) use USB-C ports for video output. Not all USB-C ports carry video: look for a Thunderbolt symbol (lightning bolt) or a DisplayPort symbol next to the port to confirm it supports display output. USB-C with DisplayPort Alt Mode carries video natively. Thunderbolt 3 and 4 ports (which use USB-C connectors) also carry video.
VGA. An older analog connector, trapezoidal with 15 pins in three rows. Still found on some older laptops and business machines. VGA carries video only, no audio, and maxes out at 1080p with reduced clarity compared to digital connections.
Mini DisplayPort (Thunderbolt 1/2). Found on older MacBooks and some Windows machines. Uses the same physical connector as Mini DisplayPort but can carry Thunderbolt signal.
Step 2: Identify Your Monitor’s Input Port
Most external monitors have multiple input options. Match your laptop’s output port to an available input on your monitor:
- HDMI to HDMI: the simplest connection, cable only
- DisplayPort to DisplayPort: similarly direct
- USB-C to USB-C: works when both laptop and monitor support USB-C video
- HDMI to DisplayPort: requires a directional adapter (not all adapters work in both directions)
- USB-C/Thunderbolt to HDMI: requires a USB-C to HDMI adapter or cable
- VGA to VGA: direct connection for older equipment
If your laptop and monitor don’t share a port type, you’ll need an adapter. USB-C to HDMI adapters and dongles are the most commonly needed for modern thin laptops connecting to monitors with only HDMI inputs.
Step 3: Connect the Cable and Power On
Plug one end of the cable into your laptop’s output port and the other into your monitor’s input. Power on the monitor if it’s not already on and select the correct input source on the monitor (usually via a menu button on the monitor itself). Most monitors auto-detect input when a signal is present.
When connecting an external monitor to a laptop for the first time, Windows and Mac both detect the new display automatically within a few seconds. If nothing appears on the external monitor, don’t assume the connection failed: check the display settings before troubleshooting the hardware.
Step 4: Configure Display Settings on Windows
Right-click on the desktop and select Display settings. Windows will show the detected displays as numbered rectangles. If your external monitor isn’t shown, click Detect at the bottom of the Multiple displays section.
Display mode options (Windows):
- Duplicate: shows the same image on both screens. Useful for presentations.
- Extend: treats the two displays as one large workspace. The most useful mode for everyday productivity.
- Second screen only: uses only the external monitor, turns off the laptop display. Useful when the laptop is docked or closed.
- PC screen only: uses only the laptop display, ignores the external monitor.
Switch between these modes quickly with the keyboard shortcut Windows key + P, which opens a sidebar with the four options.
Under display settings, you can also adjust the resolution and refresh rate for the external monitor. Set these to the monitor’s native resolution for the sharpest image. The arrangement of the two display rectangles determines which side you move your mouse off to switch between screens: drag the rectangles to match your physical monitor placement.
Step 5: Configure Display Settings on Mac
On macOS, go to Apple menu > System Settings > Displays (or System Preferences > Displays on older macOS versions). The connected external monitor will appear alongside the built-in display.
Display mode options (Mac):
- Mirror Displays: same content on both screens (equivalent to Duplicate on Windows).
- Use as Separate Display (Extend): the default and most useful mode, treating both displays as one expanded workspace.
To set the external monitor as the primary display (where the menu bar appears), drag the white menu bar rectangle from the built-in display to the external monitor in the arrangement view.
Resolution and refresh rate settings are available per display. Scaled resolutions give you options for how much content fits on screen versus how large elements appear.
Closed-lid mode on Mac: MacBooks can run in clamshell mode with the lid closed, using only the external monitor. To do this, connect the monitor, connect a USB-C power adapter (the laptop must be charging), and close the lid. The laptop will stay awake and drive the external monitor. You’ll need an external keyboard and mouse for this to be practical.
Common Problems and Fixes
No signal on external monitor. Check that the monitor is on the correct input source. Try unplugging and replugging the cable. If using an adapter, try a different adapter or cable. Restart the laptop with the monitor connected.
Blurry or wrong resolution. The monitor may have defaulted to a non-native resolution. Go to display settings and set the resolution to the monitor’s native resolution (listed in the monitor’s manual or on the manufacturer’s website).
External monitor not detected at all. On Windows, use Windows key + P and try switching modes. Go to Display Settings and click Detect. Update your graphics driver through Device Manager. On Mac, hold Option and click Detect Displays in System Settings.
Flickering image. Usually caused by a loose cable connection, a damaged cable, or an incompatible refresh rate setting. Try a different cable first, then check the refresh rate matches what the monitor supports.
Only one USB-C port and need it for charging. A USB-C hub or docking station solves this: it provides HDMI output and pass-through charging from a single USB-C connection to the laptop.
For other technical setup guides that help you get more out of your devices, how to freeze a row in Excel is another common productivity setup step that pairs well with a larger monitor workspace.
Key Takeaways
- Identify your laptop’s video output port (HDMI, DisplayPort, USB-C/Thunderbolt, VGA) before buying cables or adapters
- Not all USB-C ports carry video: look for a Thunderbolt or DisplayPort symbol next to the port to confirm display output capability
- Connect the cable, power on the monitor, select the correct input on the monitor, and Windows or Mac will detect the display automatically within a few seconds
- On Windows, use Windows key + P to quickly switch between Duplicate, Extend, Second screen only, and PC screen only modes
- On Mac, go to System Settings > Displays to configure arrangement, mirroring, and resolution
- Always set the external monitor to its native resolution for the sharpest image: defaulting to a lower resolution is the most common cause of blurry output
- A USB-C hub or docking station solves the single-port problem on thin laptops, providing HDMI output and simultaneous charging


