
Cannot Verify Server Identity: Fix SSL Certificate Errors on iPhone and Mac
Your iPhone tries to send an email. A pop-up appears with an ominous message: “Cannot verify server identity.” Your heart sinks. Has someone hacked your account? Is your data at risk? You sit there staring at the error, unsure whether to proceed or panic. The truth is simpler than you think. Cannot verify server identity is Apple’s strict security system telling you something isn’t quite right with your email server’s certificate. It’s not necessarily a cyberattack. It’s not your fault. It’s a certificate verification issue that you can fix.
This error appears on iPhones, iPads, Macs, and even Windows Outlook. It frustrates millions of users yearly. The good news is that cannot verify server identity is almost always fixable with straightforward steps. Understanding what triggers this error and how to resolve it saves you time and stress.
What Does Cannot Verify Server Identity Mean
When you see the “cannot verify server identity” error, your device is doing exactly what it should. Your iPhone or Mac is checking the SSL certificate of the mail server you’re trying to connect to. SSL stands for Secure Sockets Layer. It’s a digital certificate that authenticates a website or server’s identity and creates an encrypted connection.
Apple devices are particularly strict about security verification. When your device detects even minor certificate issues, it blocks the connection and warns you. This protective behavior has prevented countless security breaches, but it also means legitimate certificate problems trigger these warnings.
Common Reasons for Cannot Verify Server Identity:
- Expired SSL certificate on the mail server
- Certificate domain mismatch where the certificate doesn’t match the server hostname
- Incorrect server hostname in your email settings
- Outdated cached certificates stored on your device
- Wrong IMAP or SMTP ports configured in your email account
- Date and time set incorrectly on your device
- Self-signed certificates not installed on your device
- VPN or network interference disrupting certificate validation
- Calendar subscription with an expired SSL certificate
The error doesn’t automatically mean you have a security breach. It often means your email settings have become outdated or misconfigured. Sometimes the mail server administrator renewed the SSL certificate and your device hasn’t updated yet.
Quick Fixes to Try First
Before diving into complex solutions, try these quick fixes. Many users resolve the issue within minutes using these simple steps.
Immediate Quick Fixes:
- Restart your device to clear temporary glitches and software conflicts
- Close and reopen your Mail app to refresh the connection
- Toggle airplane mode on for 10 seconds, then off again to reset network connections
- Switch between WiFi and cellular data to see if network type matters
- Update iOS or macOS to the latest version for bug fixes
- Check your date and time settings ensure they’re set to automatic
Restart Your Device:
The simplest fix often works best. Restarting your iPhone, iPad, or Mac clears temporary software glitches and resets SSL certificate validation processes. Power off completely, wait 30 seconds, then power back on. Try sending or receiving email again.
Toggle Airplane Mode:
This trick forces your device to completely disconnect and reconnect to networks. Turn Airplane Mode on through Settings or Control Center. Wait 10 seconds. Turn it off. This refresh sometimes resolves certificate verification issues without more drastic steps.
Update Your Operating System:
Pending software updates sometimes cause cannot verify server identity errors. Apple regularly releases updates fixing security and certificate validation bugs. Go to Settings on iPhone or System Settings on Mac and check for available updates. Install any pending updates immediately.
Remove and Re-Add Your Email Account
Apple’s primary recommendation for persistent cannot verify server identity errors is removing and re-adding your email account. This forces your device to re-establish the connection fresh and re-validate the SSL certificate.
Steps to Remove and Re-Add Email:
- Open Settings on your iPhone or Mail on your Mac
- Navigate to Passwords & Accounts (iPhone) or Accounts (Mac)
- Select the problematic email account from the list
- Tap or click Delete Account and confirm removal
- Wait a few seconds before proceeding
- Add the account again by tapping Add Account
- Enter your email and password when prompted
- Verify server details match exactly
When re-adding your account, ensure you use correct server hostnames. Common examples include:
- Gmail: imap.gmail.com and smtp.gmail.com
- Outlook/Hotmail: imap-mail.outlook.com and smtp-mail.outlook.com
- iCloud: imap.mail.me.com and smtp.mail.me.com
Critical Port Numbers:
- IMAP incoming: 993 (secure)
- POP incoming: 995 (secure)
- SMTP outgoing: 465 or 587 (secure)
Using incorrect ports causes connection failures and SSL certificate errors. When re-adding your account, verify the port numbers match your email provider’s requirements.
Fix Incorrect Date and Time Settings
An overlooked culprit for cannot verify server identity errors is incorrect date and time settings. Your device validates SSL certificates partially through time verification. If your clock is wrong, certificate validation fails.
Correct Date and Time Settings:
- Open Settings on your iPhone
- Go to General then Date & Time
- Toggle on Set Automatically to let your device auto-sync
- Restart your device after changing settings
- Try sending or receiving email again
On Mac, check System Settings in the same locations. Enable Automatic date and time to let the system handle synchronization.
Check Calendar Subscription Issues
Persistent cannot verify server identity pop-ups sometimes come from Calendar subscriptions rather than Mail. A subscribed calendar might have an expired SSL certificate causing repeated warnings.
Fix Calendar Subscription Issues:
- Open Settings on your iPhone
- Navigate to Calendar then Accounts
- Check subscribed calendars for any with issues
- Toggle off Use SSL for problematic calendars
- Or select Delete Account to remove the subscription entirely
If you use Google Calendar subscriptions, check your subscription list carefully. Some subscriptions automatically sync with SSL certificates, and expired certificates trigger warnings.
Disable SSL if Necessary
As a temporary measure, you can disable SSL for problem email accounts. This removes the encryption but allows email to flow. This option is less secure, so only use it as a short-term solution while you resolve the underlying certificate issue.
Disable SSL on iPhone:
- Go to Settings then Mail
- Select Passwords & Accounts
- Choose the problematic account
- Tap Account then Advanced
- Toggle off Use SSL
- Make sure ports are correct for non-SSL connections
On Mac Mail, access the same settings through Preferences then Accounts. Click Server Settings and toggle off Use SSL.
Reset Network Settings
Persistent cannot verify server identity errors sometimes stem from network configuration issues. Resetting network settings forces your device to reconfigure all network connections from scratch.
Reset Network Settings on iPhone:
- Open Settings
- Go to General
- Tap Transfer or Reset iPhone
- Select Reset
- Choose Reset Network Settings
- Enter your passcode to confirm
- Device restarts automatically
This removes all saved WiFi networks and passwords, so have those ready before proceeding. Your device maintains cellular settings, so mobile data continues working.
Clear Cached Certificates and Browser Data
Cached certificate data sometimes becomes corrupted or outdated. Clearing your browser cache and resetting certificates can resolve cannot verify server identity errors.
Clear Safari Data on iPhone:
- Open Settings
- Scroll to Safari
- Tap Clear History and Website Data
- Confirm deletion
On Mac, delete cached certificates through Keychain Access. Open Finder, navigate to Applications > Utilities > Keychain Access. Search for certificates related to your mail server and delete outdated ones.
Contact Your Email Provider
If none of these solutions work, your email provider’s server side might have legitimate certificate issues. Contact your hosting provider or email service to ask about recent SSL certificate changes or renewals.
Information to Provide Your Email Provider:
- The exact error message you’re receiving
- Your server hostname (not your email address)
- The date SSL certificate was last renewed
- What devices are experiencing the error
- Operating system versions on affected devices
Many providers can directly resolve issues by pushing certificate updates or confirming your hostname matches the certificate exactly.
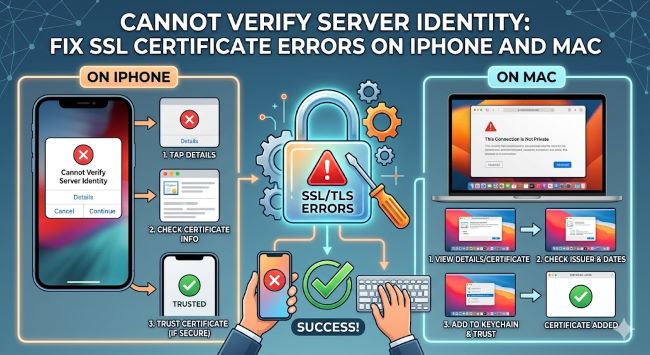
Verify Certificate Details on Mac
Mac users can inspect certificate details directly through Safari. This tells you exactly what the problem is and if the certificate is actually trustworthy.
Check Certificate on Mac:
- Open Safari
- Visit your mail server URL (e.g., https://mail.yourdomain.com)
- Click the padlock icon in the address bar
- Review certificate details for expiration dates and hostname matching
- Contact your provider if the certificate is expired or mismatched
This inspection doesn’t fix the issue but provides concrete information to share with your email provider.
When to Use the Trust Button
When re-adding your email account, you might see a certificate error with a Trust button in the details view. Clicking Trust tells your device to accept the certificate despite the warning.
Use the Trust button only if:
- You just re-added the account and recognize the server
- Your email provider confirmed they renewed the certificate
- The certificate hostname matches your provider’s domain
Don’t use the Trust button if you don’t recognize the server or feel uncomfortable with the connection.
Understanding Self-Signed Certificates
Some mail servers use self-signed certificates that aren’t issued by recognized certificate authorities. iPhones and Macs initially reject these certificates by default. If you use a self-signed certificate, you need to manually install it on your device.
Install Self-Signed Certificate on iPhone:
- On your Mac, export the certificate as a .pem file
- Email the file to yourself
- On iPhone, open the email with the attached certificate
- Tap the certificate to open an install profile
- Tap Install and confirm
- Restart Mail to register the installed certificate
This process trusts the self-signed certificate on your device specifically.
Key Takeaways
- Cannot verify server identity is an SSL certificate verification error that appears when your device can’t confirm the mail server’s identity.
- The error is usually not a cyberattack but rather an outdated certificate, misconfigured settings, or hostname mismatch.
- Quick fixes like restarting your device, toggling airplane mode, or updating your operating system resolve many instances.
- Removing and re-adding your email account forces your device to re-validate the SSL certificate and resolve most issues.
- Incorrect date and time settings prevent proper certificate validation. Enable automatic date and time synchronization.
- Calendar subscription issues with expired SSL certificates can cause repeated cannot verify server identity warnings.
- Disabling SSL is a temporary measure only. Address the underlying certificate issue rather than disabling security.
- Resetting network settings clears configuration issues but removes saved WiFi passwords.
- Contact your email provider if the error persists after trying all solutions. The certificate issue might require server-side fixes.
- Trust buttons during account setup let you approve certificates after verification.


