
How to Add Fonts to DaVinci Resolve
Learn how to add fonts to DaVinci Resolve on Windows and Mac. This step-by-step guide covers installing system fonts so they appear in Resolve’s text tools instantly.
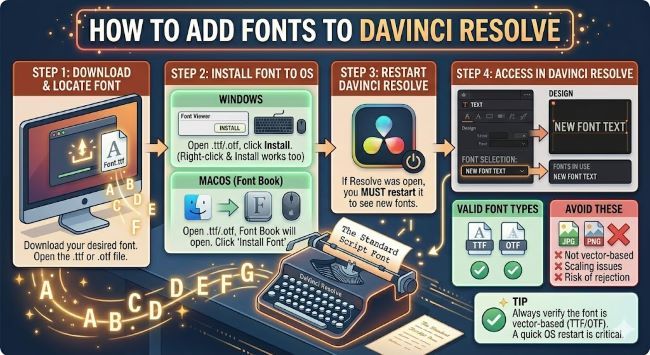
DaVinci Resolve is one of the most capable video editing tools available, but its font system can catch new users off guard. If you have tried to use a custom font in a title or text+ layer and could not find it anywhere inside the app, you are not alone. Adding fonts to DaVinci Resolve is not done inside the software itself. It is done at the operating system level, and once you understand that, the whole process takes about two minutes.
This guide walks you through exactly how to do it on both Windows and Mac.
How to Embed Fonts in PowerPoint
Learn how to embed fonts in PowerPoint so your presentation looks exactly the same on any device. A step-by-step guide for Windows and Mac users.
How DaVinci Resolve Handles Fonts
DaVinci Resolve does not have its own internal font manager. Instead, it reads directly from the fonts installed on your computer. Whatever fonts your system has, Resolve can use. Whatever fonts are missing from your system, Resolve cannot access, no matter what you do inside the app.
This means the process of adding fonts to DaVinci Resolve is really just the process of installing fonts on your computer, then restarting Resolve so it picks them up.
How to Add Fonts to DaVinci Resolve on Windows
- Find the font you want to use. Free sources include Google Fonts, DaFont, and Font Squirrel. Download the font file. It will usually arrive as a .zip folder.
- Unzip the downloaded folder by right-clicking it and selecting Extract All.
- Open the extracted folder and locate the font file. It will have a .ttf (TrueType Font) or .otf (OpenType Font) extension.
- Right-click the font file and select Install to install it for your user account, or Install for all users to make it available to everyone on the machine.
- Close DaVinci Resolve completely if it is already running.
- Reopen DaVinci Resolve.
- Open a project and add a Text+ or Fusion title layer.
- In the font dropdown inside the Inspector or Fusion panel, search for your newly installed font by name.
It should appear in the list. If it does not, restart your computer and try again. Resolve reads the font list when it launches, so fonts installed while it is running will not show up until you restart.
How to Add Fonts to DaVinci Resolve on Mac
The process on Mac is nearly identical, just with slightly different steps for the installation.
- Download the font file from your chosen source.
- Unzip the downloaded file by double-clicking it.
- Locate the .ttf or .otf file inside the unzipped folder.
- Double-click the font file. A preview window opens showing the font’s characters.
- Click Install Font in the bottom right corner of the preview window.
- The font installs to your Mac’s Font Book.
- Quit DaVinci Resolve completely.
- Reopen Resolve and navigate to your text or title tools. The font will now be available in the font picker.
If you want to install multiple fonts at once, you can select them all in Finder, right-click, and choose Open With > Font Book. Font Book lets you install them all in one step.
Where to Find Good Fonts for Video Work
Not every font looks great in video. Thin, delicate typefaces can flicker or look soft on screen, especially on lower resolution exports. Here are reliable sources with fonts that tend to hold up well in motion graphics:
- Designbeep (free fonts): Free, well-tested, and extensive. Many of the fonts used in professional YouTube videos and short films come from here.
- DaFont (dafont.com): A large library with filters for style and license. Pay attention to the license if you are using fonts for commercial projects.
- Font Squirrel (fontsquirrel.com): Free for commercial use, with a quality filter that keeps the library tighter than DaFont.
- Adobe Fonts: If you have a Creative Cloud subscription, you have access to thousands of professional fonts that install directly through the Creative Cloud app and show up in Resolve automatically.
For titles and lower thirds, bold and semi-bold weights tend to read better on screen than regular or light weights. Test your font at your actual export resolution before committing to it across a full project.
Troubleshooting: Font Not Showing Up in DaVinci Resolve
If you installed a font and it is still not appearing in Resolve, work through these steps:
- Fully close and reopen Resolve. Clicking the X is not always enough on some systems. Use Task Manager on Windows or Activity Monitor on Mac to confirm Resolve is not still running in the background.
- Restart your computer. This forces a full font cache refresh on both Windows and Mac.
- Check where the font installed. On Windows, installed fonts live in C:/Windows/Fonts. Confirm your font appears there.
- Try a different font file. Some downloaded font files are corrupted or in a format Resolve does not support. Download a fresh copy and try again.
- Check for duplicate fonts. If you have two versions of the same font installed, conflicts can sometimes cause display issues. Remove duplicates through Font Book on Mac or the Fonts folder on Windows.
The Bottom Line
Adding fonts to DaVinci Resolve comes down to one thing: install the font on your operating system, then restart Resolve. The app reads your system fonts on launch, so anything installed on your computer becomes available inside Resolve automatically.
Download the font, install it, restart the app, and it will be there waiting for you in the font picker. From that point, it works like any other font in your library.


