
When designing for digital media, what you see is what you get. Your final design represents the actual final product. However, when you design for print media, your final design still has to be printed onto a physical medium, which means there is always a chance for distortion between your intended final design and the actual final product.
To ensure the best quality in your print media, you have to figure out which imprint method is right for your design. Knowing the benefits and limitations of the most popular printing processes makes it easier for you to design with print in mind.
4-Color Process
 If you’ve ever printed something from your home or office printer, then you already know a thing or two about 4-color process and the kind of results you can achieve with it. 4-color process uses a mixture of cyan, magenta, yellow and black inks to reproduce photographs and pictures in full color. If you want your final product to feature color photography, you will have to use this printing method in some capacity.
4-color process inks are not pre-mixed before printing begins. Instead they are applied in different measures during the printing process itself. Due to the nature of the procedure, white tones are created from the stock of the paper; therefore, using 4-color process on colored stock will create color distortion. Any area of your design that is supposed to look white will instead take on the color of the stock.
Color limitations in 4-color process
There are also some color limitations to using 4-color process, as not every tone is possible through the mixture of CMYK tones. This color distortion will not be as noticeable in a color photograph as it will in an illustration or graphic, which is why 4-color process is not always a strong choice for branding purposes. There are also a number of colors that cannot be accurately reproduced in 4-color process, including:
- Orange
- Dark blue
- Navy
- Silver/metallic tones
Fluorescent tones
Be sure to convert your design files from RGB mode to CMYK before printing with this process. Doing so will allow you to see how the printed colors will look and gives you the freedom to tweak any distorted color tones before sending it to the printer. If you fail to do so, your printer will have to make the conversion for you, which could result in a final product that is not to your liking.
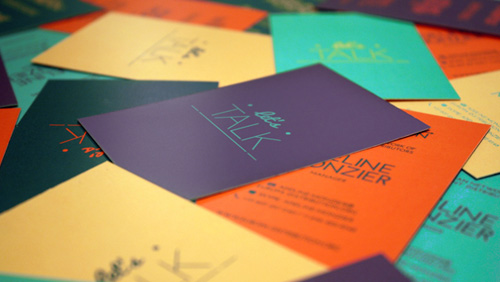
PMS Printing
 PMS printing (which stands for Pantone Matching System) utilizes an ink standardization system which ensures you will always get the exact tone you want when printing in color. PMS inks are pre-mixed, so a greater degree of control is possible. They can also accurately reproduce many of the colors that 4-color process cannot, such as fluorescents and dark blues.
Metallic colors such as silver, gold, and bronze are difficult to reproduce using 4-color process. However, with metallic PMS ink, not only is it possible to accurately reproduce these colors, you get the added reflective appearance of actual metal. This is due to the fact that actual metal shavings are added to the mixture, allowing the ink to catch the light.
The downside to this method is the limitation in how many colors you can feasibly add to any product. Each time a new PMS color is added to your print job, it has to be re-run through the printer which increases the cost. The more layers of ink you add, the more weight you add to the stock; too much ink can cause cracks to appear over time.
The magic number for PMS printing is three—that is, three layers of ink. Anything more and you risk running into issues with quality, not to mention an increase in the price of your print job. Fortunately, one color of PMS ink can be used in different densities to create a variety of tones. This makes PMS ink the perfect choice for reproducing black-and-white photos or monochromatic designs as the colors will be richer than with 4-color process.
PMS Spot Printing
 The spot printing process allows you to add PMS ink to select areas of your design, which gives you the ability to overcome the limitations of both 4-color process and PMS printing. You can print a design with color photography but still have color-accuracy in your branded design elements through the use of PMS spot printing. You can also spot print with metallic PMS inks, which allows you to add subtle reflective areas to your design.
Like any PMS print job, you want to stay within the limitations of three layers of ink, or else risk a loss of quality. Likewise, keep in mind that any time you add a new layer of ink (whether spot printed or otherwise), the price of your final product will increase.
Embossing
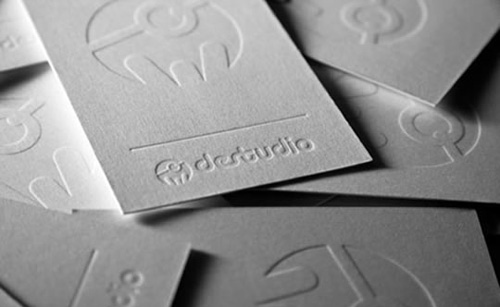
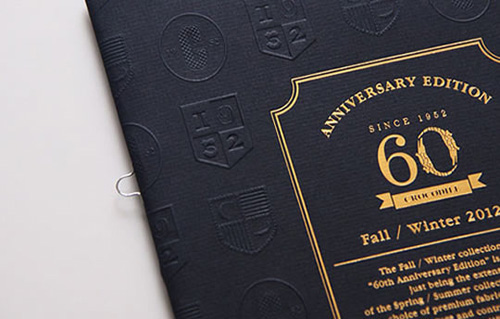 Many digital designers are so used to stimulating their audience’s eyes, they fail to remember that printed products are physical items that are meant to be touched. Embossing is a printing process that uses heat and pressure to imprint a raised textural design directly into the stock. If you’ve ever felt a watermark on an official document, then you’ve come into contact with embossing.
From a design perspective, the embossing process provides several avenues to explore. Blind embossing is the act of using only embossed elements on a design without any ink or other imprint method. This creates a subtle, stylish effect and really pairs well with a stock that has thick fibers.
Embossing can also be used in tandem with other imprint methods to create raised areas of a design. For example, you can emboss just the logo to make it stand out over your other design elements, or you might emboss a section of a photograph to create a 3-D effect.
Debossing
The effect still begs to be touched, much like embossing, but it creates a different visual than embossing. Debossing pulls the viewer into the design, inviting them to be a part of it. This can be especially effective for the cover of print media like folders or brochures because it encourages the viewer to open up the media and see what’s inside.
Sculptured Embossing
This technique actually lets you use embossing and debossing in coordination with one another, so you could have a design element where some parts pop out while others sink into the stock. The effect of varying depths and heights helps to give your embossed elements even more dimension.
Foil Stamping
 The foil stamping process also uses heat and pressure in lieu of ink, but instead of creating a design in the physical texture of the stock, a layer of foil is added. This allows foil stamping to be used with any color stock without distortion. In fact, foil stamping often looks best when paired with a darker colored stock as opposed to plain white and there are a few different options to choose from.
Foil stamping is often used along with other imprint methods so that certain design elements stand out, especially embossed graphics. Adding foil to embossing creates an effect that not only looks like it’s popping off the page, but has a unique texture that makes it feel like a different material from the paper stock.
Types of Foils
There are a number of different foils available, so be sure to talk to your printer about what your options might be. A few common examples include:
Metallic – Foils that take on the property of metals, creating a highly reflective, shiny effect.
Non-Metallic – Richly colored foils that are shiny and smooth without appearing metallic.
Holographic – Reflective foils that create three-dimensional optical illusions.
Special Effect – An ever-growing category of unique foils with effects like diffractions, sparkles, pearlescence and more.
Conclusion
If you are having a problem picking the right prinitng process for your particular design, remember that all of these processes pair well with one another, so feel free to use as many or as few as you like. Let the design itself decide which printing process is going to work best. Your printer will know which printing methods will be most compatible with your design and which ones will cause issues for your print job, so be sure to consult with them before making any final decisions.


