
How to Replace Windshield Wipers
Worn wiper blades are easy to ignore until the first heavy rain. Then they streak, squeak, and leave a blurry film right where you need to see. New blades cost little and take minutes to install. Once you learn how to replace windshield wipers, you can skip the service counter and do the job in your driveway with no tools.
This guide explains when to change your blades, how to find the right size, and how to swap them on each common type of wiper arm. It also covers rear wipers, refill inserts, blade types, care tips, and fixes for common problems.
Signs You Need New Wiper Blades
- Streaks or bands of water left behind
- Skipping or chattering across the glass
- Squeaking with each pass
- Smearing that blurs your view
- Cracked, split, or torn rubber
- A blade edge that feels hard or rounded
- A bent or corroded frame
- Rubber pulling away from the blade
Most makers suggest new blades every 6 to 12 months. Hot sun, ice, road salt, and dust all shorten their life. A good habit is to check them each time you fill the washer fluid.
What You Need
- Two new wiper blades in the correct sizes
- A soft towel or a folded piece of cardboard
- Glass cleaner and a clean cloth
- Rubbing alcohol
- A small flathead screwdriver, for stubborn clips
- Your owner’s manual
Part of the appeal of learning how to replace windshield wipers is the short list. Most blades install by hand. The screwdriver is only a helper.
Step 1: Find the Right Size
Driver and passenger blades are often different lengths. Many cars use a longer blade on the driver side. Blade lengths are listed in inches, and most fall between 12 and 28 inches.
Find your sizes in one of these ways.
- Check the owner’s manual. Look in the maintenance or specifications section.
- Use a store lookup. Auto parts stores have a book or kiosk in the wiper aisle, and their websites let you enter the year, make, and model.
- Measure the old blades. Measure each blade from end to end and round to the nearest inch.
- Ask at the counter. Staff can look up the fit.
Write both sizes down. Buy the exact length. A blade that is too long can hit the windshield frame or the other blade. One that is too short leaves part of the glass unwiped.
Step 2: Identify Your Wiper Arm Connector
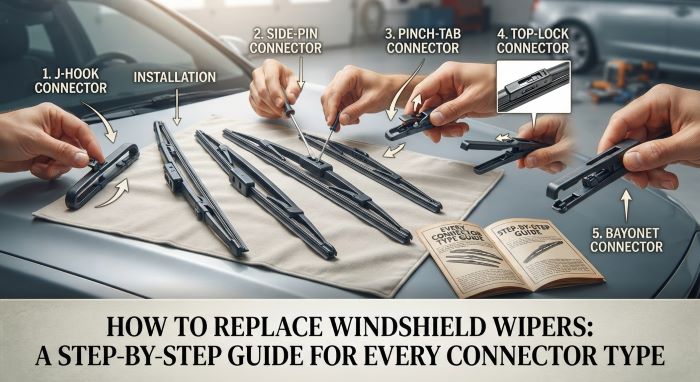
The connector is how the blade attaches to the metal arm. Look at the point where they meet.
| Connector Type | What It Looks Like | Common On |
|---|---|---|
| J-hook or U-hook | The arm ends in a curved hook | Most older and many current cars and trucks |
| Side pin | A small pin sticks out from the side of the arm | Some European and domestic models |
| Bayonet | A flat, narrow arm that slides into the blade | Older vehicles and some imports |
| Pinch tab | Two tabs that squeeze together at the joint | Many newer European and domestic cars |
| Push button or top lock | A button or square on top of the joint | Many newer vehicles |
| Side lock | A hinged cap locks over a side post | Some newer models |
Most blades sold today come with several adapters in the package to fit different arms. Read the fit chart on the box, and keep the instructions.
Step 3: Protect the Windshield
Wiper arms are spring loaded. If a bare metal arm snaps back, it can chip or crack the glass.
Lay a thick towel or a piece of cardboard on the windshield under the arm before you begin. Work on one side at a time, and leave the other blade in place as a reference.
Step 4: Lift the Wiper Arm
Pull the arm away from the glass until it stays upright by itself.
Some vehicles tuck the wipers under the edge of the hood, so the arms cannot lift. These cars have a service position. The method varies, but a common one is to switch the ignition off and then push the wiper stalk up or down within a few seconds. The wipers move to the middle of the glass and stop. Check your manual for the steps on your model.
Step 5: Remove the Old Blade
Hook Arm
- Turn the blade so it sits at a right angle to the arm.
- Find the small tab on the underside, where the blade meets the hook.
- Press or lift the tab.
- Slide the blade down toward the base of the arm, away from the hook’s curve.
- Unhook it and pull it free.
- Lower the arm gently onto the towel.
Side Pin Arm
- Lift the blade away from the arm slightly.
- Press the release tab, if there is one.
- Pull the blade sideways off the pin.
Bayonet Arm
- Find the release tab or small hole on the connector.
- Press the tab, or lift it with a small screwdriver.
- Slide the blade straight off the end of the arm.
Pinch Tab Arm
- Squeeze the two tabs on the sides of the connector.
- Pull the blade down and away from the arm.
Push Button Arm
- Press the button on top of the connector.
- Slide the blade off the arm.
Take a photo before you remove the old blade. It is the best guide for fitting the new one.
Step 6: Install the New Blade
Check that you have the correct blade for that side. Then follow the removal steps in reverse.
For a hook arm:
- Fit the adapter to the blade if it is not already attached.
- Hold the blade at a right angle to the arm.
- Pass the hook over the adapter.
- Pull the blade up into the curve of the hook until it clicks.
- Tug gently to make sure it is locked.
For other arms: Line up the pin, tabs, or slot, and push until you hear or feel a click. Close any locking cap.
Remove the plastic guard from the rubber edge of the new blade. Many people forget this step and wonder why the new blades smear.
Lower the arm slowly onto the glass. Never let it drop.
Step 7: Repeat and Test
Do the same on the other side. Then:
- Clean the windshield with glass cleaner.
- Spray washer fluid and run the wipers.
- Watch for smooth, quiet, full contact.
- Make sure the blades do not hit each other or the trim.
- Tug each blade once more to confirm it is secure.
That is the full process for how to replace windshield wipers on most vehicles.
How to Replace a Rear Wiper
Hatchbacks, wagons, and SUVs often have a rear wiper. It usually takes a shorter, vehicle-specific blade.
- Lift the rear arm away from the glass. Some have a plastic cover at the base that flips up first.
- Rotate the blade until it unclips from the arm. On many models, you pivot the blade past its normal angle, and it pops off the pin.
- Snap the new blade onto the pin or hook.
- Lower the arm and test it.
Rear blades wear more slowly, but dust and grit collect on the back glass, so check them twice a year.
Replacing Only the Rubber Refill
Some blades let you replace just the rubber insert. This costs less and creates less waste. It is common on vehicles from makers such as Toyota and Honda.
- Remove the blade from the arm.
- Find the locking end of the rubber insert.
- Squeeze or pull that end free of its clip.
- Slide the old rubber out of the frame.
- Move the thin metal strips to the new insert if they are not included.
- Slide the new insert through each claw of the frame.
- Lock the end in place.
Refills take more patience than a full blade swap. If the frame is bent or rusted, replace the whole blade.
Types of Wiper Blades
| Type | Design | Pros | Cons | Typical Price Each |
|---|---|---|---|---|
| Conventional | Metal frame with several pressure points | Cheapest, widely available | Frame can ice up, uneven pressure with age | $8 to $15 |
| Beam | One-piece curved blade with no outer frame | Even pressure, good in snow and at speed, longer life | Costs more | $15 to $30 |
| Hybrid | Frame covered by a plastic shell | Good pressure and airflow, sturdy | Mid to high price | $15 to $25 |
| Winter | Frame sealed in a rubber boot | Resists ice and snow buildup | Heavier, best used seasonally | $12 to $25 |
| Silicone | Silicone wiping edge | Long life, leaves a water-repellent film | Highest price | $20 to $35 |
Prices are rough guides and vary by brand and size. If your car came with beam blades, replace them with beam blades. The arm pressure is set for that design.
How to Make Wiper Blades Last Longer
- Clean the blades monthly. Wipe the rubber edge with a cloth dampened with rubbing alcohol or washer fluid.
- Keep the windshield clean. Dirt, sap, and bug residue grind down the rubber.
- Never run wipers on dry glass. Use washer fluid first.
- Do not use wipers to clear ice. Scrape the glass, and free the blades by hand.
- Lift the blades before a snowstorm, unless high winds are expected.
- Park in shade or a garage. Sun dries and cracks rubber.
- Top up washer fluid. Use a winter blend in cold climates. Do not use plain water, which can freeze.
- Replace both blades together. They wear at the same rate.
Troubleshooting
| Problem | Likely Cause | Fix |
|---|---|---|
| New blades streak | Dirty glass or a film on the blade | Clean the glass and wipe the blade with alcohol |
| Chattering or skipping | Wax or water repellent on the glass, or a bent arm | Clean the glass well. Have the arm angle checked |
| Blade misses a section | Wrong size or weak arm spring | Confirm the size. Replace the arm if the spring is weak |
| Blade will not click in | Wrong adapter | Try another adapter from the package |
| Blades hit each other | A blade is too long | Check the sizes for each side |
| Squeaking | Dry glass or a hard rubber edge | Use washer fluid. Replace old blades |
| Blade comes loose | Not fully locked | Remove and reinstall until it clicks |
| Smearing in one direction | Blade edge has taken a set | Replace the blade |
If new blades do not fix the problem, the arm may be bent or its spring may be weak. A shop can check and replace the arm.
Common Mistakes to Avoid
First-timers who look up how to replace windshield wipers tend to make the same few slips.
- Letting a bare arm snap back onto the glass
- Buying the wrong length
- Mixing up the driver and passenger blades
- Leaving the protective strip on the rubber
- Forcing a blade without the right adapter
- Skipping the tug test
- Replacing only one blade
- Throwing away the instructions before the job is done
What It Costs
A pair of blades usually costs between $20 and $60, based on type and brand. Many auto parts stores install them for free when you buy there. Dealers and repair shops often charge for parts and a small labor fee. Doing it yourself saves money and lets you pick the blade you want.
Dispose of Old Blades Properly
Most old blades go in household trash. Some auto parts stores accept them for recycling, since the frames contain metal. Ask when you buy your new set.
Why Good Wipers Matter
Clear vision is basic to safe driving. Rain, snow, road spray, and bugs can block your view in seconds. Worn blades also scratch glass if the metal frame touches it. Some states require working wipers to pass a vehicle inspection. For the price of a tank of gas or less, new blades are one of the cheapest safety upgrades you can make.
Frequently Asked Questions
How often should I replace my wipers? Every 6 to 12 months, or as soon as they streak, skip, or squeak.
How long does it take? About 5 to 10 minutes for both blades.
Do I need tools? Usually not. A small screwdriver can help with a stiff clip.
Are the driver and passenger blades the same size? Often they are not. Check both sizes.
What is the easiest way to learn how to replace windshield wipers on my exact car? Read the instructions in the blade package and the wiper section of your owner’s manual. The steps here cover the common types.
Can I replace just the rubber? On some blades, yes. Refills cost less but take more effort.
Are expensive blades worth it? Beam and silicone blades tend to last longer and work better in bad weather. Standard blades are fine in mild climates.
Why do my new wipers streak? The glass may be dirty, the protective strip may still be on, or the blade may not be seated.
Can I use a different blade type than the original? Often, yes, but match the length and connector. Stay with beam blades if the car came with them.
Will auto parts stores install wipers? Many do so for free with a purchase.
Final Thoughts
Knowing how to replace windshield wipers is one of the simplest car care skills. Find the correct sizes, check the connector, protect the glass, release the old blade, and click the new one in place. The whole job takes about 10 minutes.
Check your blades every few months and replace them at the first sign of streaks or noise. Keep the glass clean, top up the washer fluid, and treat the blades gently in winter. With that routine, you will always have a clear view, and how to replace windshield wipers will be a task you can handle in any parking lot.
Key Takeaways
- Replace wiper blades every 6 to 12 months or when they streak, skip, or squeak.
- The first step in how to replace windshield wipers is to find the correct size for each side, which often differs.
- Identify the connector: hook, side pin, bayonet, pinch tab, or push button.
- Lay a towel on the glass so a bare wiper arm cannot crack the windshield.
- Press the release tab, slide the old blade off, and click the new one into place.
- Remove the protective strip, lower the arm gently, and test with washer fluid.
- Clean blades and glass regularly, and never use wipers to scrape ice.