

Imagine having the perfect image, but a cluttered background distracts from your subject. This is where a clipping path in Photoshop becomes a game-changer.
A clipping path allows you to isolate an object from its background. It provides clean, precise edges, giving your image a professional, polished look.
In this guide, we’ll walk you through creating a clipping path in Photoshop—step by step. You’ll learn how to do it and understand why it’s an essential skill for anyone working with images.
Let’s dive in!
What is a Clipping Path?
A clipping path is a closed, vector-based path you draw around an object in an image. Once created, this path allows you to isolate the object, separating it from the background. It’s like cutting out a shape precisely without losing any details.
Clipping paths are mostly used in graphic design, photography, and e-commerce. They’re great for removing backgrounds, creating product images, or isolating subjects for further editing. In short, they give you total control over what stays and what goes.
Another significant advantage is the non-destructive editing. When you use a clipping path, you can easily change the background or manipulate the image without affecting the original. This means you can experiment freely and always have the option to go back.
Preparing Your Image for Clipping Path
Before creating a clipping path, preparing your image correctly is essential. Start by making sure your image is high-resolution. The clearer and sharper the image, the easier it is to create precise paths.
Next, set up your Photoshop workspace. Ensure you have the right tools visible, especially the Pen Tool, which you’ll use to create the clipping path. You can also open the Paths Panel (Window > Paths) to keep track of your progress.
Zooming in on the image is a good idea for better accuracy. The more detail you can see, the better your clipping path will be. Finally, check the background—if it’s too complex, it might complicate things, so try to work with images with clear subject boundaries.
Step-by-Step Guide to Create a Clipping Path in Photoshop
Now, let’s dive into creating a clipping path using Photoshop.
Don’t worry; we’ll break it down into simple steps.
a. Using the Pen Tool
- Select the Pen Tool (Shortcut: P) from the toolbar.
- Start by clicking on the edge of the object you want to isolate. This creates your first anchor point.
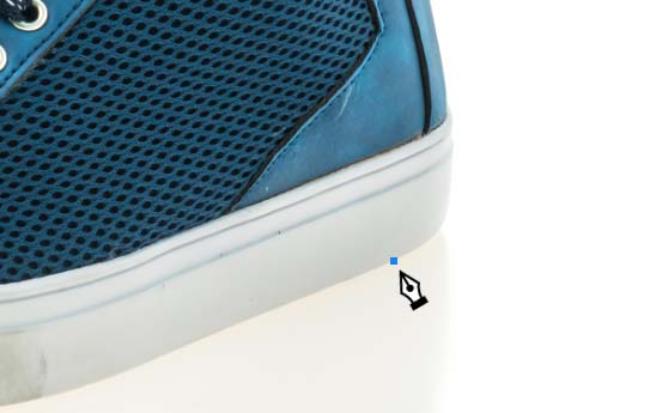
- Move along the edge, clicking to create straight lines. If you need curves, click and drag to create direction handles.
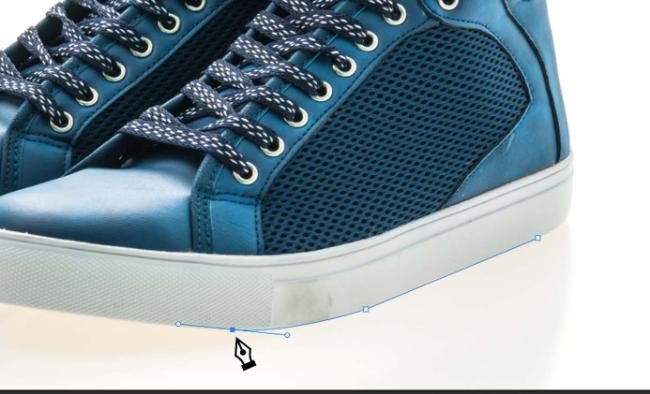
- Keep adding anchor points around the object, following its contours.
- Once you reach the starting point, click on it again to close the path.
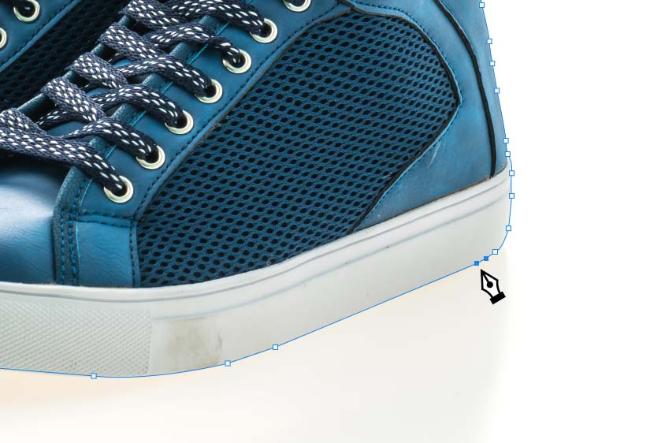
b. Refining the Path
- If any part of the path doesn’t look right, use the Direct Selection Tool (Shortcut: A) to adjust the anchor points or curves.
- Click on an anchor point to move it or adjust the direction handles for smoother curves.
- If you need to change a straight line into a curve, use the Convert Point Tool (found in the Pen Tool options) to drag the anchor points into a curve.
c. Making the Clipping Path Selection
- Once your path is complete, right-click on the path and choose Make selection. This will turn the path into a selection.
- In the options, set the Feather Radius to 0 (unless you want a soft edge).
- Hit OK, and now you have a clean selection based on your clipping path!
This is the basic process of creating a clipping path in Photoshop. With practice, you’ll get quicker and more accurate at it.
Saving the Clipping Path
Once you’ve created your clipping path, it’s essential to save it so you can use it later. Here’s how you can do that:
- Go to the Paths Panel (Window > Paths).
- In the panel, you’ll see the path you just created listed. Right-click on the path and choose Save Path.
- Give your path a name, then click OK. Now, your path is saved in the document.
If you plan to use the clipping path for future edits or to remove the background, you’ll want to save your file in a format that preserves the path. PSD or TIFF files are your best options for this. They keep all your layers and paths intact.
Now, whenever you need to access that path again, go back to the Paths Panel, and you’ll find it ready for use!
Using the Clipping Path for Cutting Out an Image
Now that you’ve created and saved your clipping path, it’s time to use it to cut out your image. Here’s how you can do that:
- Create a New Layer
First, make sure you’re working on the right layer. You can duplicate your image layer to keep the original intact. To duplicate, right-click on the layer in the Layers Panel and choose Duplicate Layer.
- Turn the Path into a Selection
Go to the Paths Panel, right-click on your saved path, and select Make selection. This will turn your clipping path into a selection.
- Remove the Background
With the active selection, you can delete the background or create a mask. If you want to delete it, just hit the Delete key, and the background will vanish, leaving the isolated object. If you prefer using a mask, click the Add Layer Mask button at the bottom of the Layers Panel. This will hide the background non-destructively.
- Refine Edges
If needed, you can refine the edges by selecting the Layer Mask and using the Brush Tool to clean up any rough areas. You can also use the Select and Mask workspace to fine-tune the edges.
And there you have it!
Your subject is now perfectly isolated, and you can place it onto a new background or edit it further.
Tips and Tricks for a Perfect Clipping Path
Creating a perfect clipping path takes practice, but here are a few tips to make the process easier and more accurate:
- Zoom In for Detail
The more you zoom in, the more precise your clipping path will be. It’s beneficial for tricky areas with more complex edges.
- Use the Convert Point Tool
When working with curves, the Convert Point Tool is your best friend. It helps you adjust curves smoothly so you don’t end up with sharp, jagged lines where there should be a curve.
- Be Patient with Complex Edges
Clipping paths can be more challenging for objects with soft edges, like hair or fur. Take your time and work slowly, adjusting the path as you go. You may need to create multiple paths to get the best result.
- Use the Pen Tool on Large, Simple Objects First
If you’re new to clipping paths, practice on simple objects (like geometric shapes or flat objects). This will help you get comfortable with the Pen Tool before you tackle more complex subjects.
- Refine Your Path with the Direct Selection Tool
After creating your path, use the Direct Selection Tool (shortcut: A) to adjust individual anchor points. You can move them around to perfect your shape and get smoother lines.
- Use Layer Masks for Flexibility
If you’re unsure about deleting the background, use a Layer Mask instead. It’s non-destructive, so you can always adjust or remove it later without losing your original image.
With these tips, you can create even cleaner, more professional clipping paths in Photoshop! Keep practicing, and you’ll soon get the hang of it.
Common Mistakes to Avoid
When creating clipping paths, there are a few common mistakes you’ll want to watch out for. Here’s what to avoid:
- Overlapping Paths
If your paths overlap or cross each other, it can cause issues when making selections. Make sure each path is clean and separate. Take your time to ensure each section is fully defined.
- Jagged Edges
Jagged edges happen when the anchor points aren’t placed correctly or the curves aren’t smooth. To avoid this, zoom in and refine your path, adjusting the anchor points and direction handles.
- Ignoring the Feather Radius
If you forget to set the Feather Radius to 0 when turning your path into a selection, your edges will be soft and blurry. This isn’t ideal for a clean cut-out. Always set it to 0 unless you specifically want soft edges.
- Not Saving Your Path
Don’t forget to save your path after creating it! If you close your file without saving the path, you’ll lose it. Always save it in the Paths Panel before closing the document.
By avoiding these mistakes, your clipping paths will be much cleaner and easier to work with. You’ll get the hang of it and produce professional-quality results with some practice.
Conclusion
Creating a clipping path in Photoshop is a powerful skill that can make a huge difference in your editing work. It allows you to isolate subjects, remove backgrounds, and create clean, professional-looking images. While it may take a bit of practice, the process becomes much easier once you get the hang of it.
Remember, using the Pen Tool and refining your path is key to achieving precise, sharp edges. Don’t forget to save your paths, and take your time with complex images, especially when dealing with hair or detailed edges.
Happy editing!


")
")