

If you want to save videos, gameplay, or other screen activities on your Mac, you can simply apply a screen recording app. So, in this article, we will offer you the best screen recorder. And you will learn how to capture what happens on your display step by step.
Make Your Screen Recording Much Easier
When it comes to screen recording, the first recorder that comes to your mind may be the built-in recording tool provided by Apple, QuickTime Player. It is a free program pre-installed on almost every Mac. However, QuickTime still has some limitations despite its convenience. For example, this app doesn’t support internal audio recording while capturing the action on the screen, which means you cannot get the system sound. And even if you enable the external mic recording and turn up the volume, that still cannot give you the best sound quality.
In that case, to record the screen on your Mac with the best quality, what you need is a much more professional screen recorder. Therefore, you shouldn’t miss Vidmore Screen Recorder for Mac. It is the best screen recording software for any occasion. No matter you want to record exciting gameplay, capture webcam videos, save online lectures, download favorite music, or just save a screenshot, this recorder can make your screen recording much easier.
Key Features of Vidmore Screen Recorder for Mac
– Vidmore Screen Recorder for Mac can capture any screen activities on Mac smoothly and save the recorded videos in various file formats, such as MP4, MOV, MKV, WMV, and GIF.
– It enables you to select the recording area according to your need. You can record the entire screen or a fixed screen like 1920*1080, 1280*720, 854*480, 1024*768, and 640*480. You can also drag and select a custom recording area with your cursor.
– This recorder can also be considered as a webcam recorder, with which you can easily make a reaction video or a picture-in-picture video.
– You are able to grasp any audio from microphone, system sound or both. It allows you to record online audio from streaming sites like YouTube.
– While recording, you can add real-time drawing tools, including text, lines, shapes, arrows, and specific labels.
– Vidmore offers great editing features to help you cut off unwanted parts from the captured video when you preview the recorded video before saving it on your computer.
– This software makes it possible for you to take screenshots of the whole screen or certain window without any hassle.
– It is easy to use thanks to the intuitive interface. Besides, it supports hotkeys that can control the process when you record the screen on Mac.
How to Record the Screen on Mac with Vidmore Screen Recorder for Mac
– Step 1. Download & Install the Software
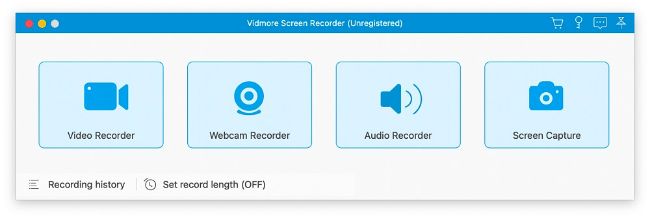
Go to the official website of Vidmore Screen Recorder for Mac to download and install the program on your Mac. Launch the program, and you will see 4 recording options in the home interface. If you want to record the screen on your Mac, you need to select Video Recorder on the left side. But if you only want to record webcam, capture audio, or take screenshots, just pick the click on the corresponding button.
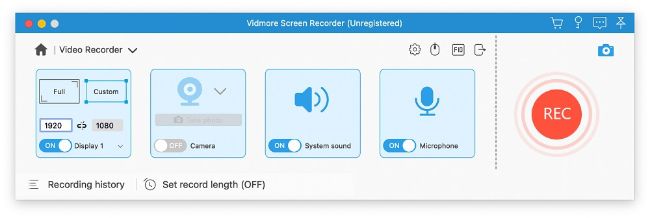
– Step 2. Adjust Recording Settings
You can select the recording region according to your need. Choosing Full means that you want to capture the entire screen. You can also customize the screen size as you wish. After that, please turn on System Sound, Microphone or both. If you need to add the camera screen, then enable the Camera option. Click REC to start your recording.
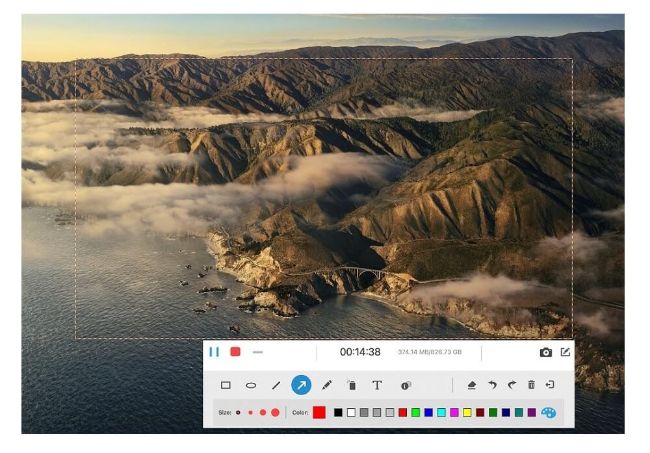
– Step 3. Record Screen on Mac
There will be a control bar around the recording area. While recording, you can add text, line, arrow, and other marks to the video in real-time. You can pause/stop the recording and take snapshots at any time as you like. When you finish, just click the Stop icon to end the recording.
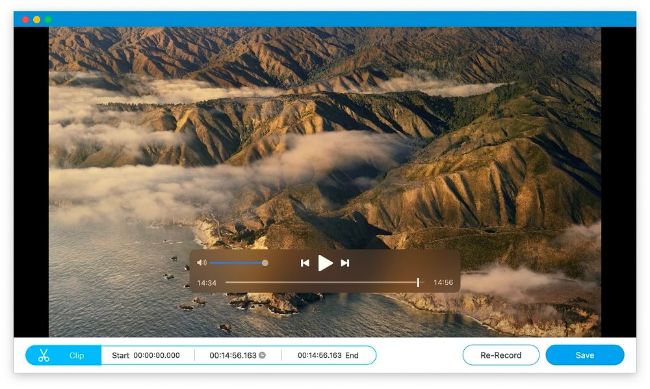
– Step 4. Save the Recording
Vidmore Screen Recorder for Mac even allows you to preview and trim the captured video before saving it on your Mac. You can easily adjust the start/end time and duration. Once you complete, you can export the recording to your computer by clicking Save. If you are not satisfied with the video, you can also choose to record the screen again.
Conclusion
Now you can record everything on your Mac screen effortlessly. And unlike QuickTime Player, Vidmore Screen Recorder for Mac has no audio restriction during the recording process. It should be your best choice to create your own video or audio masterpieces. Hope that you can enjoy the best recording experience on your Mac.


